How To Make Dunkin Cold Brew At Home
If you are tired of spending money on daily coffee runs, learning how to make Dunkin cold brew at home is a total game changer. This guide provides the exact ratios and techniques you need to achieve professional results overnight. We will show you how to master the process quickly so you can enjoy your favorite refreshing caffeine fix anytime.
What makes Dunkin’ cold brew different?
The specific coffee bean blend used
To replicate the Dunkin’ experience at home, you must start with their signature 100% Arabica bean blend. Unlike their standard ground coffee, the cold brew variant utilizes a darker roast profile specifically sourced from Central and South America.
When making this at home, the secret lies in the coarse grind size, which should resemble sea salt to prevent over-extraction and bitterness. Using a high-quality burr grinder ensures that the oils and flavors are released slowly during the long immersion process.
Dunkin’ prides itself on a consistent, smooth base that lacks the burnt notes often found in lower-quality beans. By purchasing the official Dunkin’ Cold Brew packs or grinding their whole beans coarsely, you ensure the foundational flavor matches the cafe version perfectly.
This specific selection of beans is designed to withstand a long soak without becoming astringent, providing that reliable, bold foundation that fans of the brand expect from every single handcrafted pitcher.
Steeping time vs. traditional iced coffee
The fundamental difference between Dunkin’ cold brew and their standard iced coffee is the 12-to-15-hour cold extraction process. While traditional iced coffee is brewed hot and quickly chilled, which can lead to a watery consistency, authentic cold brew is made by steeping grounds in cold water for an extended period.
To do this at home, place your coffee filter packs or loose grounds in a pitcher and let them sit at room temperature or in the fridge. This slow infusion method gently draws out the caffeine and flavor without the harshness caused by boiling water.
Dunkin’ specifically crafts their concentrate to be robust, so they recommend a long soak to achieve that velvety mouthfeel. If you rush the process, you will miss out on the deep, complex notes that define the beverage.
Patience is the most critical ingredient here; allowing the coffee to rest for at least twelve hours ensures a syrupy, rich concentrate that maintains its integrity even after you add plenty of ice.
The flavor profile and acidity levels
One of the primary reasons people choose Dunkin’ cold brew is its ultra-smooth, low-acid profile. Because the coffee grounds never encounter hot water, the chemical compounds that create bitterness and acidity are never released.
This results in a drink that is naturally sweeter and chocolatey, making it much easier on the stomach than traditional drip coffee. When brewing at home, you will notice a distinct mellow finish and rounded body that requires less sugar or cream to be palatable.
The cold extraction highlights the nuanced notes of cocoa and toasted nuts that are often masked by the high-heat brewing process. To maintain this profile, ensure you use filtered water, as mineral content can alter the delicate pH balance of the final brew.
The result is a highly concentrated liquid that serves as a versatile base for milk, foam, or flavored syrups. This low-acidity characteristic is what gives the drink its signature ‘clean’ taste, allowing the natural sweetness of the Arabica beans to shine through brilliantly.
Essential ingredients and equipment you need

Choosing the right Dunkin’ coffee grounds
To replicate the signature taste of a Dunkin’ cold brew, you must start with the correct coffee beans. Look for the Dunkin’ Cold Brew Coffee Packs or the Original Blend ground coffee.
If you are grinding your own beans at home, aim for a coarse grind consistency similar to sea salt. A coarse grind is essential because it allows for a slow extraction process over twelve to twenty-four hours without making the final beverage taste bitter or overly acidic.
Using a fine grind will result in a cloudy, over-extracted mess that clogs your filters. For the most authentic experience, ensure your coffee is freshly opened to preserve those familiar nutty and chocolatey notes.
Many enthusiasts prefer the pre-measured pouches specifically designed for cold brewing because they take the guesswork out of ratios, ensuring you get that smooth, robust flavor every single time you prepare a batch in your kitchen.
Filtered water vs. tap water
The quality of your water is just as important as the coffee beans themselves since a cold brew concentrate is roughly ninety-eight percent water. You should always prioritize filtered water over standard tap water to avoid any metallic or chlorine aftertastes that can ruin the delicate profile of the brew.
Tap water often contains minerals and chemicals that interfere with the extraction process, leading to a dull or inconsistent flavor. By using a Brita filter or bottled spring water, you provide a clean canvas that allows the natural sweetness of the Dunkin’ roast to shine through.
Keep your water at room temperature or cool during the initial mixing phase; never use hot water, as the cold brew method relies entirely on time rather than heat to extract flavor.
This cold steeping technique results in a lower acidity level, making it much easier on the stomach while highlighting the rich, velvety texture that fans of the franchise expect.
Best containers for home brewing
Selecting the proper vessel for steeping and storage will significantly impact the longevity and taste of your homemade coffee. A large glass Mason jar or a dedicated cold brew pitcher with a built-in mesh filter are the top choices for home baristas.
Glass is highly recommended because it is non-porous and will not absorb old coffee oils or impart plastic flavors into your drink. Ensure your container has an airtight seal to prevent the coffee from absorbing odors from other foods in your refrigerator during the long steeping process.
If you do not have a specialized cold brew maker, you can simply use a large pitcher and strain the mixture through a fine-mesh sieve lined with a paper coffee filter or a cheesecloth. This dual-filtration step is vital for achieving a sediment-free, crystal-clear concentrate.
Once the brewing is complete, store your concentrate in the fridge, where it will remain fresh and delicious for up to two weeks.
Step-by-step guide to making Dunkin’ cold brew

Measuring the perfect coffee-to-water ratio
To replicate the signature smooth taste of Dunkin’ cold brew at home, you must start with the correct measurements to ensure a bold concentrate.
The ideal starting point is a 1:4 ratio of coffee to water, which translates to using approximately one cup of coarsely ground coffee for every four cups of cold, filtered water.
Using a coarse grind size is essential; if the beans are ground too finely, the resulting brew will be unpleasantly bitter and difficult to filter.
For the most authentic flavor, choose Dunkin’ Original Blend beans or their specific cold brew packs, which are formulated to maintain sweetness during the long extraction process. Always use filtered water rather than tap water to prevent chlorine or minerals from masking the subtle cocoa notes of the beans.
Carefully combine your ingredients in a large glass jar or a dedicated cold brew maker, ensuring all grounds are fully saturated without over-stirring, which can introduce unwanted acidity into your final batch.
The steeping process and timing
Once your coffee and water are combined, the transformation happens through time rather than heat. Place your container in the refrigerator or on a cool countertop for a period of 12 to 15 hours.
While some recipes suggest longer, Dunkin’ style coffee thrives on a slightly shorter steep time to maintain its famous mellow profile and avoid the harsh, woody flavors that occur after 24 hours. If you prefer a more intense kick, aim for the 15-hour mark, but never exceed 18 hours.
During this phase, the cold water slowly extracts the caffeine and oils from the grounds, resulting in a low-acidity beverage that is naturally sweeter than traditional iced coffee.
It is vital to keep the container tightly sealed during this process to prevent the coffee from absorbing any stray odors from your fridge.
Consistency is key here; set a timer so you do not forget to move to the filtration stage, as over-steeping is the most common mistake made by home baristas.
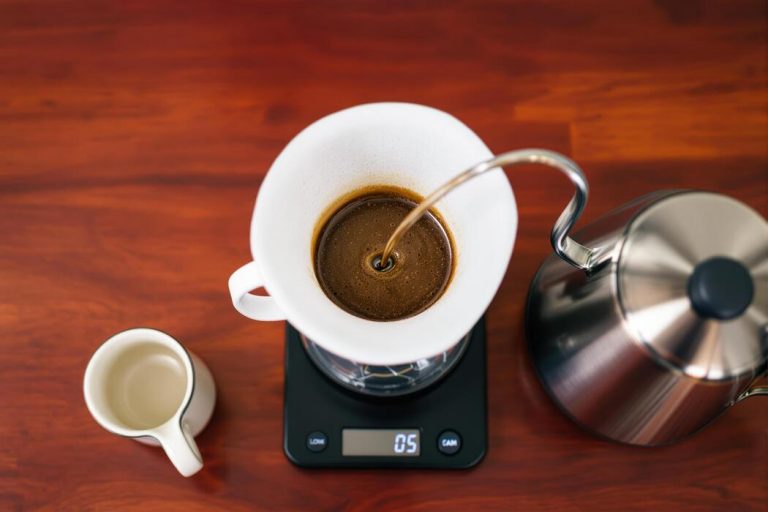
How to strain and filter your concentrate
After the steeping time is complete, you must carefully separate the liquid from the grounds to achieve a crisp, sediment-free finish. Begin by pouring the mixture through a fine-mesh sieve to catch the largest grounds, then perform a second pass using a paper coffee filter or a nut milk bag.
This double-filtration method is the secret to getting that professional, translucent look seen in Dunkin’ cafes. Do not squeeze the filter or press down on the grounds, as this forces fine silt and bitter tannins into your drink, ruining the smooth mouthfeel.
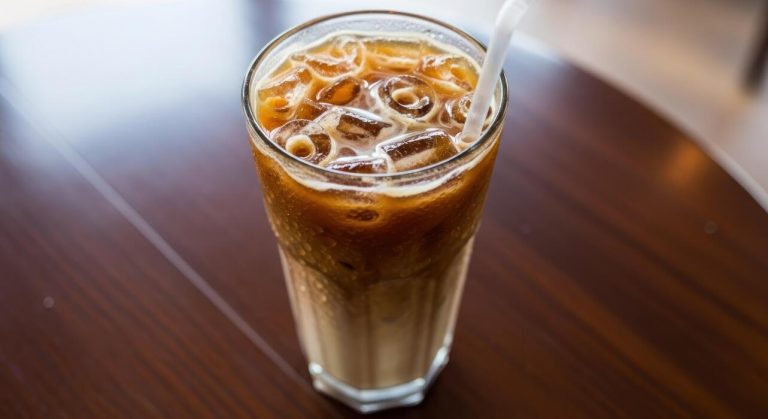
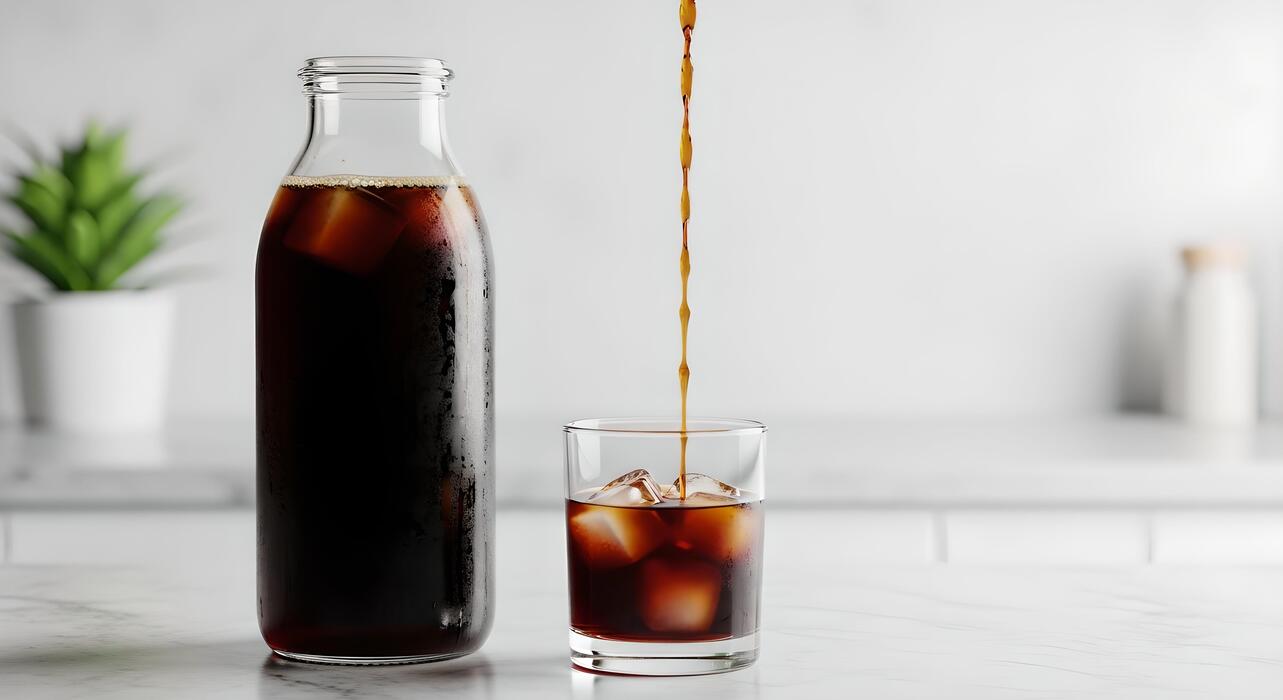
What remains is a potent coffee concentrate that should be stored in a glass carafe. Because this is a concentrate, you should dilute it with equal parts water or milk before serving over fresh ice. For a true Dunkin’ experience, add a splash of cream and your favorite flavored swirl.
Your homemade concentrate will stay fresh and delicious in the refrigerator for up to one week if kept in an airtight container.
How to dilute and serve your cold brew
Finding your preferred strength
To replicate that signature Dunkin’ flavor profile, you must first master the ratio of concentrate to water. Because cold brew is a concentrated extraction, drinking it straight can be overwhelming and overly caffeinated.
For a standard result, start with a 1:1 dilution ratio, mixing equal parts coffee concentrate and filtered water. If you prefer a bolder, more robust kick similar to a black cold brew from the drive-thru, try a 2:1 ratio of coffee to water.
Conversely, if you enjoy a smoother, lighter beverage, add more water until you reach your desired clarity. Always use filtered water for dilution to ensure no mineral aftertaste interferes with the chocolatey notes of the beans. Experimenting in small increments allows you to find your perfect balance.
Remember that the strength will also be affected by any liquid sweeteners or creamers you add later, so taste your base mixture first to ensure it provides a strong enough foundation for your customized drink.
The best ice cubes to prevent watering down
One common mistake when serving homemade cold brew is using standard ice cubes that melt quickly and dilute the intense flavor. To maintain that consistent Dunkin’ quality from the first sip to the last, the best solution is to create coffee ice cubes.
Simply pour a portion of your prepared cold brew into an ice tray and freeze them overnight. As these cubes melt, they release more coffee into your glass rather than plain water, keeping your drink bold and flavorful.
If you prefer traditional ice, opt for large silicone molds to create oversized spheres or squares; these have less surface area than small cubes and melt significantly slower. Using high-quality ice is essential because cold brew is served chilled and often consumed over a longer period.
By controlling the melting rate, you ensure the integrity of the brew remains intact, preventing that disappointing watery finish that often plagues homemade iced coffee drinks during the warmer summer months.
Adding milk, cream, or dairy-free alternatives
To achieve the creamy texture of a Dunkin’ specialty cold brew, the final step involves choosing the right lightener. Traditionalists often reach for half-and-half or heavy cream, which provides that iconic velvety mouthfeel and cuts through the natural acidity of the beans.
If you are looking for a dairy-free alternative, oat milk is the superior choice for cold brew because of its natural sweetness and thick consistency that mimics dairy perfectly.
When adding your chosen milk, pour it slowly over the top of the ice to create a beautiful marbling effect before stirring.
For those who enjoy the ‘Sweet Cold Foam’ style, you can froth a small amount of milk with a dash of vanilla syrup until it reaches a thick, pillowy consistency and layer it on top.
Regardless of your preference, always add your sweeteners or syrups to the coffee before the milk to ensure they dissolve completely. This creates a cohesive, professional-grade beverage that rivals any cafe experience from your own kitchen.
Tips for getting the signature Dunkin’ flavor
Using Dunkin’ branded syrups and swirls
To replicate the exact taste profile of a professional Dunkin’ cold brew, you must pay close attention to their signature flavor additives. Unlike standard coffee shops that primarily use thin syrups, Dunkin’ is famous for its thick, sweetened flavor swirls.
To get that authentic taste, look for Dunkin’ branded bottled swirls like Caramel or French Vanilla at grocery stores, or source a high-quality condensed milk-based syrup.
The key is to add the swirl to the bottom of your glass before pouring the cold brew, ensuring the flavors integrate seamlessly as you stir. If you prefer a less sweet option, use their sugar-free flavor shots which provide a concentrated aroma without the syrupy texture.
Remember that Dunkin’ typically uses two to four pumps depending on the size, so adjust your ratios carefully to match their standard medium serving.
Balancing the bold, chocolatey notes of the cold brew concentrate with these specific dairy-based swirls is the most effective way to achieve that nostalgic, drive-thru flavor profile in your own kitchen.
How to make sweet cold foam at home
The velvety layer of sweet cold foam is a modern staple of the Dunkin’ experience, and achieving that stable, cloud-like consistency requires specific ingredients.
Start by mixing heavy cream, 2% milk, and vanilla syrup in a small pitcher; the combination of different fat contents is essential for a structure that won’t immediately dissolve into the coffee.
Use a handheld milk frother for approximately thirty seconds until the mixture doubles in volume and reaches a soft-peak stage. For the most authentic result, ensure your dairy is ice-cold directly from the refrigerator, as warmer liquids will not hold the necessary air bubbles.
Once your cold brew is poured over ice, gently spoon the foam over the top rather than pouring it quickly, allowing it to sit as a distinct layer. This technique mimics the ‘Cold Foam’ lids used in-store, providing a creamy texture with every sip.
You can even sprinkle a bit of cinnamon or cocoa powder on top to enhance the visual appeal and add a final touch of professional sweetness to your homemade beverage.
The secret to that smooth finish
A signature characteristic of Dunkin’ cold brew is its remarkably low acidity and incredibly smooth finish, which is achieved through a meticulous steeping process.
To replicate this at home, you must use a coarse grind size similar to sea salt; using fine grounds will result in a bitter, over-extracted mess that lacks clarity.
Steep your coffee grounds in filtered water for exactly twelve to fifteen hours at room temperature or up to twenty-four hours in the fridge to pull out the natural sweetness without the harsh tannins.
Another professional secret is the filtration method; once steeping is complete, double-filter your concentrate using a fine mesh sieve followed by a paper coffee filter to remove all sediment. This ensures a clean mouthfeel that allows the subtle cocoa undertones to shine through.
Finally, always dilute your concentrate with fresh water or milk at a one-to-one ratio before serving. This prevents the brew from being overpowering and helps maintain that signature drinkability that makes Dunkin’ fans return daily. Proper dilution and careful filtration are the ultimate keys to a polished, café-quality result.
How to store your homemade cold brew
Shelf life in the refrigerator
To replicate that signature Dunkin’ experience, timing is everything when managing your homemade batch. Once you have filtered your grounds, your cold brew concentrate will stay at peak quality for up to two weeks in the refrigerator.
However, if you have already diluted the concentrate with water or milk, that window shrinks significantly to about two to three days before the profile begins to shift. It is essential to keep the liquid chilled at a consistent temperature below 40 degrees Fahrenheit to prevent bacterial growth.
Many home baristas find that the flavor is most vibrant during the first five to seven days of storage. To ensure you are drinking the freshest brew possible, always use a permanent marker or masking tape to label your container with the date it was brewed.
This simple habit prevents guesswork and ensures your morning caffeine kick remains as crisp and refreshing as a fresh pour from the drive-thru window every single time.
Keeping the flavor fresh for days
Oxygen is the primary enemy of flavor preservation, so choosing the right storage vessel is the most critical step for success. You should store your cold brew in an airtight glass container, such as a Mason jar or a dedicated glass carafe with a silicone seal.
Glass is superior to plastic because it is non-porous and odorless, meaning it won’t leach chemical tastes or absorb old coffee smells over time.
To further minimize oxidation, try to use a container that matches the volume of your coffee; minimizing the headspace or air gap at the top of the jar helps maintain those delicate chocolatey notes characteristic of the Dunkin’ style.
Additionally, keep your coffee away from pungent foods like onions or garlic in the fridge, as coffee can act as a deodorizer and absorb surrounding scents. For the best results, keep the lid tightly fastened at all times and only open it when you are ready to pour a glass.
Signs your cold brew has gone bad
Even with perfect storage conditions, homemade cold brew will eventually lose its luster and require disposal. The first indicator of spoilage is a noticeable loss of aroma; if that rich, roasted scent has been replaced by a flat or dusty smell, the oils have likely oxidized.
Next, perform a visual check for any cloudiness or sediment that wasn’t there initially, or in extreme cases, small white spots which indicate mold growth. When it comes to taste, look out for an overwhelming acidity or sourness that mimics the taste of vinegar.
A fresh batch should be smooth and mellow, so any harsh, metallic, or fermented notes are a clear sign that the batch is past its prime. If the liquid feels unusually thick or slimy in texture, discard it immediately.
Trust your senses—if the brew lacks that clean finish you expect from a professional-grade cold brew, it is time to wash your carafe and start a fresh brewing cycle for the week ahead.
Common mistakes to avoid when brewing
Why you should never use fine grinds
One of the most frequent errors when attempting to recreate the signature Dunkin taste is using a fine or medium grind setting. Fine particles are designed for rapid extraction, which is ideal for espresso but disastrous for the slow immersion process of cold brewing.
When you use fine grinds, the water extracts solubles too quickly, leading to a muddy texture and a harsh, astringent flavor profile that masks the smooth chocolate notes of the bean.
To achieve that professional result, you must switch to a coarse, sea salt consistency to ensure water flows through the grounds evenly. This larger surface area allows for a gentle extraction over many hours, preventing the silt from passing through your filter and into your final carafe.
By maintaining a consistent coarse grind size, you guarantee a clean, sediment-free cup that mirrors the clarity and body of the authentic restaurant version. Always prioritize a high-quality burr grinder to avoid the uneven dust produced by blade grinders.
Avoiding the bitter taste of over-steeping
Patience is a virtue in cold brewing, but leaving your coffee to steep for too long is a guaranteed way to ruin the batch.
While it might be tempting to let the pitcher sit for 24 hours or more to get a ‘stronger’ concentrate, this actually pulls out heavy tannins and woody flavors that create a sharp bitterness.
For the perfect DIY Dunkin experience, you should aim for a strict window of 12 to 15 hours at room temperature or up to 20 hours if steeping in the refrigerator.
Beyond this timeframe, the chemical balance shifts, and the sweetness of the Arabica beans is replaced by an unpleasant acidity. To avoid this mistake, set a digital timer the moment you submerge the grounds so you remember to strain the liquid exactly when it reaches its peak flavor profile.
If you find the brew is too strong after the recommended time, it is better to dilute the finished concentrate with water or milk rather than extending the steeping duration.
Temperature mistakes during the brew cycle
Temperature control is the silent factor that often separates a successful home brew from a failed experiment. Many beginners make the mistake of using hot or lukewarm water to jumpstart the process, but this mimics a standard iced coffee rather than a true cold brew.
Starting with heat triggers a different chemical reaction that releases oils and acids you want to avoid. Instead, you should always use filtered, room temperature or cold water from the very beginning to ensure a mellow, low-acid finish.
Additionally, fluctuations in the environment can affect the extraction rate; if your kitchen gets particularly hot during the day, it is safer to move your brewing vessel into the refrigerator to maintain a stable, cool environment.
While the fridge method takes slightly longer, it protects the delicate flavor compounds from oxidizing too quickly. Using purified water also prevents mineral buildup from interfering with the natural sweetness of the coffee, ensuring that your homemade version tastes as fresh and crisp as the store-bought alternative.
Frequently Asked Questions
What coffee beans are best for making Dunkin’ style cold brew at home?
To replicate the signature taste, use Dunkin’ Original Blend medium roast beans or their specific ‘Cold Brew’ packs. Ensure you use a coarse grind setting to prevent the coffee from becoming bitter or cloudy during the long steeping process.
What is the ideal coffee-to-water ratio for Dunkin’ cold brew?
A standard ratio is 1 cup of coarsely ground coffee to 4 cups of cold, filtered water. This creates a concentrate that you can later dilute with water or milk according to your strength preference.
How long should I steep the coffee to match the Dunkin’ flavor?
You should steep the grounds in cold water for 12 to 15 hours at room temperature, or up to 24 hours in the refrigerator. Steeping longer than 24 hours can lead to over-extraction and a harsh, woody taste.
Do I need special equipment to make cold brew at home?
No special equipment is required; you can simply use a large glass jar and a fine-mesh strainer or cheesecloth. However, using a French press or a dedicated cold brew maker can make the filtration process much cleaner and easier.
How should I serve my homemade Dunkin’ cold brew?
Fill a tall glass with ice and pour in your cold brew concentrate, diluting it with equal parts water or milk. To truly mimic the Dunkin’ experience, add your favorite flavored swirls or simple syrup and stir well.
How long does homemade cold brew stay fresh in the fridge?
Once filtered, your cold brew concentrate will stay fresh in a sealed container in the refrigerator for up to 7 to 10 days. For the best flavor, try to consume it within the first week.
Conclusion
Mastering the art of Dunkin cold brew at home is both simple and rewarding. By using the right coffee-to-water ratio and allowing ample steeping time, you can achieve that signature smooth, bold flavor without leaving your kitchen. Experimenting with different creamers and sweeteners allows you to customize every glass to your liking. Now that you have the tools and techniques, it is time to start brewing your own refreshing batches and enjoy significant savings.