How Make Homemade Iced Coffee
Making a refreshing glass of homemade iced coffee is easier than you think, and it tastes much better than the watered-down versions from the drive-thru. Whether you prefer a quick flash-chill method or a smooth overnight cold brew, you are in the right place. This guide will show you exactly how to make homemade iced coffee using simple ingredients you already have in your kitchen. Let’s dive into the best techniques to get your caffeine fix perfectly chilled today.
Best Coffee Beans for Iced Coffee
Dark Roast vs Medium Roast
When learning how to make homemade iced coffee, selecting the right roast level is your first critical decision for a balanced beverage. Dark roast beans are the traditional favorite for iced preparations because their bold, smoky, and chocolatey notes remain distinct even after being diluted by melting ice cubes.
These beans undergo a longer roasting process, resulting in lower acidity and a heavy body that stands up well to added milk or sweeteners.
On the other hand, medium roast beans offer a more nuanced profile, featuring a pleasant balance of acidity and sweetness that can be incredibly refreshing when served cold. If you prefer a crisp, clean finish without overwhelming bitterness, a medium roast provides a bright complexity that shines in flash-chilled methods.
Ultimately, the choice depends on whether you want a rich, syrupy texture or a lighter, more vibrant caffeine kick to fuel your afternoon. Experimenting with both roast levels will help you discover which intensity best complements your specific homemade brewing technique.
The Importance of Freshly Ground Beans
To achieve a professional-grade result at home, the timing of your grind is just as important as the quality of the bean itself. Freshly ground coffee beans contain volatile oils and aromatic compounds that begin to dissipate immediately after being crushed, leading to a stale taste if left sitting.
For the best homemade iced coffee, you should grind your beans immediately before brewing to ensure these flavors are trapped in your cup rather than lost to the air.
Furthermore, the size of the grind must match your brewing method; use a coarse grind for cold brew to prevent over-extraction and bitterness, or a medium-fine grind if you are brewing hot coffee directly over ice.
Investing in a quality burr grinder allows for the consistency needed to produce a smooth, sediment-free drink every time. By prioritizing freshness, you unlock the full potential of the bean’s natural sugars, creating a naturally delicious beverage that requires less sugar and artificial flavorings to enjoy thoroughly.
Best Flavor Profiles for Cold Drinks
Identifying specific flavor profiles can transform your DIY coffee experience from basic to gourmet. When shopping for beans, look for tasting notes that include chocolate, caramel, or roasted nuts, as these deep, earthy flavors are enhanced by cold temperatures and provide a comforting foundation.
If you enjoy a more modern, tea-like iced coffee, seek out beans with citrusy or floral undertones, which are often found in African varieties like those from Ethiopia or Kenya. These bright notes provide a refreshing acidity that is perfect for hot summer days.
Additionally, beans with a naturally sweet profile help balance the inherent bitterness of caffeine, making your homemade drink smoother on the palate. Avoid beans with overly fermented or very wine-y notes, as these can sometimes become unpleasantly sour when chilled.
By selecting beans with a profile that matches your taste preferences, you ensure that your homemade iced coffee is consistently satisfying, whether you drink it black or with a splash of cream and vanilla.
How to Make Easy Iced Coffee at Home

The Standard Drip Method
To craft a refreshing glass of iced coffee using your standard drip brewer, the most effective technique involves brewing a concentrated batch to prevent dilution.
Begin by doubling the amount of coffee grounds you typically use while keeping the water volume the same; this ensures the flavor remains robust even as the ice melts. Once the cycle finishes, let the carafe sit for a few minutes before transferring the liquid into a heat-safe pitcher.
For the best results, flash-chill the coffee by pouring it directly over a large shaker filled with ice or simply allowing it to reach room temperature before refrigerating. To serve, fill a tall glass with fresh ice cubes and pour your concentrated brew over the top.
You can then customize your drink with liquid sweeteners like simple syrup or agave, which dissolve much faster in cold liquids than granulated sugar. Adding a splash of half-and-half or oat milk creates a creamy texture that perfectly complements the bold, chilled caffeine kick.
Using a French Press for Iced Coffee
The French press is an exceptional tool for making iced coffee because it allows for full immersion, resulting in a rich and full-bodied profile that stands up well to ice.
To start, add coarse coffee grounds to the bottom of the press using a ratio of roughly one part coffee to eight parts water. Pour hot water over the grounds, stir gently to ensure even saturation, and let it steep for exactly four minutes.
After pressing the plunger down slowly, transfer the hot coffee into a separate container immediately to stop the extraction process.
To avoid a watery mess, consider making coffee ice cubes ahead of time by freezing leftover coffee in a tray; using these ensures your drink stays cold without losing its intensity. Once your brewed coffee has cooled significantly, pour it over your prepared ice.
The natural oils preserved by the metal filter provide a velvety mouthfeel that pairs beautifully with a hint of vanilla extract or a sprinkle of cinnamon for a gourmet touch.
How to Use a Keurig or Pod Machine
Using a Keurig or pod-based machine is arguably the fastest way to satisfy an iced coffee craving at home. The secret to success here is selecting the ‘Strong’ or ‘Iced’ setting if your specific model offers it, which optimizes the flow rate for a smaller, more potent extraction.
Before you start, fill a sturdy, heat-resistant tumbler entirely with ice cubes. Place the tumbler directly under the dispense head and insert your favorite dark roast pod.
By brewing directly over ice, the coffee chills instantly, locking in the aroma while the melting ice provides the necessary dilution for a balanced flavor. If your machine does not have a dedicated iced button, simply choose the smallest ounce setting (usually 6oz) to ensure the coffee isn’t too weak.
Once the cycle is complete, stir in your favorite flavorings such as caramel sauce or almond milk. This method is perfect for busy mornings when you need a quick, cold caffeine fix without the wait of traditional cooling methods or overnight steeping.
The Secret to Perfect Cold Brew Coffee
How to Mix the Coffee-to-Water Ratio
To master homemade iced coffee, you must first understand that cold brew is a concentrate, not a standard drip. The gold standard for a rich, bold base is a one-to-four ratio, meaning one cup of coarsely ground beans for every four cups of filtered water.
Using a coarse grind size is essential; if the grounds are too fine, the coffee will become over-extracted and bitter, making it difficult to filter later. Simply combine your coffee and room-temperature water in a large glass jar or pitcher, ensuring all grounds are fully saturated.
Do not stir too vigorously, as a gentle fold is enough to kickstart the process. This specific ratio ensures that once you add ice, milk, or extra water to your final cup, the flavor remains robust and balanced rather than watered down.
By focusing on this heavy concentration, you allow the natural sweetness and chocolatey notes of the beans to shine through without the acidity found in hot-brewed methods.
Steeping Times for Maximum Flavor
Patience is the most critical ingredient when learning how to make the perfect cold brew at home. Unlike traditional coffee that relies on heat, cold brew uses time to gently extract oils and caffeine. For the best results, let your mixture steep for 12 to 18 hours at room temperature.
Steeping for less than 12 hours often results in a weak, tea-like consistency that lacks depth. Conversely, letting it sit for more than 24 hours can lead to a harsh, woody aftertaste that ruins the smooth profile you are aiming for.
If you prefer to steep your coffee in the refrigerator, keep in mind that the cold temperature slows down extraction, so you should aim for the full 18 to 24-hour window.
Once the time is up, you will have a potent concentrate that serves as the perfect foundation for any iced drink. Consistency in timing is the secret to achieving that signature velvety mouthfeel and low-acid finish every single time you brew.
How to Properly Filter Your Concentrate
The final step to achieving a professional-grade iced coffee is a clean, sediment-free filtration process. After the steeping period is complete, you need to separate the liquid from the spent grounds without pressing or squeezing them. Start by pouring the mixture through a fine-mesh sieve to remove the largest particles.
For a truly crisp and polished finish, perform a second pass using a paper coffee filter or a clean flour sack towel. This extra step is vital because it removes the fine silty remains that can cause your iced coffee to taste muddy or dusty.
Avoid the temptation to squeeze the filter, as this forces bitter tannins into your drink. Once filtered, your concentrate can be stored in a sealed glass container in the fridge for up to two weeks.
When you are ready to serve, simply dilute your concentrate with equal parts water or milk over plenty of ice. This meticulous approach to filtering ensures a crystal-clear appearance and a clean, refreshing taste in every sip.
How to Make Japanese Style Flash-Brewed Coffee
Why Flash Brewing Preserves Aroma
Flash brewing is widely considered the superior method for homemade iced coffee because it captures the delicate aromatic compounds that cold brewing often misses. When you brew hot coffee directly onto ice, the immediate temperature drop locks in the volatile oils and bright acidity that define high-quality beans.
Unlike traditional methods that involve chilling room-temperature coffee in the fridge, which often results in a stale or oxidized flavor profile, the Japanese method ensures your drink remains vibrant and crisp.
By utilizing heat to extract the complex flavors first, you achieve a depth of taste that is both refreshing and sophisticated. This technique is particularly effective for light to medium roasts, where floral and fruity notes are prominent.
The instant cooling process prevents the bitter tannins from dominating the palate, resulting in a clean finish. Embracing this approach allows you to enjoy a cafe-quality beverage at home that balances the strength of a hot pour-over with the cooling sensation of a summer treat.
Calculating the Ice-to-Water Ratio
The secret to a perfect flash-brewed coffee lies in the precise balance between hot water and ice to avoid a watery result. To master this at home, you should generally aim for a ratio of 60% hot water to 40% ice by weight.
For example, if your standard recipe calls for 500 grams of water, you would brew with 300 grams of hot water and place 200 grams of ice directly into the carafe.
It is crucial to use a digital kitchen scale for accuracy, as volume measurements can be misleading due to the air gaps between ice cubes.
Because you are using less hot water to extract the coffee, you must grind your beans slightly finer than usual to ensure proper extraction during the shorter contact time. This adjustment compensates for the reduced brewing volume, ensuring your iced coffee remains bold and flavorful even as the ice melts.
Following these specific proportions ensures that the final beverage is perfectly diluted and chilled the moment the brewing process is complete.
Step-by-Step Pour Over Instructions
To begin the process, place your dripper over a carafe pre-loaded with the calculated amount of fresh ice. Start by saturating your paper filter with hot water to remove any papery taste, then discard that rinse water before adding your medium-fine coffee grounds.
Begin the brew with a thirty-second bloom, pouring just enough hot water to dampen the grounds and release trapped gases. Proceed to pour the remaining hot water in slow, circular motions, ensuring you finish the pour within two to three minutes.
As the hot concentrate hits the ice, it will flash-chill, creating a beautiful layered effect before fully melting the cubes into a balanced brew. Once the dripping stops, give the carafe a gentle swirl to homogenize the temperature and flavor.
Pour the finished coffee into a glass filled with fresh ice to keep it cold without further dilution. This method provides a clean, sediment-free cup that highlights the nuances of your beans.
By following these steps, you can enjoy a professional-grade iced coffee that is ready to drink immediately without any waiting time.
Ways to Prevent Watered-Down Iced Coffee
How to Make Coffee Ice Cubes
One of the most effective strategies to maintain the integrity of your homemade beverage is to stop using standard frozen water. Instead, you should learn how to make coffee ice cubes by freezing leftover brewed coffee in standard silicone molds.
This simple hack ensures that as the cubes melt, they release additional caffeine and flavor rather than diluting your drink into a watery mess. To achieve the best results, allow your freshly brewed coffee to reach room temperature before pouring it into the trays to avoid cracks or freezer burn.
You can even customize these cubes by adding a splash of milk or vanilla syrup directly into the mold before freezing, creating a built-in creamer effect. Once frozen solid, store them in an airtight container to prevent them from absorbing unwanted odors from other frozen foods.
This method guarantees a consistently bold profile from the very first sip to the final drop, making your morning ritual much more satisfying.
The Benefits of Chilling Your Glassware
Temperature management is critical when learning how to make homemade iced coffee that tastes professional. Many enthusiasts overlook the importance of chilling your glassware before assembly, which significantly slows down the melting process of your ice.
By placing your glass or tumbler in the freezer for at least fifteen minutes prior to brewing, you create a thermal barrier that protects the ice from immediate heat transfer.
A cold vessel ensures that the liquid remains at an optimal temperature, allowing you to savor the nuanced flavor notes without the urgency of drinking it quickly before it becomes lukewarm.
If you are in a rush, rinsing your glass with cold water or filling it with a quick ice-and-water slurry can provide a similar, albeit less intense, cooling effect. Utilizing insulated double-walled glasses can further enhance this benefit, keeping the exterior condensation-free while maintaining a frosty interior environment.
This small step makes a massive difference in the overall quality and longevity of your refreshment.
Using Coffee Concentrates
The secret to a robust and flavorful drink often lies in the strength of your initial brew. Using coffee concentrates or cold brew extracts provides a powerful base that is specifically designed to stand up to the addition of ice and dairy.
Because these concentrates are brewed with a much higher coffee-to-water ratio, they possess a dense flavor profile that remains prominent even as dilution naturally occurs over time.
When you prepare a concentrate at home, you have total control over the intensity, allowing you to create a liquid that is two or three times stronger than a standard cup of drip coffee.
This approach is ideal for those who prefer a creamy texture, as the concentrate can be cut with milk or heavy cream without losing the essential bitterness and aroma of the bean.
Simply store your homemade concentrate in the refrigerator for up to two weeks, providing a convenient and quick solution for busy mornings while ensuring your iced coffee never tastes weak or flavorless.
Best Milk and Sweetener Options
How to Make Simple Syrup at Home
One common mistake when making iced coffee is adding granulated sugar directly to a cold drink, which leads to a gritty texture at the bottom of the glass.
To avoid this, you should prepare a basic simple syrup by combining equal parts white sugar and water in a small saucepan over medium heat.
Stir the mixture constantly until the sugar is fully dissolved and the liquid becomes clear, then remove it from the heat and let it cool completely. For a more complex flavor profile, you can infuse your syrup with vanilla beans or cinnamon sticks during the cooling process.
Store the finished syrup in a glass jar in your refrigerator for up to one month. Using a liquid sweetener ensures your iced coffee remains smooth and perfectly balanced from the first sip to the last.
This technique is the professional standard for high-quality cafes because it allows the sweetness to distribute evenly through the chilled coffee base without any residue.
Best Dairy-Free Milks for Iced Coffee
Choosing the right plant-based milk can transform your homemade iced coffee into a gourmet experience. Oat milk is widely considered the best choice due to its naturally creamy texture and neutral flavor that doesn’t overpower the coffee beans.
It mimics the mouthfeel of dairy milk exceptionally well, making it perfect for those who enjoy a latte-style drink. If you prefer a nuttier profile, unsweetened almond milk offers a lighter option with fewer calories, though it may be thinner in consistency.
For a tropical twist, coconut milk adds a rich fat content that pairs beautifully with dark roasts, though it can solidify if the coffee is ice-cold.
When shopping, look for barista-grade versions of these milks, as they contain specific stabilizers designed to prevent curdling when hitting the acidic environment of the coffee.
Always shake your milk carton vigorously before pouring to ensure the fats are well-emulsified for a consistent, velvety pour that blends seamlessly with your cold brew or espresso.
Natural Sweeteners That Dissolve Easily
If you are looking to avoid refined sugars, several natural alternatives work beautifully in cold beverages. Agave nectar is an excellent choice because it has a low glycemic index and a thin consistency that dissolves almost instantly in cold liquids.
Its mild, honey-like flavor enhances the coffee without leaving a bitter aftertaste. Another great option is pure maple syrup, which provides a rich, autumnal depth that complements the roasted notes of the coffee beans perfectly.
Unlike honey, which can seize up and become waxy when it touches ice, maple syrup remains fluid and easy to stir.
For those monitoring their sugar intake, liquid stevia or monk fruit drops offer high-intensity sweetness without the calories; since they are already in liquid form, they integrate effortlessly into your glass. Using these natural liquids allows you to customize your sweetness levels precisely while maintaining a clean label.
Experimenting with these options helps you find a healthy balance that satisfies your sweet tooth without the need for artificial additives or messy granulated sugars.
Tips for Professional Coffee Shop Results
How to Layer Your Drink for Photos
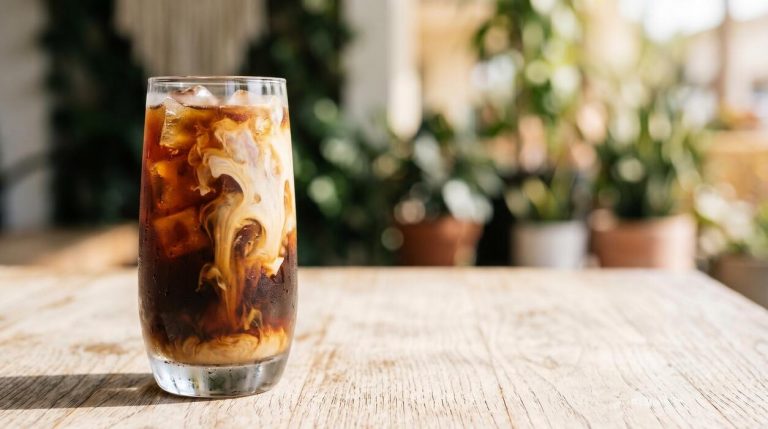
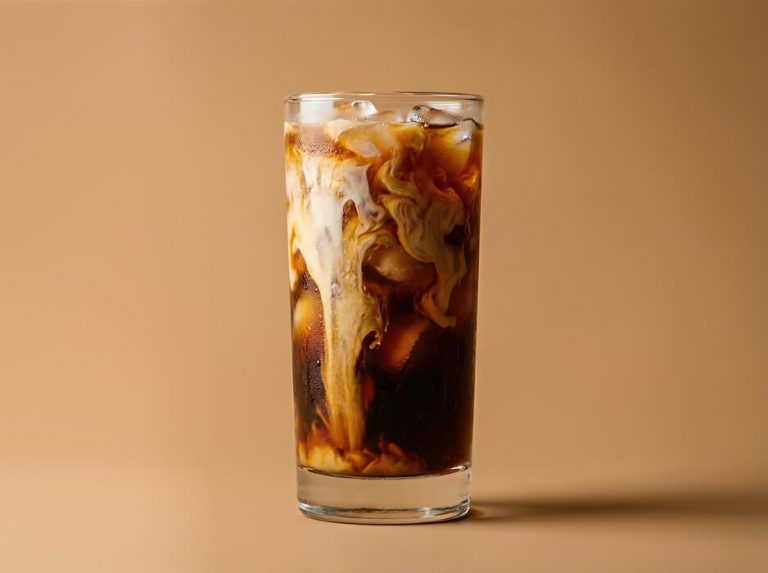
To achieve that stunning, gradient look found in high-end cafes, the secret lies in the density of your ingredients and the speed of your pour. Start by filling your glass to the brim with large, solid ice cubes, as these provide the structural scaffolding needed to separate liquids.
Always pour your sweetener or heavy syrups first, followed by your choice of milk or cream. To create the iconic separation, slowly pour your concentrated coffee or espresso over the back of a spoon directly onto the top ice cube.
This technique, known as gravity-defying layering, slows the descent of the dark liquid, allowing it to bleed beautifully into the white milk below. For the best visual results, use a transparent glass and ensure your coffee is significantly darker than your base liquid.
This creates a high-contrast aesthetic that looks professional and serves as a perfect subject for food photography before you stir the layers together for a balanced and delicious sip.
Adding Homemade Cold Foam
Elevating your homemade iced coffee with a velvety layer of cold foam is easier than most people realize and requires no expensive machinery.
To replicate the thick, cloud-like texture of a professional barista’s creation, combine two tablespoons of heavy cream, one tablespoon of 2% milk, and a teaspoon of flavored syrup in a small jar or frother pitcher.
Use a handheld electric milk frother for approximately thirty seconds until the mixture doubles in volume and holds a soft peak. If you do not own a frother, you can achieve similar results by shaking the ingredients vigorously in a tightly sealed mason jar for one minute.
The key to success is ensuring the dairy is ice-cold before you begin, as warm fat molecules will not stabilize the air bubbles required for that signature loft.
Gently spoon the finished foam over the top of your iced coffee, where it should sit elegantly on the surface without immediately sinking, providing a creamy, luxurious mouthfeel with every single cold sip.
Common Mistakes to Avoid
The most frequent error when making iced coffee at home is using standard-strength hot coffee, which results in a thin, watery beverage once the ice begins to melt.
To prevent this, always brew your coffee at double strength or utilize a dedicated cold brew concentrate to ensure the flavor remains robust even after dilution.
Another critical mistake is adding granulated sugar directly to a cold drink; the crystals will never fully dissolve, leaving a gritty residue at the bottom of your glass. Instead, always use a pre-made simple syrup or melt your sugar into the hot coffee before chilling it.
Additionally, avoid using small or crushed ice, which melts too rapidly and ruins the drink’s integrity. For the ultimate professional touch, consider making coffee ice cubes by freezing leftover coffee in a tray.
This ensures that as the ice melts, it actually reinforces the caffeine content and flavor profile of your drink rather than weakening it, maintaining a consistent and high-quality experience from start to finish.
Frequently Asked Questions
What is the best way to make iced coffee at home without it getting watery?
The most effective method is to brew your coffee at double strength to account for dilution from melting ice. Alternatively, you can freeze coffee into ice cubes to keep your drink strong as they melt.
Can I use regular hot coffee to make iced coffee?
Yes, you can use hot coffee, but it is best to let it cool to room temperature before pouring it over ice. To speed up the process, brew a concentrated pot and pour it directly into a cocktail shaker with ice to chill it instantly.
How do I make cold brew coffee at home?
Combine coarsely ground coffee beans with cold water in a jar using a 1:4 ratio and let it steep for 12 to 24 hours. Strain the mixture through a coffee filter or fine-mesh sieve to create a smooth, low-acidity concentrate.
What is the best way to sweeten homemade iced coffee?
Simple syrup is the best sweetener because it dissolves instantly in cold liquid, unlike granulated sugar which sinks to the bottom. You can make it by boiling equal parts water and sugar until the sugar is fully dissolved.
Which coffee beans work best for iced coffee?
Medium to dark roasts are generally preferred for iced coffee because they have bold, chocolatey, or nutty profiles that stand up well to milk and ice. Light roasts can sometimes taste overly acidic when served cold.
How long can I store homemade iced coffee in the fridge?
Brewed coffee can stay fresh in a sealed container in the refrigerator for up to 3 to 4 days. Cold brew concentrate lasts even longer, maintaining its flavor for up to two weeks when kept chilled.
Conclusion
Creating the perfect homemade iced coffee is an easy way to enjoy a cafe-quality treat while saving money. By mastering the cold brew method or chilling freshly brewed grounds, you can customize every cup with your favorite sweeteners and milks. Experiment with flavored syrups and coffee ice cubes to elevate your experience further. Now that you know the secrets, it is time to grab your glass and start brewing your own refreshing masterpiece today.