How To Make The Best Iced Coffee
Tired of watered-down drinks that lack that coffeehouse punch? Learning how to make the best iced coffee at home is easier than you think, and it starts with the right technique. Whether you prefer a bold cold brew or a flash-chilled pour-over, we have the perfect solution to upgrade your morning routine. Let’s dive into the simple secrets for crafting your perfect chilled cup.
Choose the Best Coffee Beans for Iced Drinks
Dark Roast vs. Light Roast for Cold Coffee
Selecting the right roast profile is the foundation of learning how to make the best iced coffee at home. For a traditional, bold flavor that stands up well to melting ice and heavy creamers, dark roast beans are the gold standard.
These beans offer low acidity and rich notes of chocolate, caramel, and toasted nuts, which become even more pronounced when served chilled. If you prefer a more modern, tea-like experience, light roast beans provide a vibrant complexity.
Light roasts retain more of the coffee cherry’s natural brightness, offering citrusy and floral undertones that are incredibly refreshing on a hot day. However, light roasts can sometimes taste sour if under-extracted, so they are best suited for the cold brew method rather than flash-chilling.
Ultimately, your choice depends on whether you value a robust, smoky punch or a delicate, fruity profile. Experimenting with medium roasts can also provide a balanced middle ground for those seeking a smooth finish without overwhelming bitterness.
Why Freshly Ground Beans Matter
To truly elevate your beverage, you must prioritize the timing of your grind. The volatile oils responsible for the aromatic complexity of coffee begin to dissipate the moment the bean is cracked open.
When making iced drinks, where flavors can be diluted by water, using freshly ground beans ensures that the maximum concentration of flavor ends up in your glass. Investing in a burr grinder allows for a consistent particle size, which is critical for achieving a balanced extraction.
For iced pour-over or flash-brewed coffee, a medium-fine grind is ideal to ensure quick extraction before the ice melts. Conversely, if you are making cold brew concentrate, a coarse, sea-salt texture is necessary to prevent the over-extraction that leads to a muddy, bitter taste.
Taking those extra sixty seconds to grind your beans right before brewing will transform a standard caffeine fix into a gourmet coffeehouse experience, providing a noticeably cleaner and more vibrant flavor profile that pre-ground coffee simply cannot match.
Best Coffee Regions for Iced Brewing
The geographical origin of your beans plays a massive role in the final taste of your iced drink. For those who enjoy a naturally sweet and chocolatey iced latte, beans from Central and South America, particularly Brazil or Colombia, are excellent choices.
These regions typically produce beans with milder acidity and nutty profiles that harmonize beautifully with milk and sweeteners. If you are looking for a bright, crisp, and fruity iced black coffee, look toward East African regions like Ethiopia or Kenya.
These beans are famous for their berry-like acidity and jasmine aromas, which sparkle when served over ice. Alternatively, Sumatran beans from Indonesia offer an earthy, spicy, and full-bodied experience that remains incredibly intense even as the ice begins to melt.
By matching the regional flavor characteristics to your preferred serving style, you can customize your brew to be exactly as refreshing or decadent as you desire. Understanding these origins is the secret to mastering the nuances of the perfectly balanced iced coffee.
Master the Cold Brew Method for Low Acidity
Step-by-Step Cold Brew Instructions
To master the ultimate low-acidity iced coffee, start by coarsely grinding your favorite beans to a texture resembling sea salt; this prevents over-extraction and ensures a clean finish.
Place the grounds into a large glass jar or dedicated cold brew maker, then slowly pour filtered water over them to ensure every grain is fully saturated.
Instead of using hot water which releases bitter oils, this cold-immersion technique relies on time to gently draw out the natural sweetness of the bean. Once the water is added, stir the mixture gently to eliminate dry pockets without agitating the grounds too much.
Cover the container securely to prevent any refrigerator odors from contaminating the brew. After the steeping process is finished, filter the concentrate through a fine-mesh sieve or a paper filter to remove all sediment.
This creates a velvety, concentrated base that serves as the perfect foundation for a refreshing, professional-quality iced beverage at home.
The Ideal Water-to-Coffee Ratio
Achieving the perfect balance for your cold brew depends heavily on the specific water-to-coffee ratio you choose during the initial mixing phase. For a versatile and robust concentrate, most experts recommend a 1:4 ratio of coffee to water, measured by weight for maximum precision.
This concentrated strength allows you to dilute the final product with ice, milk, or extra water later without losing the intricate flavor profile. If you prefer a ready-to-drink version that requires no dilution, aim for a lighter 1:8 ratio instead.
Using high-quality filtered water is essential, as the mineral content significantly impacts how the coffee flavors are extracted over several hours. By adhering to these measurements, you ensure a consistent result every time, avoiding the common mistake of a watery or overly harsh brew.
Remember that a stronger concentrate stays fresh longer in the refrigerator, giving you a convenient source of smooth, low-acid caffeine throughout the entire week.
How Long to Steep Your Grounds
Patience is the secret ingredient when learning how to make the best iced coffee, as the optimal steeping time typically ranges between 12 and 18 hours.
Leaving the grounds to soak at room temperature for 12 hours results in a bright, clean flavor, while extending the process to 18 hours in the refrigerator yields a deeper, more chocolatey profile with significantly reduced acidity.
You should avoid steeping for longer than 24 hours, as this can lead to over-extraction and woody notes that mask the bean’s natural character.
The temperature of the environment plays a critical role; a countertop steep is faster due to increased molecular movement, whereas a cold steep in the fridge is more forgiving and produces a smoother finish. Once your desired time is reached, strain the mixture immediately to stop the brewing process.
This careful timing ensures your iced coffee remains incredibly smooth, highlighting the complex notes of the roast without any of the burnt bitterness found in traditional hot-brewed methods.
How to Make Flash-Chilled Iced Coffee
The Japanese Method Explained
Flash-chilling, frequently referred to as the Japanese method, is widely considered the secret to achieving the best iced coffee because it focuses on immediate preservation.
Unlike traditional cold brew, which relies on a long immersion process that can result in a muted or woody profile, flash-chilling involves brewing coffee hot directly over a vessel filled with ice. This rapid temperature drop instantly locks in the volatile aromatic compounds and delicate acids that define high-quality beans.
To execute this properly, you should use a manual pour-over dripper like a V60 or Chemex. By brewing at a higher concentration to account for dilution, you ensure the final beverage remains bold and vibrant.
This technique is superior because it maintains the bright acidity and floral notes that are often lost when coffee is left to cool slowly at room temperature. The result is a crisp, clean, and incredibly refreshing drink that highlights the nuanced terroir of your specific coffee roast without any bitterness.
Calculating Ice Displacement
The most critical factor in mastering flash-chilled iced coffee is getting the ratio of hot water to ice exactly right to prevent a watery mess. To achieve the perfect balance, you must replace approximately one-third to one-half of your total brewing water with ice cubes placed directly in the carafe.
For example, if your standard recipe calls for 500 grams of water, you should use 300 grams of hot water for the brew and 200 grams of ice in the vessel.
This calculation ensures that as the hot coffee drips onto the ice, it melts just enough to reach the desired temperature while reaching the ideal extraction strength. Using a digital scale is mandatory for precision, as it allows you to track the weight of both the ice and the pour.
By adjusting your grind size to be slightly finer than usual, you can compensate for the lower volume of hot water, ensuring that you still extract the full depth of flavor from your grounds before the ice dilutes the concentrate.
Why Flash-Chilling Preserves Flavor
The science behind flash-chilled coffee explains why it consistently outperforms other methods in taste tests. When coffee is brewed hot, the water extracts a complex spectrum of oils and acids that are simply inaccessible to cold water.
However, if hot coffee is left to cool gradually, those same compounds begin to oxidize and degrade, leading to a stale or sour flavor profile. By instantaneously lowering the temperature, you halt the oxidation process and trap the aromatic gasses before they can escape into the air.
This method is particularly effective for light to medium roasts, where vibrant citrus and berry notes are the primary appeal. Because the coffee is chilled the moment it is born, the integrity of the bean is showcased in its purest form.
This produces a dynamic and transparent cup that feels sophisticated and lively on the palate. Choosing flash-chilling over refrigeration means you are serving the freshest possible version of an iced beverage, characterized by a sparkling clarity that makes it the definitive choice for enthusiasts.
Essential Equipment for Professional Results
Best Coffee Makers for Iced Drinks
To achieve professional results, the foundation of your iced coffee begins with the right brewing equipment. While standard drip machines work, true aficionados prefer a dedicated cold brew maker or a high-quality Japanese pour-over setup.
A cold brew system uses a slow immersion process to pull chocolatey, low-acid notes from the beans, resulting in a concentrate that remains flavorful even when diluted by ice. Alternatively, using a Hario V60 or Chemex allows for the flash-chilling method, where you brew hot coffee directly over ice.
This technique instantly locks in bright, floral aromatics that are often lost in traditional cooling methods. For those seeking intensity, an AeroPress is an excellent budget-friendly tool that creates a concentrated shot similar to espresso, providing a robust base that stands up against milk and sweeteners.
Investing in a brewer that allows for control over water flow and temperature ensures your iced beverage never tastes watery or overly bitter.
Precision Scales and Grinders
Consistency is the hallmark of a professional barista, and this is achieved through the use of a digital gram scale and a burr grinder. When making iced coffee, the ratio of coffee to water is critical because you must account for the eventual dilution from melting ice.
A scale allows you to measure precisely, ensuring your brew is strong enough to maintain its profile. Equally important is the grind size; a conical burr grinder provides a uniform particle size that prevents over-extraction.
For cold brew, you require a coarse, sea-salt grind, whereas flash-chilled methods demand a medium-fine setting. Using pre-ground coffee leads to stale flavors, so grinding fresh immediately before brewing is essential to capture the volatile oils that provide sweetness and depth.
By mastering these two tools, you eliminate the guesswork and ensure that every glass of iced coffee you prepare has a balanced, cafe-quality body and a clean, vibrant finish without any unwanted sediment.
Glassware That Keeps Drinks Cold
The final element of the professional iced coffee experience is the vessel used for serving, as temperature retention is vital for flavor longevity.
Double-walled borosilicate glassware is the industry standard because it provides an insulating layer of air that keeps your drink icy for hours while preventing messy condensation on the exterior.
If you prefer a more modern aesthetic, stainless steel tumblers offer even superior thermal regulation, making them ideal for slow sipping throughout a warm afternoon. Beyond the glass itself, consider using large-format silicone ice molds to create oversized cubes or spheres.
These have a lower surface-area-to-volume ratio than standard tray ice, meaning they melt significantly slower and won’t water down your carefully crafted beverage.
Using the right glassware not only enhances the visual appeal of the layered coffee and milk but also ensures the first sip is just as cold and flavorful as the last. Choosing high-quality vessels transforms a simple caffeine fix into a sophisticated, refreshing ritual.
Pro Tips to Avoid Watered-Down Coffee

How to Make Coffee Ice Cubes
One of the most effective ways to prevent a diluted beverage is to replace standard water-based ice with coffee ice cubes. To do this, simply brew a fresh pot of your favorite blend, let it cool to room temperature, and pour it into clean silicone trays.
For an extra boost of flavor, you can even add a touch of simple syrup or a splash of cream to the mixture before freezing.
As these cubes melt into your drink, they release concentrated coffee flavor instead of plain water, ensuring your last sip is just as robust and flavorful as the first. This method is a total game-changer for slow sippers who enjoy savoring their drink over an hour or more.
By keeping a steady supply of these frozen gems in your freezer, you eliminate the primary cause of watery iced coffee and maintain that perfect caffeine kick regardless of how long it takes to finish your glass.
Using Concentrates for Stronger Flavor
To achieve a professional-grade beverage at home, you should focus on using cold brew concentrates or double-strength hot brews. When coffee is brewed specifically for icing, it needs to be significantly stronger to compensate for the thermal shock and eventual melting of ice.
If you are using a standard drip machine, try doubling the coffee grounds while keeping the water volume the same. Alternatively, making a batch of cold brew concentrate over twelve to twenty-four hours provides a low-acid, high-intensity base that stands up beautifully to heavy cream and sweeteners.
This approach creates a bold flavor profile that remains consistent even as the temperature changes. By starting with a liquid that is naturally more dense and flavorful, you create a buffer against dilution.
Using a concentrate ensures that the essential oils and aromatics remain the star of the show, providing a rich mouthfeel that standard brewing methods simply cannot replicate in a cold format.
The Role of Rapid Cooling Tools
The speed at which you lower the temperature of your coffee significantly impacts its final texture and strength.
Investing in rapid cooling tools, such as specialized stainless steel chillers or hyper-chilling carafes, allows you to drop the temperature of hot coffee by over one hundred degrees in less than a minute.
This rapid transition prevents the ice from melting instantly upon contact, which is the leading cause of a weak and watery profile.
If you do not have a dedicated tool, try the ‘flash brew’ method by brewing hot coffee directly over a measured amount of ice, which locks in the volatile aromatics and bright acidity that are often lost during slow cooling.
By minimizing the time the liquid stays in the ‘melt zone,’ you preserve the integrity of the bean’s profile. Utilizing these professional cooling techniques ensures that your iced coffee retains its intended strength and complexity, offering a crisp and refreshing experience without the disappointment of a diluted mess.
Best Ways to Sweeten and Flavor Your Drink
How to Make Simple Syrup at Home
To achieve a professional-grade iced coffee, you must master the art of the simple syrup. Unlike granulated sugar, which often settles at the bottom of a cold glass, a homemade syrup integrates instantly for a consistent taste.
Start by combining equal parts filtered water and white granulated sugar in a small saucepan over medium heat. Stir the mixture constantly until the liquid becomes completely clear and the sugar crystals have fully dissolved.
It is crucial not to let the mixture reach a rolling boil for too long, as this can alter the viscosity and create a thick caramel consistency that is difficult to pour.
Once the syrup is clear, remove it from the heat and allow it to cool to room temperature before transferring it to a glass airtight container. For a unique twist, you can infuse the syrup with herbs like mint or lavender during the cooling process.
This liquid sweetener ensures your drink is perfectly balanced from the first sip to the very last drop.
Natural Sweeteners That Dissolve Easily
If you are looking for healthier alternatives to processed sugars, several natural options work beautifully in chilled beverages without leaving a gritty residue. Agave nectar is a top choice for iced coffee enthusiasts because its thin consistency allows it to blend effortlessly into cold liquids.
It provides a neutral sweetness that does not overpower the delicate notes of your coffee beans. Another excellent option is high-quality maple syrup, which adds a rich, autumnal depth and a hint of woodsy flavor that pairs exceptionally well with dark roasts.
For those who prefer a floral profile, mild honey can be used, though it is best to whisk it with a small amount of warm coffee or water first to ensure it remains liquid when it hits the ice.
These natural sweeteners offer a more complex flavor profile than standard sugar while providing a smoother mouthfeel and cleaner finish. Using these alternatives allows you to customize your sweetness levels while maintaining a focus on wholesome, unrefined ingredients.
Adding Spices and Extracts
To truly elevate your beverage without adding extra calories or sugar, look toward your spice cabinet and pantry staples. Incorporating a few drops of pure vanilla or almond extract can transform a basic cup into a gourmet experience, providing a fragrant aroma that mimics sweetness.
If you enjoy warm, earthy tones, try adding a pinch of ground cinnamon or cardamom directly to your coffee grounds before brewing.
This technique allows the oils from the spices to extract alongside the coffee, resulting in a more integrated and sophisticated flavor profile that does not leave a powdery texture in your glass.
For a refreshing summer treat, a tiny pinch of sea salt can be added to neutralize bitterness and enhance the natural chocolatey notes of the beans. Experimenting with these aromatic additions allows you to create a signature flavor profile that is tailored to your specific palate.
By focusing on high-quality extracts and fresh spices, you can achieve a rich and complex taste that rivals any high-end cafe.
Milk and Creamer Options for a Rich Texture
Best Dairy-Free Milks for Iced Coffee
To achieve a rich texture without dairy, oat milk stands out as the ultimate champion for iced coffee. Its natural sugars and thick consistency mimic the mouthfeel of whole milk, preventing your beverage from feeling watered down as the ice melts.
If you prefer a nuttier profile, almond milk is a popular choice, though it is thinner; look for ‘barista blend’ versions which contain added stabilizers to prevent curdling when hitting the acidic coffee. Soy milk remains a reliable classic, offering a high protein content that creates a smooth, velvety finish.
For those seeking an exotic twist, coconut milk adds a tropical sweetness and a heavy creaminess that pairs exceptionally well with dark roasts. Always remember to shake your milk alternative vigorously before pouring to ensure a consistent texture.
By selecting a high-fat plant milk, you guarantee a luxurious experience that rivals any professional cafe. Experimenting with these options allows you to customize the flavor profile while maintaining that essential, indulgent body required for the perfect glass.
How to Make Cold Foam at Home
Elevating your iced coffee with a professional-style cold foam is surprisingly simple and requires minimal equipment. The secret to a stable, pillowy foam is using cold, non-fat or low-fat milk, as the protein structure holds air bubbles better than heavy fats.
To begin, pour about half a cup of milk into a glass jar or a handheld milk frother. If using a jar, shake it aggressively for sixty seconds until the volume doubles.
For a more polished result, a handheld electric whisk works wonders, creating a micro-foam texture in under thirty seconds. You can enhance the flavor by adding a splash of vanilla extract or a pinch of cinnamon before frothing.
Once the foam is stiff, gently spoon it over the top of your iced coffee. This technique creates a distinctive layer of sweetness that slowly melds with the brew, providing a cafe-quality aesthetic and a delightful contrast in temperatures.
Mastering this step ensures your homemade drink has that signature creamy cap found in high-end coffee shops.
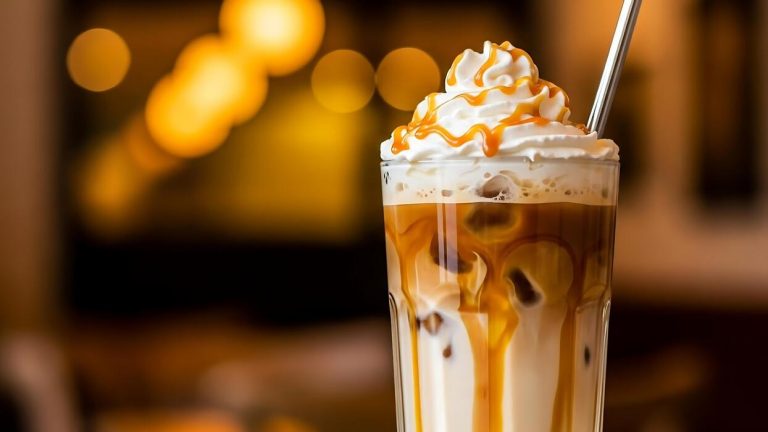
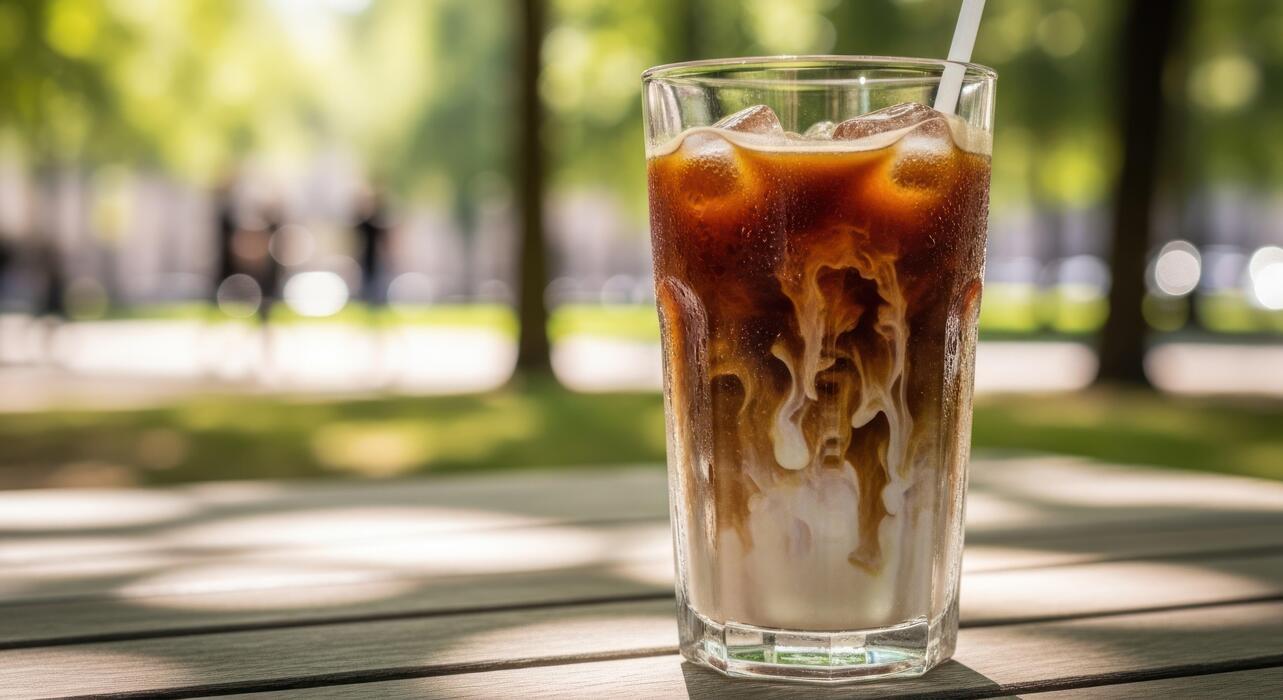
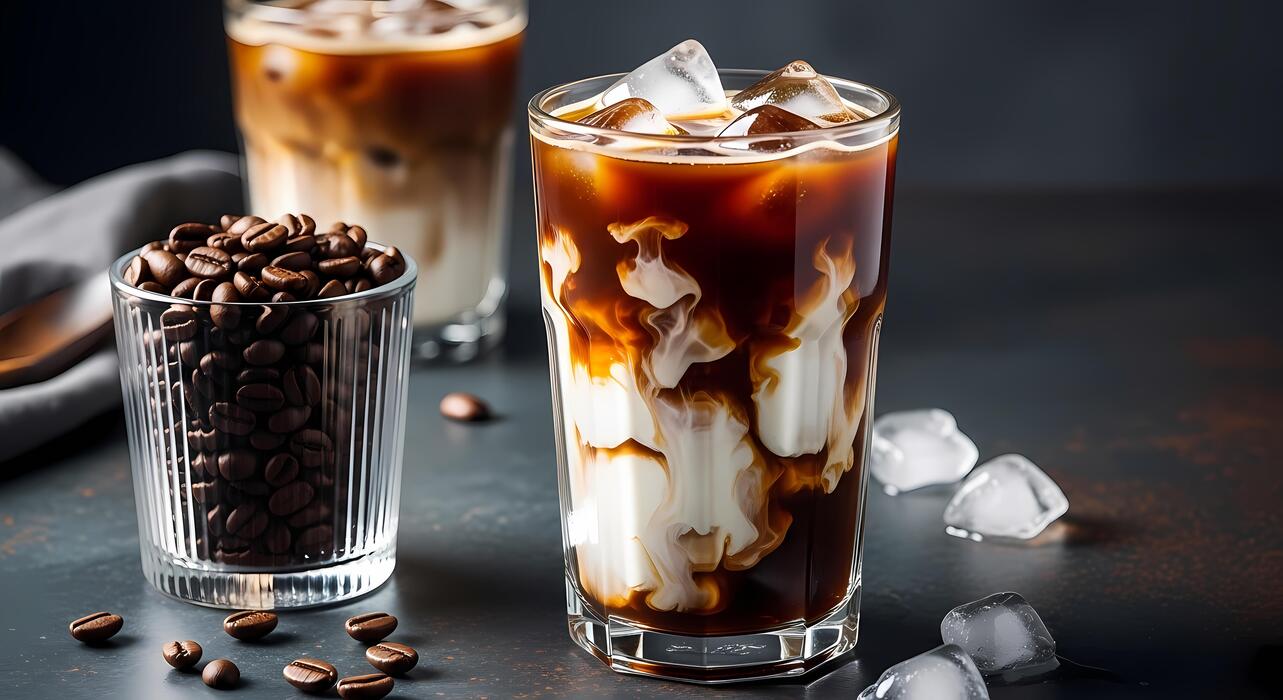
Achieving the Perfect Creamy Layer
The key to a visually stunning and delicious iced coffee lies in the technique used to combine your dairy or creamer with the brew. To prevent the milk from immediately disappearing into the coffee, you should pour the creamer slowly over the back of a spoon.
This creates a beautiful cascading effect known as ‘marbling,’ which allows you to control the intensity of the creaminess as you sip.
If you prefer a completely integrated texture, try stirring the milk and sweetener into the hot coffee before pouring it over ice; this ensures everything dissolves perfectly without leaving grit at the bottom.
For an ultra-rich treat, consider using half-and-half or heavy cream, which provides a dense richness that stands up to strong cold brews. Using chilled glassware and large ice cubes also helps maintain the integrity of the creamy layer by slowing down dilution.
By focusing on the order of operations and temperature control, you can transform a standard caffeinated drink into a sophisticated, multi-textured masterpiece that stays creamy until the very last drop.
Frequently Asked Questions
What is the best coffee-to-water ratio for iced coffee?
For a standard brew that won’t taste watery, use a 1:8 or 1:10 ratio of coffee to water. This creates a stronger concentrate that maintains its flavor profile even as the ice cubes begin to melt.
Should I use cold brew or chilled drip coffee?
Cold brew is best for a smooth, low-acid flavor, while chilled drip coffee offers a brighter, more acidic profile. If using drip coffee, brew it at double strength to ensure the ice doesn’t dilute the taste too quickly.
How can I prevent my iced coffee from getting watery?
The best trick is to make coffee ice cubes by freezing leftover coffee in an ice tray. As these cubes melt, they release more coffee flavor into your drink instead of plain water.
What is the best way to sweeten iced coffee?
Use simple syrup or liquid sweeteners rather than granulated sugar, which does not dissolve well in cold liquids. You can make a basic simple syrup by boiling equal parts water and sugar until the sugar is fully dissolved.
What kind of roast works best for iced coffee?
Medium to dark roasts are generally preferred for iced coffee because they have bold, chocolatey, and nutty notes that stand up well to milk and ice. Lighter roasts can sometimes taste overly sour when served cold.
How do I make ‘flash chilled’ iced coffee?
Flash chilling involves brewing hot coffee directly over a vessel filled with ice. This method preserves the aromatic oils and bright acidity of the beans that are often lost during the long steeping process of cold brew.
Conclusion
Making the perfect iced coffee at home is all about balancing the strength of your brew with the quality of your ice. By using cold brew methods or chilling concentrated coffee, you ensure a bold flavor that stands up to dilution. Don’t be afraid to experiment with homemade syrups and different milk varieties to find your signature blend. With these simple tips, you can enjoy a refreshing, cafe-quality beverage every single day. Happy brewing!