How To Make Iced Coffee Recipe
If you are tired of watered-down drinks and expensive cafe runs, you have come to the right place. Learning how to make iced coffee recipe at home is surprisingly simple and much more affordable. Whether you prefer a bold cold brew or a quick chilled pour-over, we have perfected the process for you. This guide delivers the quick, refreshing solutions you need to master your morning brew. Stick with us to discover the best techniques for cafe-quality results in minutes.
Basic ingredients and tools for home iced coffee
Choosing the right coffee beans
To master the perfect iced coffee recipe, your journey begins with selecting the ideal bean profile to withstand dilution from melting ice. We recommend choosing medium to dark roast beans because they possess the robust, chocolatey, and nutty notes that remain prominent even when chilled.
Lighter roasts often contain delicate floral acidity that can taste sour or thin when served over ice. If you prefer a smoother experience with lower acidity, look for beans specifically labeled for cold brew or espresso blends.
For the freshest flavor, always opt for whole bean coffee and grind it just before brewing to preserve the volatile aromatic oils. If you are making a quick iced pour-over, a medium-fine grind works best, whereas a coarse grind is essential for a slow-steeped cold brew.
Investing in high-quality, specialty-grade Arabica beans ensures your homemade beverage rivals any professional cafe, providing a rich, satisfying base that pairs perfectly with milk or flavored syrups.
Essential brewing equipment
You do not need an expensive setup to create a delicious iced coffee, but having a few essential brewing tools will significantly improve your results. A standard drip coffee maker or French press is versatile enough for most methods, including the popular flash-chilling technique.
For those who prioritize precision, a digital kitchen scale is vital for measuring the exact ratio of coffee grounds to water, ensuring consistency every time you brew. If you enjoy a concentrated base, a Moka pot or Aeropress can produce an espresso-style shot that holds up beautifully against heavy cream.
Additionally, a long-handled stirring spoon and a high-quality insulated tumbler are practical additions that keep your drink cold for hours without condensation. Don’t forget a dedicated burr grinder, which allows you to control the particle size for optimal extraction.
Having these basic tools organized in your kitchen makes the process efficient and repeatable, allowing you to experiment with different strengths and styles of iced beverages effortlessly.
Ice quality and water ratios
The most overlooked aspect of a great iced coffee recipe is the quality of your ice and water. Since coffee is over 98% water, using filtered water instead of tap water prevents chlorine or minerals from masking the bean’s natural flavors.
When it comes to the ice, larger cubes are preferable because they have less surface area and melt more slowly, preventing your drink from becoming watery too quickly.
For an advanced hack, try freezing leftover coffee into coffee ice cubes; this ensures that as they melt, your drink actually gets stronger instead of diluted.
Mastering the brewing ratio is equally critical; when brewing directly over ice, you should use half the usual amount of hot water to create a concentrate, letting the melting ice provide the remaining liquid volume.
A standard starting point is a 1:15 coffee-to-water ratio, but you should adjust this based on how much ice you plan to add. Proper calibration between temperature and volume ensures a crisp, refreshing finish every single time.
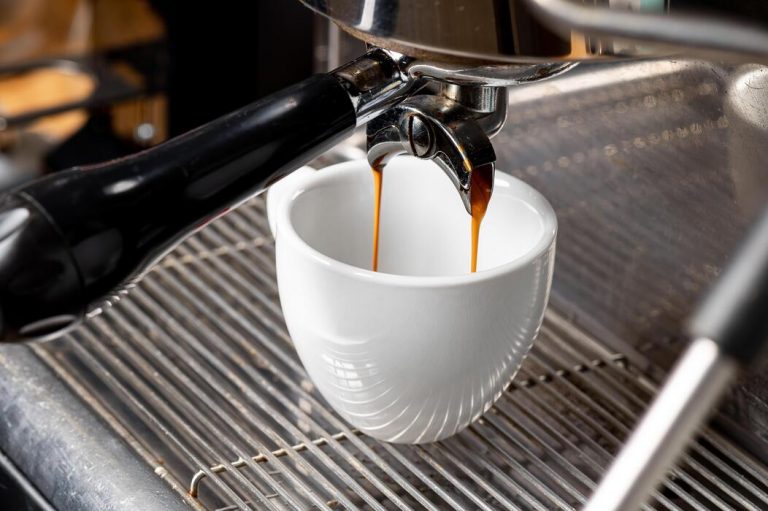
How to make iced coffee with the hot brew method
The drip coffee maker approach
To master the hot brew method using a standard machine, you must adjust your usual ratio to account for future dilution. Start by filling your water reservoir with exactly half the amount of water you would typically use for a full pot.
For the coffee grounds, maintain the full amount required for a standard brew or even increase the dose slightly to ensure a robust profile. Place your filter and grounds into the basket as usual and initiate the cycle.
By using less water during extraction, you create a concentrated coffee base that possesses enough body to withstand the addition of ice later. Once the brewing process finishes, it is vital to transfer the liquid out of the glass carafe immediately to stop the heating process.
This foundational step ensures your iced coffee recipe starts with a high-intensity concentrate that retains its complex notes once chilled, providing a professional-grade beverage right from your own kitchen counter.
How to cool hot coffee quickly
The most effective way to transition your hot brew into a refreshing iced beverage without waiting hours is through a staged cooling process. Immediately after brewing your concentrate, pour the liquid into a stainless steel or glass pitcher to help dissipate heat rapidly.
If you are in a rush, you can place this container inside a larger bowl filled with an ice-water bath, stirring the coffee gently for about three minutes. This technique drops the temperature significantly before the liquid ever touches your serving glass.
Alternatively, utilize a specialized flash-chilling device or a cocktail shaker filled with large ice cubes to aerate and cool the coffee in seconds. The goal is to reach room temperature or lower before pouring the brew over fresh ice.
This rapid cooling method locks in the delicate aromatics and prevents the bitterness that often develops when hot coffee is allowed to sit and oxidize slowly over an extended period.
Preventing watered-down flavor
The biggest challenge with the hot brew method is maintaining integrity when ice begins to melt. To solve this, always use coffee ice cubes made from leftover brew; as these melt, they add more coffee flavor instead of water.
If you prefer standard ice, ensure you are using large, dense cubes which have less surface area and melt much slower than crushed ice.
Another professional tip is to sweeten your coffee while hot using granulated sugar or honey, as they dissolve better in heat, or use a simple syrup for cold applications.
Additionally, consider adding a splash of heavy cream or condensed milk, which provides a richer mouthfeel that counteracts any perceived thinness from the melting ice.
By focusing on these dilution-control strategies, your homemade iced coffee will remain bold and flavorful from the first sip to the very last drop, successfully mimicking the quality of your favorite local café’s signature chilled offerings.
Steps for making cold brew coffee at home

The coarse grind secret
To master the art of homemade cold brew, you must start with the correct texture of your beans. Unlike traditional drip coffee that requires a medium grind, the secret to a smooth iced coffee recipe lies in using a consistent coarse grind.
If your coffee grounds are too fine, they will over-extract during the long soaking process, resulting in a bitter, muddy flavor that ruins the refreshing experience. Aim for a texture similar to sea salt or cracked peppercorns.
This larger surface area allows the cold water to gently pull out the chocolatey and nutty notes without the harsh acidity typical of hot brewing methods. Using a high-quality burr grinder is highly recommended to ensure uniformity, as inconsistent particles lead to uneven extraction.
By focusing on this crucial first step, you create the perfect foundation for a clean, professional-grade concentrate that rivals your favorite local cafe. Remember that the ratio of water to coffee is also vital, but everything begins with that essential coarse texture for success.
Steeping times for maximum flavor
Patience is the most important ingredient when learning how to make iced coffee at home. Once you have combined your coarse grounds with filtered water, usually at a one-to-four ratio, you must allow the mixture to steep undisturbed.
For the best results, let the coffee sit at room temperature for 12 to 18 hours. Steeping for less than twelve hours often results in a weak, underdeveloped flavor profile, while exceeding twenty-four hours can introduce unwanted bitterness and a woody aftertaste.
Many enthusiasts prefer a 15-hour steep time as the sweet spot for achieving a bold, syrupy body. You can steep the mixture in a simple glass jar or a dedicated cold brew maker, but ensure it is kept away from direct sunlight.
This slow, cold extraction process is what creates the low-acidity profile that makes cold brew so popular. By precisely timing your brew, you ensure a consistently smooth concentrate that serves as the perfect base for your morning caffeine fix, regardless of the ice or milk added later.
How to strain and store concentrate
After the steeping process is complete, you must carefully separate the liquid from the grounds to stop the extraction. Use a fine-mesh sieve lined with a paper filter or a nut milk bag to ensure no sediment remains in your final carafe.
Pouring slowly prevents the filter from clogging and maintains the clarity of the beverage. Once strained, you are left with a potent cold brew concentrate. This liquid should be stored in an airtight glass container in the refrigerator immediately.
When kept properly chilled, your homemade concentrate will stay fresh and flavorful for up to two weeks, allowing you to make instant iced coffee whenever the craving strikes.
When you are ready to serve, remember that this is a concentrate; you should dilute it with equal parts water or milk over fresh ice. This storage method is incredibly convenient for busy mornings, providing a high-quality, cost-effective solution for your daily routine.
Proper filtration and cold storage are the final steps in securing a delicious, cafe-standard result every single time you brew.
How to make instant iced coffee in minutes
Dissolving coffee without heat
To master the art of instant iced coffee without waiting for a kettle to boil, you should start by using a small amount of room-temperature water rather than ice-cold liquid.
While most granules are designed for heat, you can achieve a smooth consistency by whisking the coffee powder with just two tablespoons of lukewarm water first. This creates a concentrated slurry that prevents undissolved clumps from floating in your drink.
If you prefer a completely cold process, use a handheld milk frother to agitate the mixture rapidly, which forces the crystals to break down into a dark, syrupy base. This method is incredibly efficient for those busy mornings when you need a caffeine fix in under sixty seconds.
Once your base is completely smooth and free of grit, you can safely add your chilled milk or water. By avoiding boiling water entirely, you also preserve the delicate profile of the bean and ensure your ice cubes don’t melt instantly upon contact with the liquid.
Ratio of powder to water
The secret to a professional-tasting iced beverage lies in the concentration, as melting ice will naturally dilute your drink over time. To counteract this, you should double the standard amount of coffee granules you would typically use for a hot cup.
A reliable ratio for a standard sixteen-ounce glass is two rounded tablespoons of instant coffee to roughly six ounces of water. This creates a robust coffee concentrate that maintains its structural integrity even as it is poured over a full glass of ice.
If you find the flavor too intense, you can adjust the balance by adding more milk or cream, but starting with a strong foundation is essential for preventing a watery, disappointing result.
Always remember that the ice acts as a secondary water source; therefore, treating your initial mix as a potent extract is the best way to ensure every sip remains flavorful from the first drop to the last.
Consistency in measurement will lead to a perfect, cafe-quality result every single time you brew.
Quick flavor boosters
Elevating your basic instant brew into a gourmet experience requires just a few simple pantry staples that integrate seamlessly into cold liquids.
Instead of granulated sugar, which struggles to dissolve in cold temperatures, reach for liquid sweeteners like maple syrup, agave, or a homemade simple syrup to ensure even sweetness throughout the glass.
You can also enhance the aromatic profile by adding a pinch of ground cinnamon or a drop of pure vanilla extract directly into your coffee slurry before adding the ice.
For those who enjoy a creamier texture, shaking your coffee and milk in a mason jar creates a luxurious foam that mimics the mouthfeel of a nitro cold brew. Another pro tip is to use coffee ice cubes made from leftover brew, which prevents any dilution whatsoever as they melt.
These small additions take less than a minute but transform a humble instant powder into a sophisticated, refreshing treat that rivals expensive coffee shop offerings. Experimenting with these quick boosters allows you to customize your drink to your exact palate preferences.
Best ways to sweeten and flavor your drink

How to make simple syrup
To achieve a professional-grade iced coffee, skip granulated sugar which often settles at the bottom of the glass. Instead, prepare a simple syrup by dissolving equal parts white sugar and water in a saucepan over medium heat.
This liquid sweetener integrates instantly into cold liquids, ensuring every sip is perfectly balanced. For a richer, more complex profile, try using brown sugar or honey as your base, which adds deep caramel notes to your brew.
Once the sugar has fully dissolved, remove the mixture from the heat and let it cool completely before transferring it to a glass bottle. You can infuse the syrup during the cooling process with cinnamon sticks or vanilla beans to elevate the flavor profile further.
Keeping a batch of this homemade syrup in your refrigerator for up to one month allows you to customize your sweetness level quickly during busy mornings, making it the most efficient way to enhance your daily caffeine routine.
Dairy and plant-based milk options
The choice of creamer can dramatically alter the texture and mouthfeel of your iced coffee. For a classic, velvety experience, whole milk or half-and-half provides a rich fat content that cuts through the acidity of the beans.
If you prefer plant-based alternatives, oat milk is widely considered the best option due to its naturally creamy consistency and subtle sweetness that mimics dairy. For those who enjoy a nutty undertone, unsweetened almond milk offers a lighter, lower-calorie profile that pairs exceptionally well with light-roast coffees.
If you want a tropical twist, full-fat coconut milk adds a luxurious thickness and a unique flavor that complements cold brew perfectly. To prevent the milk from separating, always pour your creamer over the ice before adding the coffee, or use a handheld frother to create a cold foam topper.
Experimenting with different fat contents will help you find the perfect weight and balance for your specific coffee blend.
Natural flavoring ideas
Moving beyond basic sweeteners allows you to create a gourmet experience at home using simple pantry staples. For a warm and aromatic finish, whisk a pinch of ground cinnamon or cardamom directly into your coffee grounds before brewing, or stir a drop of pure vanilla extract into your finished drink.
If you enjoy a mocha-style beverage, dissolve high-quality cocoa powder into a small amount of warm water before mixing it into your cold coffee for a smooth, chocolatey infusion.
To add a bright, refreshing contrast to the bitter notes of the coffee, try adding a strip of orange zest or a splash of maple syrup, which provides a clean and natural sweetness.
For a unique savory-sweet balance, a tiny pinch of sea salt can enhance the natural flavors of the bean while reducing perceived bitterness.
These natural additions provide a sophisticated way to customize your beverage without relying on artificial syrups, allowing the true character of your chosen coffee beans to shine through.
Tips for professional coffee shop results
How to make coffee ice cubes
One of the most common frustrations when learning how to make iced coffee recipe variations at home is the inevitable dilution that occurs as standard ice melts.
To maintain a robust, professional-grade flavor from the first sip to the last, you should freeze leftover brewed coffee in silicone trays to create specialized coffee ice cubes.
For the best results, ensure the coffee is completely cooled to room temperature before pouring it into the molds to avoid a cloudy appearance. You can even infuse your cubes with vanilla bean or a touch of simple syrup to add a subtle sweetness that releases gradually as you drink.
Using these cubes ensures that your beverage remains potent and flavorful rather than becoming watery and thin over time.
This simple preparation step is a hallmark of high-end cafes, allowing the rich espresso notes to stay concentrated regardless of how slowly you enjoy your chilled caffeine fix throughout a warm afternoon.
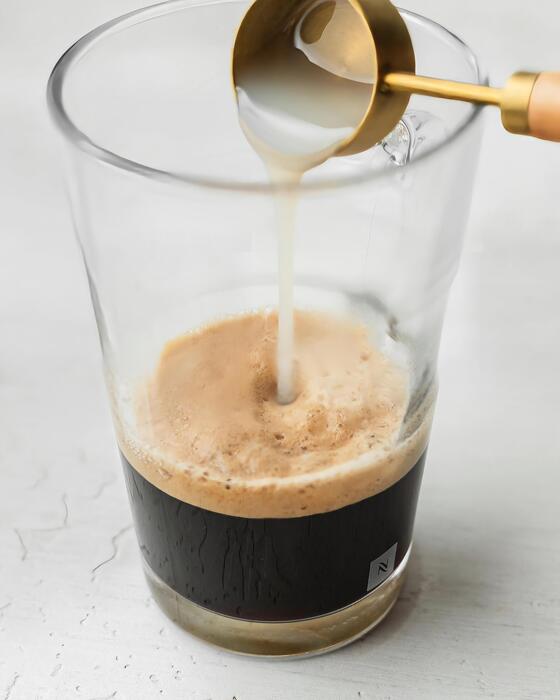
Using a cocktail shaker for foam
To achieve that coveted, velvety micro-foam often seen in artisanal coffee shops, incorporate a professional cocktail shaker into your brewing routine. After preparing your concentrated coffee base, pour it into the shaker along with your sweetener and a handful of ice.
Perform a vigorous shake for approximately fifteen to twenty seconds until the exterior of the metal canister feels frosty to the touch. This mechanical agitation aerates the liquid, creating a thick, luxurious crema-like foam that sits beautifully on top of the drink.
This technique is particularly effective for an ‘espresso shakerato’ style beverage, as it perfectly blends the ingredients while chilling the liquid instantly. By using this method, you emulsify the natural oils in the coffee, resulting in a much smoother mouthfeel and a visually stunning presentation that rivals any commercial establishment.
It is a quick, low-cost way to elevate the texture of your home-brewed iced coffee without needing expensive steam wand equipment or specialized frothing tools.
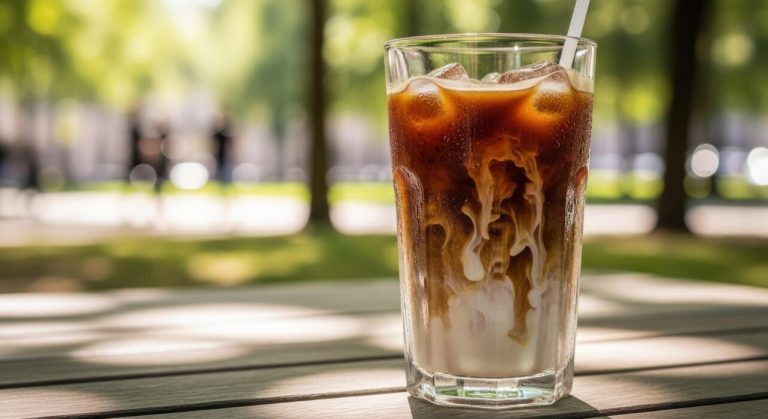
Layering your coffee and cream
Visual appeal is a significant part of the specialty coffee experience, and mastering the art of layering can turn a standard glass into a masterpiece. To achieve distinct, clean layers between your dark coffee and white creamer, you must understand the density of your liquids.
Start by filling your glass with ice and pouring in your sweetened coffee base first. Then, take a long-handled bar spoon and hold it just above the surface of the coffee, curved side up.
Slowly pour your heavy cream or milk over the back of the spoon to break its fall and disperse the liquid gently. Because the cream is often denser or colder, it will cascade down the sides in beautiful, marble-like streaks before settling.
This controlled pouring technique prevents immediate mixing, allowing you to serve a drink with a striking gradient effect. Not only does this look impressive for guests, but it also allows the drinker to control the flavor profile by stirring the layers together at their own preferred pace.
Common iced coffee mistakes to avoid
Why your coffee tastes bitter
One of the most frequent errors when following an iced coffee recipe is over-extraction, which leads to a harsh, burnt flavor that ruins the refreshing experience. This usually happens when you use boiling water directly on delicate grounds or let the coffee steep for too long before chilling it.
To solve this, ensure your water temperature is between 195 and 205 degrees Fahrenheit. If you are making cold brew, strictly adhere to a steeping window of 12 to 18 hours at room temperature; exceeding this time pulls out unwanted tannins.
Additionally, check your grind size; using a grind that is too fine for your brewing method increases the surface area and speeds up extraction, often resulting in that dreaded bitterness.
By using a coarse grind and monitoring your timing, you can achieve a smooth, naturally sweet profile that requires less sugar and cream to be palatable for your morning routine.
Fixing weak or watery drinks
The biggest complaint with homemade iced coffee is that it becomes diluted and thin as soon as it hits the ice. To prevent a watery mess, you must brew your coffee at double strength to account for the inevitable melting.
If your standard ratio is two tablespoons of coffee per six ounces of water, increase it to four tablespoons. Another professional tip is to utilize coffee ice cubes instead of plain water cubes.
Simply freeze a batch of cooled coffee in an ice tray; as they melt, they actually add more flavor to your glass rather than stripping it away. Furthermore, always ensure your hot coffee has reached room temperature before pouring it over ice.
Putting hot liquid directly onto ice causes an immediate thermal shock that melts the cubes instantly, resulting in a lukewarm, translucent drink that lacks the bold body and caffeine kick you expect from a high-quality coffeehouse beverage.
Proper storage for leftover brew
Storing your coffee incorrectly can lead to oxidation, which makes the liquid taste stale or metallic within just a few hours. To maintain a fresh flavor for your next iced coffee, always store your brew in an airtight glass container rather than an open carafe or plastic pitcher.
Glass is non-porous and will not absorb old odors or leach chemicals into your drink. Place the container in the coldest part of the refrigerator immediately after it reaches room temperature.
For those who brew in large batches, cold brew concentrate can stay fresh for up to two weeks, while standard drip coffee should ideally be consumed within 24 to 48 hours for the best taste profile.
Avoid keeping your coffee in the fridge for more than three days, as the aromatic oils will begin to break down, losing the complex notes that make a great cup. Consistent, sealed refrigeration is the secret to a convenient and delicious pour-and-go morning.
Frequently Asked Questions
What is the basic ratio for an iced coffee recipe?
A standard ratio is using two tablespoons of ground coffee for every six ounces of water. Since the ice will eventually melt and dilute the drink, brewing the coffee at double strength ensures the flavor remains bold.
How do I make iced coffee quickly without it getting watery?
The best method for quick iced coffee is the ‘flash brew’ technique, where you brew hot coffee directly over a large cup of ice. Using extra coffee grounds compensates for the immediate dilution from the melting ice cubes.
Can I use regular hot coffee to make iced coffee?
Yes, you can use regular hot coffee, but it is best to let it reach room temperature before pouring it over ice. To prevent a watery drink, consider using coffee ice cubes made from leftover coffee instead of plain water ice cubes.
What is the difference between iced coffee and cold brew?
Iced coffee is brewed hot and then chilled, resulting in a crisp and acidic profile. Cold brew is made by steeping grounds in cold water for 12-24 hours, producing a much smoother, less acidic, and more concentrated flavor.
How should I sweeten my iced coffee recipe?
Granulated sugar does not dissolve well in cold liquids, so it is best to use simple syrup or flavored syrups. If you prefer natural sweeteners, honey or agave can be stirred into the coffee while it is still warm for better integration.
What are the best coffee beans for an iced coffee recipe?
Medium to dark roasts generally work best for iced coffee because they maintain their chocolatey and nutty notes even when diluted. African beans with citrusy notes are also popular for those who prefer a brighter, tea-like iced coffee.
Conclusion
Making the perfect glass of iced coffee at home is both simple and rewarding. By mastering the balance of strong coffee, ice, and your favorite sweeteners or milks, you can skip the cafe lines and save money. Whether you prefer a classic cold brew or a quick chilled pour-over, the possibilities for customization are endless. Now that you have the tools and techniques, it is time to start brewing your own refreshing, caffeinated creations today.