How To Make Starbucks Cold Brew
Craving that smooth, velvety caffeine kick without the coffee shop price tag? You have come to the right place. Learning how to make Starbucks cold brew at home is surprisingly simple and requires just two basic ingredients. Stick with me to discover the secrets to brewing barista-quality cold brew right in your own kitchen.
What makes Starbucks cold brew different?
The specific coffee bean blend
To replicate the Starbucks experience at home, you must start with the right foundation: a custom blend of Latin American and African beans. Unlike their standard espresso, the cold brew blend is specifically curated to withstand a long steeping process without becoming overly acidic or bitter.
The Latin American beans provide those familiar rich cocoa and nutty notes, while the African beans introduce a subtle citrus brightness that rounds out the flavor profile.
When making this at home, look for a medium-to-dark roast labeled as ‘Cold Brew Blend’ or mix a nutty Colombian bean with a fruity Ethiopian variety. This specific combination is what allows the coffee to taste naturally sweet even without added sugar.
By selecting a low-acidity specialty bean, you ensure that the finished concentrate remains smooth on the palate. Achieving this professional balance is the first essential step in mastering the Starbucks method and ensuring your homemade batch has that iconic, velvety mouthfeel found in every handcrafted cup.
The signature coarse grind size
The secret to the clarity and texture of Starbucks cold brew lies in the extra-coarse grind size, which should resemble sea salt or cracked peppercorns. Using a fine grind is a common mistake that leads to over-extraction, resulting in a cloudy, bitter liquid that is difficult to filter.
A burr grinder is highly recommended over a blade grinder to ensure uniformity, as consistent particle size allows for an even extraction of oils and flavors.
When you use a coarse grind, the water can circulate freely around the large surface area of the coffee particles, slowly drawing out the sweetness while leaving behind the harsh tannins found in the bean’s core. This mechanical precision prevents sediment from passing through your filter, ensuring a crisp finish.
If you are buying beans at a store, ask for a ‘French Press’ or ‘Cold Brew’ setting. Maintaining this specific texture is crucial for the long-duration immersion technique, as it dictates the final strength and purity of your concentrate before dilution.
Steeping time and temperature standards
Starbucks follows a strict 20-hour steeping window at room temperature to achieve its signature profile. While many home recipes suggest 12 hours, the extended duration is what develops the deep, chocolatey undertones characteristic of the brand.
You should submerge your coarse grounds in filtered, room-temperature water—not refrigerated water—to allow the chemical extraction to occur at a steady, natural pace. Steeping in the fridge slows down the process significantly and can result under-developed flavors.
Once the 20-hour mark is reached, you must immediately strain the concentrate to stop the extraction process and prevent the brew from turning woody. The resulting liquid is a potent concentrate that should be stored in the refrigerator and diluted with a 1:1 ratio of water and ice before serving.
By adhering to these professional timing standards and temperature controls, you successfully mimic the industrial brewing environment, ensuring your home-brewed coffee is just as bold, smooth, and refreshing as the version served by a professional barista.
Essential ingredients and equipment you need
Choosing the right coffee beans
To replicate the signature Starbucks flavor profile at home, you must prioritize 100% Arabica beans with a dark roast profile. Starbucks specifically uses a blend of Latin American and African beans that provides a smooth, chocolatey finish without excessive acidity.
When preparing your ingredients, ensure you select a coarse grind setting that resembles the texture of sea salt or breadcrumbs. Using a fine grind will result in over-extraction and a bitter, muddy sediment that ruins the clarity of the cold brew.
If you cannot find the official Starbucks Cold Brew Pitcher Packs, purchasing whole beans like the Guatemala Casi Cielo or the standard Espresso Roast and grinding them fresh will yield the most authentic results.
The coarse grind is essential because the long steeping time allows the water to gently extract the deep cocoa and toasted nut notes while leaving behind the harsh tannins found in finer particles. Consistency in your bean selection ensures a professional taste every single time you brew.
Filtered water vs. tap water
One of the most overlooked secrets to achieving that clean, crisp Starbucks taste is the quality of your water. Since cold brew is roughly 98% water, using triple-filtered water is non-negotiable for serious home baristas.
Tap water often contains minerals, chlorine, and fluoride that can chemically react with the coffee oils, leading to a metallic or ‘off’ aftertaste that masks the delicate nuances of the beans.
By using a high-quality water filter pitcher or bottled spring water, you provide a neutral canvas that allows the natural sweetness of the coffee to shine.
Furthermore, starting with cool or room temperature water rather than hot water is what defines the cold brew process; this prevents the release of acidic compounds that occur during traditional heat-based brewing.
Investing in a simple filtration system will significantly elevate your beverage from a basic caffeine fix to a premium cafe-quality experience. Always ensure your water is fresh and free from odors, as coffee grounds are highly porous and will absorb any surrounding scents during the long extraction period.
Best containers for home brewing
Selecting the proper vessel is critical for maintaining the integrity of your concentrate during the sixteen to twenty-four hour steeping process. A large glass mason jar or a specialized cold brew coffee maker with a built-in fine mesh filter are the most effective tools for the job.
Glass is preferred over plastic because it is non-reactive and does not retain odors from previous batches, ensuring your coffee tastes fresh. If you choose a dedicated brewer, look for one with an airtight seal to prevent the coffee from oxidizing or absorbing refrigerator smells while it rests.
For those using the traditional jar method, you will also need a fine-mesh strainer and paper coffee filters or a cheesecloth to double-filter the concentrate once the brewing time is complete.
This dual-filtration step is the key to achieving that signature silken mouthfeel and sediment-free clarity found in professional Starbucks batches. Having a dedicated, clean container allows you to store your finished concentrate for up to two weeks, providing a convenient and delicious base for your daily iced coffee creations.
How to grind coffee for the perfect concentrate

Why coarse grind matters
To replicate the smooth, chocolatey profile of Starbucks cold brew at home, you must prioritize a coarse, heavy grind that resembles sea salt or cracked peppercorns. Because cold brew involves an extended steeping time—typically between 12 and 24 hours—the water has ample opportunity to extract flavors from the beans.
If you use a fine or medium grind intended for drip coffee, the increased surface area leads to over-extraction, resulting in a bitter, acidic concentrate that lacks the signature sweetness. Coarse grounds ensure that the water extracts the desirable oils and sugars slowly, creating a balanced and mellow finish.
Furthermore, larger particles are much easier to filter out once the brewing process is complete. Using fine grounds often leads to a cloudy, silty texture in your final cup, as small particles bypass even the best mesh filters.
By keeping your grind size large and uniform, you guarantee a clean, crisp concentrate that serves as the perfect base for your favorite milk and syrups.
Setting your burr grinder
Achieving the perfect Starbucks-style concentrate requires the right equipment, specifically a conical or flat burr grinder rather than a blade grinder. Burr grinders provide the necessary uniformity to ensure every coffee particle extracts at the same rate.
To find the sweet spot, navigate to the highest numerical setting on your device, usually labeled for French Press or Cold Brew. If your grinder uses a notched system, aim for the very last click on the coarse end of the spectrum.
Start by grinding a small handful of beans to test the output before committing your entire bag. If the result looks like fine sand, you need to adjust the burrs wider to achieve that chunky, pebbly appearance.
High-quality grinders prevent the production of ‘fines’—microscopic dust particles that cause bitterness—allowing the deep, nutty notes of a dark roast bean to shine through without any harshness. Consistency at this stage is the most critical factor in mimicking the professional quality found in a Starbucks cafe environment.
How to check for consistency
Before you submerge your coffee in filtered water, take a moment to visually inspect and physically feel the texture of your grounds. A successful grind for cold brew should feel distinctly gritty and rough between your fingers, almost like coarse cornmeal or Kosher salt.
If you notice a significant amount of powder at the bottom of your grinder’s catch bin, your settings may still be too fine, or your burrs might need cleaning.
Another professional trick is to sift the grounds briefly if you see too much variation in size; this ensures that no tiny particles over-extract and ruin the batch.
Remember that the goal is a slow, gentle infusion, so the grounds should look like broken bits of bean rather than a unified powder. Once you have confirmed that the size is uniform and sufficiently large, you are ready to combine them with cold, filtered water.
This attention to detail during the grinding phase is what separates a mediocre homemade drink from a bold, velvety cold brew concentrate that rivals the Starbucks gold standard.
Step-by-step Starbucks cold brew recipe
Measuring your coffee-to-water ratio
To achieve that signature smooth flavor, start by selecting a high-quality, dark-roasted bean like the Starbucks Cold Brew Pitcher Packs or a coarse-ground African and Latin American blend. The secret to a professional-grade concentrate is maintaining a precise coffee-to-water ratio of 1:4.
For a standard batch, measure out exactly one cup of coarsely ground coffee for every four cups of filtered, room-temperature water. Using filtered water is essential because it removes impurities that can mask the delicate chocolate and citrus notes of the beans.
Place your grounds into a large glass jar or a dedicated cold brew maker, then slowly pour the water over them, ensuring every grain is fully saturated. Avoid stirring too vigorously, as this can lead to over-extraction and unwanted bitterness.
By perfecting this initial measurement, you create a balanced concentrate that serves as the ideal foundation for adding milk, syrup, or ice without diluting the rich caffeine profile or the distinctively velvety texture associated with the brand’s cafe experience.
The 20-hour steeping process
Unlike traditional iced coffee which is brewed hot and cooled, cold brew relies entirely on time to extract flavor without the acidity. For the authentic Starbucks taste, you must allow your mixture to steep for exactly 20 hours at room temperature.
This slow extraction process pulls out the deep, sweet flavors of the coffee while leaving behind the harsh oils and acids that heat typically releases. Keep your container in a cool, dark place away from direct sunlight to maintain a consistent temperature throughout the cycle.
If you prefer a slightly lighter body, you can shorten the time to 12 hours, but the full 20-hour window is what produces that bold, syrupy consistency fans love.
Resist the urge to refrigerate the brew while it steeps, as the cold temperature slows down the extraction too much, resulting in a weak and underdeveloped flavor profile.
Once the timer hits twenty hours, you will have a potent coffee concentrate that is ready for the final filtration stage, ensuring a mellow finish every single time.
How to filter the concentrate properly
The final step to achieving a professional-grade beverage is ensuring your liquid is completely free of sediment. Begin by preparing a fine-mesh sieve lined with a paper coffee filter or a clean cheesecloth over a clean carafe.
Slowly pour the steeped mixture through the filter, allowing gravity to do the work; never squeeze the grounds or the filter, as this forces fine particulates and bitter tannins into your drink, ruining the clarity and taste.
Once the filtration is complete, you are left with a pure concentrate that can be stored in the refrigerator for up to two weeks.
When you are ready to serve, remember that this is a concentrated liquid, so you should dilute it using a 1:1 ratio of coffee to cold water or milk.
Pour your custom blend over fresh ice and add a splash of vanilla syrup or sweet cream to replicate the iconic Starbucks menu items. This careful filtration ensures a crisp, clean mouthfeel that highlights the natural sweetness of the beans while providing a refreshing, high-caffeine kick.
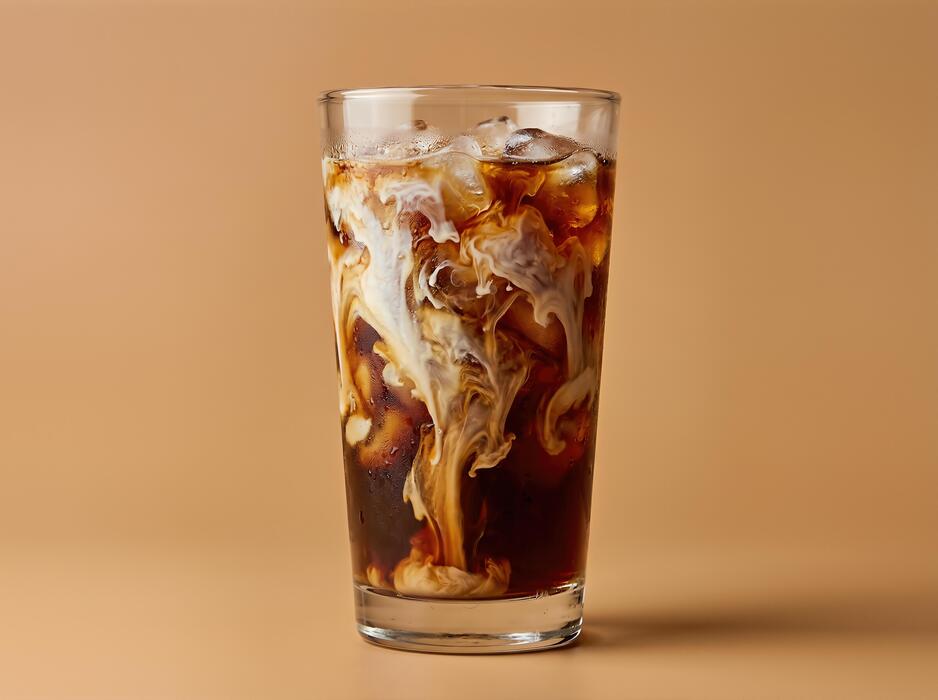
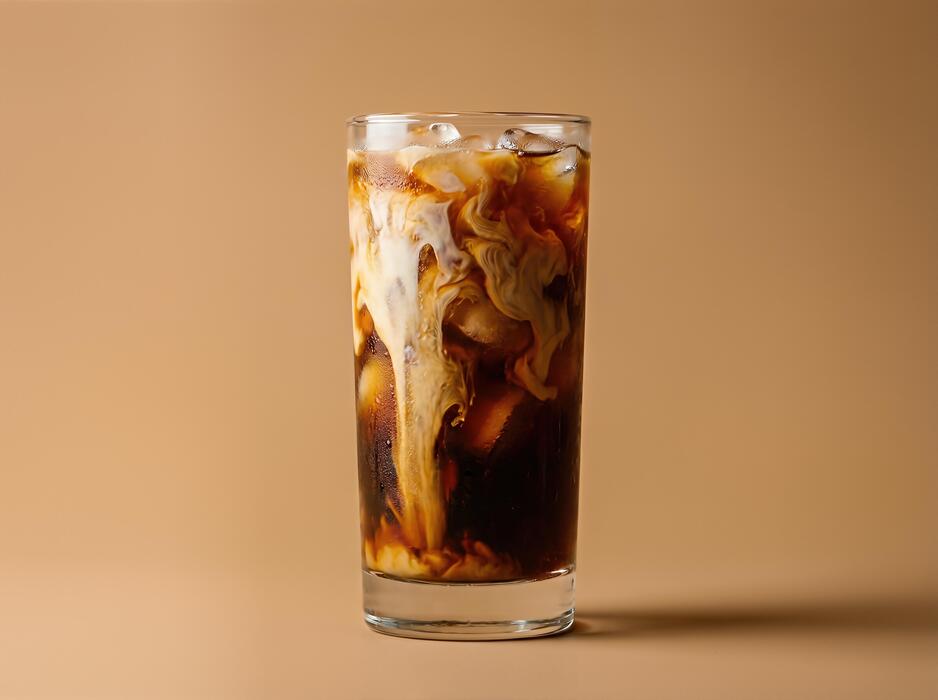
How to mix and serve your cold brew
Diluting the concentrate with water
Once your cold brew concentrate has finished steeping for the full duration, it is essential to dilute it properly to match the signature Starbucks profile.
The standard ratio for a balanced cup is one part concentrate to one part filtered water, though you can adjust this based on your personal preference for strength.
If you prefer a bolder, more robust caffeine kick, try a ratio of two parts coffee to one part water to mimic their ‘black’ serving style.
Using cold, filtered water is critical here because tap water can introduce mineral flavors that clash with the subtle chocolate and citrus notes of the beans. Slowly pour the water into your pitcher of concentrate and stir gently with a long spoon to ensure the mixture is completely homogeneous.
This step is the key to transforming a heavy, syrupy base into a smooth, drinkable beverage that feels light on the palate while maintaining that deep, low-acid flavor profile that fans love.
Adding ice without watering it down
To serve your cold brew exactly like a barista, you must manage the temperature without sacrificing the integrity of the brew.
Instead of using standard tap water ice cubes which melt quickly and dilute the flavor, consider making coffee ice cubes by freezing a small portion of your prepared brew in a tray. This ensures that as the ice melts, it only adds more coffee flavor to your glass.
When ready to serve, fill a tall glass approximately three-quarters full with large ice chunks, then pour your diluted mixture over the top. The larger the ice cubes, the slower they melt, which preserves the consistent strength and mouthfeel of the drink from the first sip to the last.
If you are adding milk or cream, leave about an inch of space at the top. This technique allows the cold brew to remain crisp and refreshing even on a hot day, providing a premium cafe-quality experience right in your own kitchen.
Storage tips to keep it fresh
Proper storage is the final step in mastering the Starbucks method at home. You should always store your cold brew concentrate in an airtight glass container, such as a mason jar or a specialized carafe, to prevent it from absorbing odors from other foods in your refrigerator.
Keep the concentrate in its undiluted form for the best longevity; it will typically stay fresh and flavorful for up to two weeks when kept chilled.
Once you have diluted the coffee with water or added milk, the shelf life drops significantly, so it is best to only mix what you plan to drink within 24 hours. If you notice a sour or overly acidic smell, it is time to brew a fresh batch.
By keeping the lid tightly sealed and maintaining a consistent temperature in the main body of the fridge rather than the door, you protect the delicate aromatic compounds and ensure every glass tastes as vibrant as the day it was steeped.
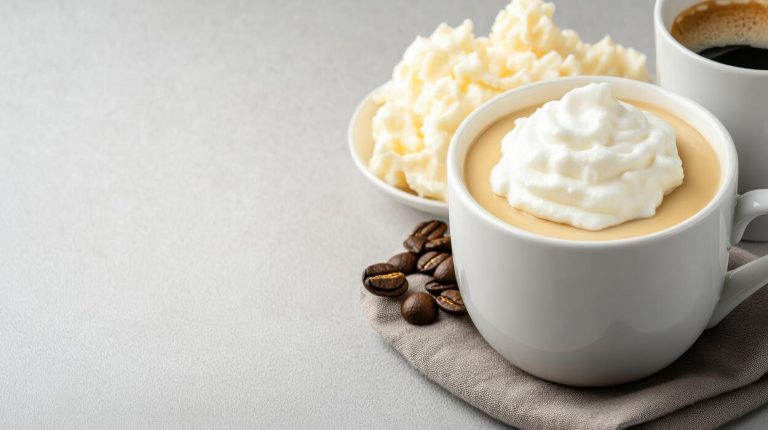
How to make Starbucks sweet cream and foam at home
Vanilla Sweet Cream recipe
To replicate the signature Starbucks flavor profile for your cold brew, you must master the specific ratio of dairy and sweetener. Begin by combining heavy whipping cream, 2% milk, and vanilla syrup in a glass pitcher.
The exact proportions are critical: use one part vanilla syrup, two parts 2% milk, and three parts heavy cream to achieve that velvety, pourable consistency that cascades beautifully into your coffee. Stir the mixture gently rather than whisking to avoid introducing too many air bubbles at this stage.
This liquid base serves as the foundation for both the cream pour and the frothed foam topper. For the best results, ensure all ingredients are thoroughly chilled before mixing, as cold fats emulsify more effectively with the sugar.
You can store this homemade sweet cream in a sealed mason jar in the refrigerator for up to five days. Having this pre-mixed batch ready allows you to elevate your morning cold brew instantly without measuring individual components every single time you need a caffeine fix.
How to froth cold foam
Transforming your prepared sweet cream into a thick, cloud-like cold foam requires the right equipment and technique. Pour about half a cup of your vanilla sweet cream into a tall glass or a specialized frothing pitcher.
Use a handheld milk frother submerged just below the surface, pulsing it for approximately thirty seconds until the liquid doubles in volume and reaches a stiff, aerated consistency.
If you do not own a handheld wand, a French press works as an excellent alternative; simply pump the plunger up and down rapidly for twenty seconds to incorporate air.
The goal is to create a microfoam that is sturdy enough to sit on top of your cold brew without immediately dissolving into the coffee. For a professional finish, pour the foam slowly over the back of a spoon onto your iced drink.
This method ensures a distinct layer between the dark coffee and the white foam, mimicking the aesthetic and textural experience of a premium handcrafted beverage from your favorite local coffee shop terrace.
Popular syrup combinations
Once you have mastered the basic sweet cream technique, you can customize your cold brew experience with various flavor infusions. A fan favorite is the Salted Caramel Cold Foam, which involves adding a pinch of sea salt and a tablespoon of caramel sauce to the cream before frothing.
This creates a sophisticated sweet-and-salty balance that complements the chocolatey notes of a dark roast cold brew. For a seasonal twist, try incorporating pumpkin spice sauce or cinnamon dolce syrup into the mixture to replicate popular autumn menu items.
If you prefer something more floral, a touch of lavender or honey syrup can provide a refreshing profile that pairs exceptionally well with lighter, citrusy coffee beans.
Always remember to adjust the sweetness levels based on your personal preference, as the syrup choice significantly impacts the final viscosity of the foam.
Experimenting with these combinations allows you to enjoy a diverse range of gourmet coffee shop flavors from the comfort of your kitchen while saving money and controlling the quality of the ingredients used.
Tips for better tasting home brew
How to avoid bitter flavors
To replicate the smooth profile of Starbucks cold brew, you must prioritize a coarse grind size and controlled extraction times. Using a fine grind will lead to over-extraction, resulting in a harsh, astringent taste that ruins the mellow chocolate notes you are aiming for.
Aim for a texture similar to sea salt or breadcrumbs to ensure water flows around the particles rather than stripping away bitter tannins. Additionally, pay close attention to your water temperature; while it is called cold brew, using filtered, room-temperature water is ideal for the initial steeping phase.
Avoid leaving the grounds in the water for more than twenty-four hours, as the extended contact time causes the organic compounds to break down into unpleasant flavors.
By maintaining a consistent 1:4 coffee-to-water ratio and straining the concentrate through a high-quality paper filter, you will achieve that signature clean finish that makes professional cold brew so refreshing and naturally sweet without adding sugar.
Cleaning your equipment correctly
One of the most overlooked steps in making cafe-quality coffee at home is the rigorous maintenance of your brewing vessels. Coffee beans contain natural oils that can quickly become rancid if left to accumulate on the walls of your pitcher or French press.
To prevent these old residues from tainting your fresh batch, you should wash all equipment with unscented, food-grade detergent after every single use. Pay special attention to mesh filters and rubber gaskets where fine silts can hide and develop mold or off-flavors over time.
For a deeper clean, occasionally soak your glass carafes in a mixture of white vinegar and warm water to dissolve stubborn mineral scales and oily buildup. Ensuring your equipment is completely dry before storage is also vital to prevent bacterial growth.
By keeping a pristine brewing environment, you ensure that the only flavors present in your cup are the high-quality notes of the beans themselves, rather than the stale remnants of last week’s failed experiment.
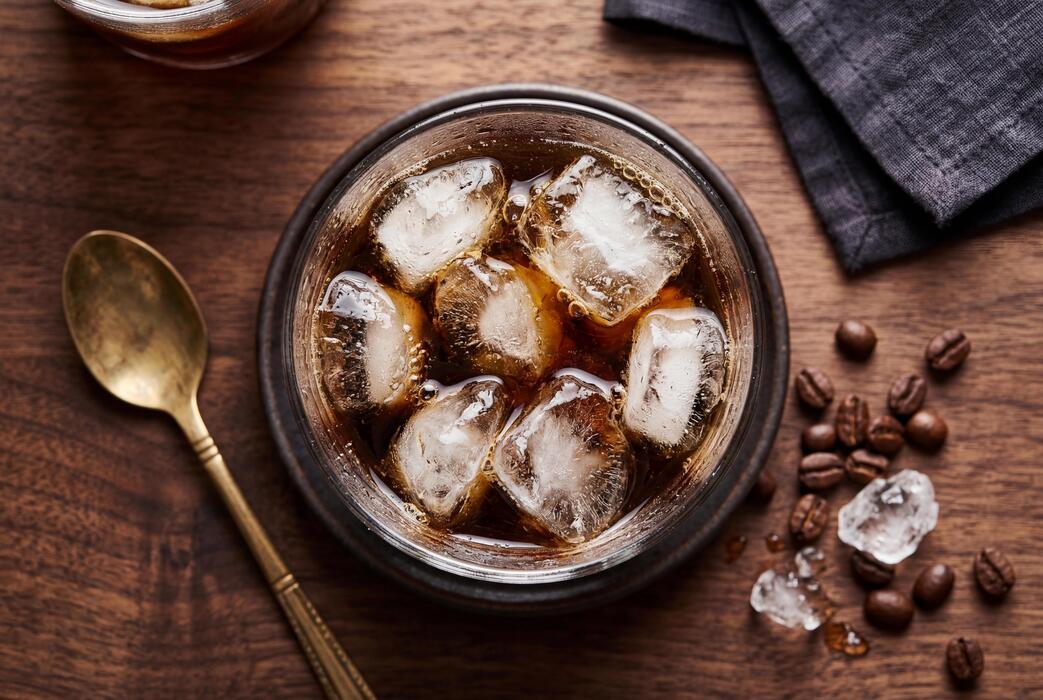
Using coffee ice cubes
A common mistake that ruins the home-brewed Starbucks experience is allowing standard ice cubes to melt and dilute the carefully crafted concentrate.
To maintain the bold strength and integrity of your drink from the first sip to the last, you should freeze a portion of your cold brew into specialized coffee ice cubes. Simply pour your extra concentrate into a clean silicone tray and let it set overnight.
As these cubes melt in your glass, they release additional coffee flavor instead of plain water, keeping your beverage consistently rich and flavorful. This technique is particularly helpful if you enjoy drinking your coffee slowly over a long period or in warmer climates where ice melts rapidly.
For an extra touch of indulgence, you can even freeze milk or vanilla-infused coffee into cubes to create a self-creaming effect as the drink sits. Utilizing this simple hack ensures your homemade cold brew remains a premium, undiluted treat that rivals any professional barista’s preparation while saving you money.
Frequently Asked Questions
What coffee beans does Starbucks use for cold brew?
Starbucks uses a specific ‘Cold Brew Blend’ which features a combination of dense beans from Latin America and Africa. To replicate the flavor at home, use a medium-to-dark roast with notes of chocolate and citrus, such as Starbucks Guatemala Casi Cielo or Kenya beans.
What is the correct coffee-to-water ratio for Starbucks cold brew?
To make a concentrate similar to the Starbucks recipe, use a 1:4 ratio of coffee to water (e.g., 1 cup of grounds to 4 cups of filtered water). If you prefer a ready-to-drink version that isn’t a concentrate, a 1:8 ratio is recommended.
How long should I steep the coffee to match the Starbucks taste?
Starbucks steeps its cold brew for exactly 20 hours at room temperature. For home brewing, you should aim for a range of 12 to 24 hours depending on your flavor preference; longer steeping times generally result in a bolder, more caffeinated brew.
Do I need to use a specific grind size for cold brew?
Yes, you must use a very coarse grind, similar to the texture of sea salt or breadcrumbs. Using a fine grind will result in an over-extracted, bitter flavor and will make it very difficult to filter the sediment out of the final liquid.
How do I make the Starbucks Vanilla Sweet Cream at home?
The signature topper is made by whisking together heavy cream, 2% milk, and vanilla syrup. To get the ‘cold foam’ consistency, use a handheld milk frother or a blender to aerate the mixture until it becomes thick and velvety.
Should I brew my cold brew in the fridge or on the counter?
While both work, brewing at room temperature (on the counter) extracts flavor more efficiently and is the method Starbucks uses. If you choose to brew in the refrigerator, increase the steeping time to 24 hours to compensate for the slower extraction.
How long does homemade Starbucks-style cold brew stay fresh?
If stored in an airtight container in the refrigerator, cold brew concentrate will stay fresh for up to 7 to 10 days. If you have already diluted the coffee with water or milk, it is best consumed within 2 to 3 days.
Conclusion
Mastering the art of Starbucks cold brew at home is both rewarding and cost-effective. By selecting high-quality beans, using a coarse grind, and allowing the coffee to steep for the full twenty hours, you can replicate that signature smooth, bold flavor. Don’t be afraid to experiment with your favorite syrups and creams to customize your perfect cup. Now that you have the secrets, it is time to start brewing and enjoy your handcrafted caffeine fix.