How To Make Cold Brew Coffee Maker
Making your own cold brew coffee maker is surprisingly simple and saves you a fortune at the cafe. You do not need expensive gadgets to enjoy that smooth, low-acid buzz at home. This guide shows you exactly how to transform basic kitchen staples like mason jars and mesh filters into a high-quality brewing system. We will walk you through the quick assembly process and the best ratios to ensure your homemade setup delivers barista-level results every single time.
Why you should make your own cold brew coffee maker
Save money on expensive store-bought equipment
Building your own setup allows you to bypass high retail markups typically found on branded cold brew systems. Commercial brewers often cost upwards of fifty dollars, yet they rely on the same fundamental principle of immersion that you can replicate for nearly zero cost.
By choosing a DIY approach, you can allocate your budget toward premium coffee beans instead of plastic hardware, significantly improving the quality of your daily cup. Making your own maker ensures you are not paying for unnecessary aesthetics or proprietary filters that force you into a specific brand ecosystem.
This cost-effective strategy is ideal for coffee enthusiasts who want professional results without the financial burden of specialized gadgets. When you understand that cold brewing is simply a time-based extraction process, you realize that expensive equipment is optional for achieving that smooth, low-acid flavor profile.
Investing in a simple homemade solution provides the same delicious concentrate while keeping your hard-earned money in your pocket for better ingredients.
Customize the batch size for your needs
One of the greatest advantages of creating your own cold brew maker is the ability to scale your production up or down based on your current lifestyle.
Store-bought carafes are usually limited to a single standard size, which can be frustrating if you are hosting a large brunch or if you only want a single glass for yourself. By using your own vessels, you can adjust the volume to match your consumption patterns perfectly.
For those with limited refrigerator space, a small glass jar works wonders, while a large food-grade bucket can produce enough concentrate to last an entire week for a busy household.
This flexibility allows you to experiment with different coffee-to-water ratios without being restricted by the physical dimensions of a pre-manufactured filter basket.
Whether you need a tiny concentrated shot or a massive gallon of ready-to-drink brew, a DIY maker gives you the ultimate control over quantity and strength that generic commercial products simply cannot provide to the average home user.
Use common household items you already own
You likely already have everything required to start brewing today, meaning there is no need to wait for shipping or visit a specialty store. Items such as Mason jars, large pitchers, or even a simple French press can be repurposed into a highly effective cold brew system.
To filter the grounds, everyday kitchen staples like fine-mesh strainers, cheesecloth, or standard paper coffee filters work exceptionally well. This approach encourages a sustainable and resourceful kitchen environment by utilizing what is already in your cabinets.
Because the process is so simple, you can start your first batch immediately using a clean glass container and a basic filtering method. Embracing a DIY maker means you avoid cluttering your counters with single-use appliances that take up valuable space.
Using household items also makes the cleanup process straightforward, as most glass jars are dishwasher safe and easy to sanitize. By leveraging existing kitchen tools, you transform ordinary objects into a high-performance coffee station that delivers cafe-quality results with zero additional waste or clutter.
Essential supplies for a DIY cold brew setup

Choosing the right glass or plastic container
To build your own cold brew maker, the primary vessel is the most critical component for success. You should prioritize using a large glass mason jar or a BPA-free plastic pitcher that can hold at least one liter of water.
Glass is generally the superior choice because it is non-porous and will not absorb old coffee oils or impart chemical flavors into your brew over time.
Ensure the container has a wide mouth to make the process of adding coarse grounds and stirring much easier, as narrow openings can lead to a messy preparation.
A tight-sealing lid is also necessary to prevent your coffee from absorbing stray odors from the refrigerator during the long 12 to 24-hour steeping process. If you are repurposing a container, make sure it is thoroughly sanitized to avoid any bacterial growth.
Selecting a vessel with a volume capacity slightly larger than your intended yield allows for the necessary displacement when you add the bulky coffee grounds to the water.
Filter options: cheesecloth vs. fine mesh
Filtering is the stage where you transform a muddy mixture into a crisp, refreshing concentrate. You have two primary DIY options: cheesecloth or a fine-mesh sieve.
Using a double layer of cheesecloth or a nut milk bag provides a very clean cup because the fabric fibers trap even the smallest sediment and silt. However, if you prefer a fuller body and a simpler cleanup, a stainless steel fine-mesh strainer is a durable and reusable alternative.
For the best results, many DIY enthusiasts choose a hybrid method: pouring the mixture through a mesh strainer first to catch large grounds, followed by a secondary pass through a paper coffee filter to achieve professional-grade clarity.
This dual-filtration process ensures that your cold brew remains smooth on the palate and free of the bitterness associated with over-extracted fines.
Regardless of the method chosen, avoid squeezing the filter too hard, as this can force unwanted tannins into your final drink and cloud the liquid, ruining the delicate flavor profile.
The importance of a digital kitchen scale
Precision is the secret ingredient that separates mediocre coffee from a cafe-quality beverage. While it is tempting to use measuring cups or spoons, a digital kitchen scale is the only way to ensure a consistent 1:4 or 1:5 coffee-to-water ratio.
Coffee beans vary significantly in density based on their origin and roast level, meaning a cup of dark roast will weigh much less than a cup of light roast. By measuring your ingredients in grams, you can replicate your favorite recipe every single time without guesswork.
Place your vessel on the scale, tare it to zero, and add your coarsely ground beans followed by the filtered water to maintain perfect accuracy.
This level of control allows you to adjust the strength of your concentrate with scientific precision, ensuring that your DIY setup produces a predictable and delicious result.
Investing in a basic scale eliminates the frustration of inconsistent batches and helps you track exactly how much water the grounds absorb during the long immersion period for better yield management.
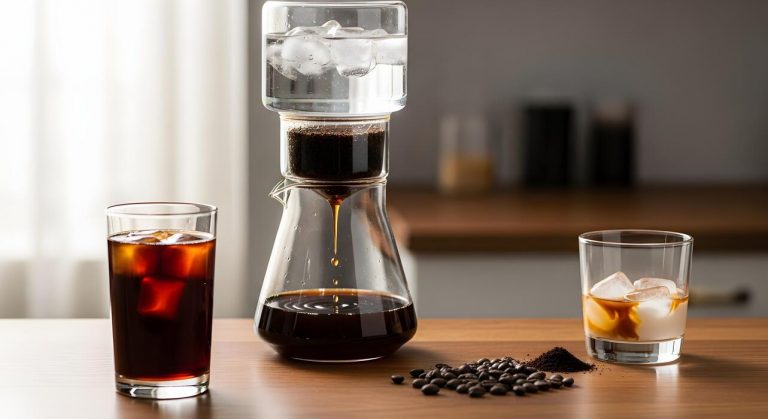
How to build a mason jar cold brew maker

Step-by-step assembly instructions
Building your own mason jar cold brew maker begins with selecting a wide-mouth quart or half-gallon glass jar, which provides ample space for water circulation and easy cleaning. To start the assembly, ensure the jar is thoroughly sanitized to prevent any off-flavors from developing during the long steeping process.
You will need a high-quality stainless steel mesh filter specifically designed for mason jars or a reusable nut milk bag. Place the filter insert directly into the mouth of the jar, ensuring it sits flush against the rim.
Measure out your coarsely ground coffee beans, using a standard ratio of one part coffee to four parts filtered water for a concentrated brew. Carefully pour the dry grounds into the center of the filter, being mindful not to spill any into the main reservoir of the jar.
This foundational setup allows you to create a professional-grade extraction system using simple household items, saving you significant money while providing a customizable brewing experience tailored to your specific taste preferences.
Fitting the filter system
The efficiency of your cold brew maker depends entirely on how well you manage the filtration process to eliminate sediment. When fitting the filter system, you must choose between an internal metal cylinder or an external straining method.
If using an internal stainless steel infuser, slide it into the jar and check that the silicone gasket is properly positioned to create a tight seal against the glass. This prevents fine particulates from escaping into the liquid during the twelve to twenty-four hour soak.
If you prefer a cloth-based system, drape a fine-mesh cheesecloth or nylon bag over the rim and secure it with a rubber band before adding your grounds.
It is vital to ensure the filter reaches near the bottom of the jar so that all coffee grounds remain fully submerged as the water level fluctuates.
A properly fitted filtration unit guarantees a smooth, low-acid cup of coffee that remains crisp and clean, highlighting the subtle chocolate or nutty notes of your chosen beans without any gritty residue.
Securing the lid for a mess-free steep
Once your filter and grounds are in place and you have poured cold, filtered water over the coffee, the final step is ensuring an airtight environment. Place the flat metal lid or a specialized pouring spout lid over the filter rim, making sure it sits level to avoid leaks.
Screw the outer metal band down firmly, but do not over-tighten, as the cold temperature in the refrigerator can cause the glass to contract and make the lid difficult to remove later.
A secure, airtight seal is essential because it prevents the coffee from absorbing unwanted odors from other foods in your fridge, such as onions or leftovers, which can ruin the delicate profile of the brew.
During the steeping phase, you may want to gently agitate the jar once or twice to ensure full saturation; a leak-proof lid assembly makes this possible without creating a mess on your countertops.
After the timer expires, simply unscrew the lid, lift out the filter, and replace the lid to store your fresh concentrate for up to two weeks.
How to make a large-batch bucket system
Selecting food-grade plastic buckets
To build a high-capacity brewing station, you must prioritize safety by selecting food-grade plastic buckets labeled with the HDPE #2 symbol. Standard utility buckets often contain harmful chemicals or recycled materials that can leach into acidic liquids like coffee over long steeping periods.
For a functional large-batch system, you will need two five-gallon buckets: one to act as the primary brewing vessel and another to serve as a secondary filtration or storage container.
Ensure the buckets come with airtight lids featuring rubber gaskets to prevent oxidation and keep contaminants out during the 12 to 24-hour brewing cycle. Before starting your first batch, thoroughly sanitize the interior surfaces with a fragrance-free, food-safe cleanser to remove any manufacturing residue.
Choosing white or translucent plastic is highly recommended as it allows you to monitor the sediment levels and coffee clarity without constantly opening the lid, which helps maintain a stable temperature and a cleaner final concentrate for your large-scale production.
Installing a spigot for easy pouring
A critical component of a professional-grade bucket system is installing a high-quality spigot at the base of the primary vessel. To begin, measure approximately two inches from the bottom of the bucket to ensure the opening sits above the natural sediment line.
Use a step drill bit to create a clean hole that matches the diameter of your food-grade bulkhead fitting. It is essential to use silicone O-rings on both the interior and exterior of the bucket wall to create a watertight seal that prevents messy leaks during the long steeping process.
Once the spigot is tightened, perform a leak test with plain water before adding your expensive coffee grounds. This modification allows you to dispense finished cold brew concentrate directly into bottles or kegs without the need for dangerous heavy lifting or awkward pouring.
By utilizing gravity-fed dispensing, you significantly reduce the risk of stirring up fine particulates, resulting in a much smoother and more professional beverage that is ready for immediate consumption.
Managing heavy coffee grounds in bulk
When brewing five gallons at once, the weight of saturated coffee grounds can exceed thirty pounds, making manual filtration difficult. To solve this, you should utilize extra-large commercial filter bags made of fine mesh or compostable paper specifically designed for cold brew systems.
Place the filter bag inside the bucket before adding your coarse-ground beans and water, ensuring the top of the bag is securely tied or clipped to the rim. This method allows for clean extraction without clogging the spigot or leaving excessive sludge at the bottom of the vessel.
For even more efficient drainage, some builders place a stainless steel false bottom or a smaller perforated bucket inside the main container to create a dedicated filtration zone.
Once the steeping time is complete, use a pulley system or a sturdy hook to suspend the heavy bag above the bucket, allowing every drop of concentrate to drain naturally.
This approach minimizes waste and ensures that cleaning the system is a simple matter of disposing of the contained grounds and rinsing the bucket.
Best coffee beans and grind size for your homemade maker

Why coarse grinds are necessary
When learning how to make cold brew coffee maker recipes work, the most critical factor is using a coarse, sea-salt-like grind size. Unlike traditional hot brewing methods that use pressure or high temperatures, cold brew relies on a slow immersion process over twelve to twenty-four hours.
If you use a fine or medium grind, the water will over-extract the oils and acids, resulting in a bitter, muddy flavor profile that ruins the smooth experience.
Furthermore, fine particles are incredibly difficult to filter out of the finished concentrate, often leading to a gritty sediment at the bottom of your carafe. By sticking to a consistent coarse setting on your burr grinder, you ensure that the water flows evenly around the large coffee fragments.
This allows for a gentle extraction of the sweet, chocolatey notes while keeping the acidity levels significantly lower than standard drip coffee. Proper filtration becomes a breeze when the grounds are large enough to be trapped by mesh or paper filters.
The best roast profiles for cold extraction
Selecting the right bean is essential for achieving that signature velvety texture. Most experts recommend using medium to dark roast beans for cold brew applications.
Because the cold extraction process tends to highlight earthy, nutty, and cocoa-driven flavors, darker roasts provide a robust backbone that stands up well to dilution with milk or ice.
Light roasts can sometimes yield a sour or overly floral result when brewed cold, which may not appeal to everyone seeking a traditional concentrate. However, if you prefer a brighter, more tea-like consistency, a high-quality medium roast from South America or Africa can offer a complex fruitiness and balanced sweetness.
Avoid using extremely oily espresso roasts, as these can leave an unpleasant film on the surface of your cold brew. Ultimately, the best beans are high-quality Arabica varieties that have been roasted specifically to emphasize low-acid characteristics.
Experimenting with different origins will help you find the perfect flavor profile for your specific homemade maker setup and personal palate.
Freshness tips for better flavor
To elevate your homemade cold brew, you must prioritize the freshness of your coffee beans. Even though cold brew is a more forgiving method than a pour-over, stale beans will still result in a flat and uninspired beverage.
Always aim to buy whole beans with a recent roast date and grind them immediately before you begin the steeping process. This preserves the volatile aromatics that provide the drink with its deep scent and nuanced taste.
Additionally, the quality of your water is just as important as the beans themselves; using filtered water instead of tap water prevents chlorine or mineral buildup from masking the natural profile of the coffee. Once your brew is complete, store the concentrate in an airtight glass container in the refrigerator.
Freshly made concentrate can stay delicious for up to two weeks, but it is best consumed within the first seven days for maximum vibrancy. By focusing on fresh ingredients and proper storage, you guarantee a coffeehouse-quality result every time you use your maker.
Step-by-step guide to brewing your first batch
The ideal coffee-to-water ratio
Finding the perfect balance between coffee grounds and water is the most critical step in mastering your cold brew coffee maker.
For a standard concentrate, most professionals recommend a 1:4 or 1:5 ratio, which translates to one cup of coarsely ground beans for every four to five cups of filtered water. If you prefer a lighter, ready-to-drink beverage straight from the brewer, aim for a 1:8 or 1:10 ratio instead.
Using high-quality, freshly roasted beans is essential, as the long extraction process highlights the subtle flavor profiles of the bean. Ensure your coffee is ground to a consistent coarse texture, resembling sea salt or breadcrumbs, to prevent over-extraction and bitterness.
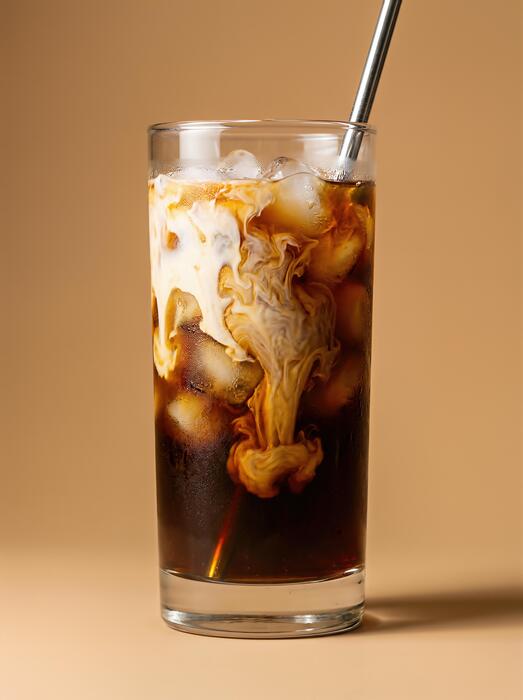
When adding the water, pour it slowly over the grounds in a circular motion to ensure every particle is fully saturated. This deliberate approach ensures an even extraction, resulting in a smooth, chocolatey, and low-acid cup that serves as the perfect foundation for your morning caffeine routine.
How long to steep at room temperature vs. fridge
The duration of your steep depends heavily on the ambient temperature of your brewing environment. If you choose to leave your cold brew coffee maker on the kitchen counter at room temperature, the extraction happens faster, typically requiring 12 to 15 hours.
This method often results in a bolder, more robust flavor profile. However, if you prefer a cleaner and brighter taste, steeping in the refrigerator is the better option.
Because the cold temperature slows down the chemical reaction, you will need to let the mixture sit for 18 to 24 hours to achieve full extraction. It is important to avoid over-steeping beyond the 24-hour mark, as this can introduce unpleasant woody or bitter notes into the concentrate.
Once the time is up, remove the grounds promptly to stop the brewing process. Experimenting with these two environments allows you to fine-tune the strength and acidity levels to match your personal palate, ensuring a customized coffee experience every single time.
The best way to filter out sediment
Achieving a crystal-clear cup without gritty residue is the hallmark of a successful cold brew batch. Most cold brew coffee makers come with a built-in stainless steel mesh filter, but for the smoothest mouthfeel, a secondary filtration step is highly recommended.
You can pour the finished concentrate through a paper coffee filter or a fine-mesh sieve lined with cheesecloth to catch the smallest fines. This extra layer of filtration removes the micro-sediment and oils that can lead to a cloudy appearance or a muddy taste.
If your brewer uses a felt filter, ensure it is thoroughly rinsed before and after use to maintain its efficacy. For those using a French press style maker, depress the plunger slowly to avoid agitating the silt at the bottom.
By taking the time to properly filter your brew, you ensure a long shelf life for your concentrate, which can be stored in an airtight glass jar in the fridge for up to two weeks without losing its refreshing and crisp quality.
Tips for cleaning and maintaining your DIY equipment
Sanitizing your containers properly
To ensure your homemade cold brew remains fresh and free from off-flavors, you must prioritize thorough sanitization of your glass jars or plastic pitchers. Since cold brewing involves a long steeping process at room temperature or in the fridge, any lingering bacteria can ruin the entire batch.
Start by washing all components with warm, soapy water to remove visible coffee oils and residue. For a deeper clean, especially if you are using recycled mason jars, consider a quick soak in a mixture of white vinegar and water or a food-safe brewing sanitizer.
Pay close attention to the rims and seals of your containers, as these areas often trap old grounds or moisture that can lead to mold growth.
Always rinse thoroughly with filtered water to ensure no soapy scent remains, and let everything air dry completely on a clean rack before starting your next brew cycle. Maintaining a sterile environment is the secret to professional-tasting DIY coffee.
How to reuse and wash cloth filters
If your DIY setup utilizes a reusable nut milk bag or a cheesecloth, proper maintenance is essential for longevity and flavor purity. Immediately after straining your coffee, discard the spent grounds and rinse the filter under high-pressure cold water to dislodge fine particles trapped in the fibers.
Avoid using harsh detergents or scented soaps, as the fabric will absorb chemical odors that will inevitably leach into your next beverage. Instead, boil the cloth filter in plain water for five to ten minutes once a week to dissolve stubborn coffee oils and kill any lingering microbes.
If the cloth begins to look stained, a soak in a solution of baking soda and hot water can help lift the discoloration without damaging the material. Once cleaned, it is vital to hang the filter to dry in a well-ventilated area.
Never store a damp cloth in a closed cupboard, as this creates a breeding ground for mildew and sour smells.
Storing your maker when not in use
When you are taking a break from caffeine production, how you store your DIY equipment determines its lifespan and readiness for the next use. Ensure every component, from the primary steeping vessel to the stirring spoon, is one hundred percent dry before putting them away.
Stacking damp containers can create a vacuum seal that traps moisture, leading to stale odors or oxidation of plastic parts. If you use a setup with rubber gaskets or silicone rings, store them loosely rather than tightly sealed to prevent the material from warping or becoming brittle over time.
It is often best to store your glass carafes with the lids removed or slightly ajar to allow for constant airflow. Keep your equipment in a cool, dark pantry away from direct sunlight, which can degrade certain materials.
By following these storage steps, you ensure that your equipment remains in peak condition, preventing the need for frequent replacements and ensuring your next batch of cold brew tastes as crisp as the first.
Frequently Asked Questions
What basic supplies do I need to make a DIY cold brew maker?
To build a simple cold brew system, you need a large glass jar or pitcher, a fine-mesh strainer, and a filtering material like cheesecloth or a paper coffee filter. You also need high-quality coffee beans and filtered water.
How do I assemble a homemade cold brew coffee maker?
Start by placing your coarse coffee grounds into a glass container and adding cold water at a 1:4 ratio. After steeping for 12-24 hours, set up a filtration station by placing a mesh sieve lined with a filter over a second jar to separate the concentrate.
What is the best coffee-to-water ratio for a manual cold brew setup?
A standard starting point for a DIY maker is a 1:4 or 1:5 ratio of coffee to water by weight. This creates a strong concentrate that you can later dilute with water or milk according to your taste preferences.
Can I use a French Press as a cold brew maker?
Yes, a French Press is one of the easiest ready-made cold brew makers. Simply add grounds and cold water, let it sit on the counter or in the fridge overnight, and press the plunger down slowly the next morning to filter the coffee.
How long should I let the coffee steep in my homemade maker?
For optimal extraction, let the coffee steep for at least 12 hours at room temperature or up to 24 hours in the refrigerator. Steeping too long can lead to over-extraction and a bitter taste, so experiment to find your ideal duration.
What kind of filter works best for a DIY cold brew system?
While a fine-mesh metal strainer works for a coarse texture, using a paper filter or a double layer of cheesecloth provides a much cleaner cup. This ensures that the fine sediment is removed, resulting in the smooth mouthfeel cold brew is known for.
Conclusion
Creating your own cold brew coffee maker is a simple yet rewarding project that saves money and enhances your morning routine. Don’t be afraid to experiment with different coffee beans and steeping times to find your perfect blend. Now that you have the tools and knowledge, it is time to start brewing and enjoy your refreshing homemade creation.