How To Make Cold Brew Foam
Craving that velvety, cloud-like topping on your favorite iced coffee? Learning how to make cold brew foam is easier than you think and elevates your morning routine instantly. Whether you prefer a rich vanilla sweet cream or a dairy-free alternative, you can achieve café-quality results at home with just a few simple tools. This guide will show you exactly how to whip up thick, long-lasting foam in seconds. Let’s dive into the best methods to perfect your brew today.
What is cold brew foam?
The difference between cold foam and steamed milk
To understand how to make cold brew foam, you must first distinguish it from traditional steamed milk used in hot lattes. Standard steaming uses heat to stretch proteins and create microfoam, whereas cold foam relies on high-speed aeration without heat to maintain a stable structure.
When you froth milk cold, you are trapping air bubbles within the liquid’s fat and protein molecules, resulting in a thick, pourable meringue-like consistency that sits gracefully on top of iced drinks.
Unlike steamed milk which eventually dissolves into the coffee, cold foam is engineered to remain separated, providing a distinct layered experience. For the best results at home, use an electric milk frother or a handheld whisk on the cold setting to achieve that signature density.
This method ensures the milk does not become watery or lose its shape when it hits the chilled surface of your cold brew. By skipping the steam wand, you preserve the natural sweetness of the dairy while creating a luxurious, velvety topper that defines the modern coffeehouse aesthetic.
Why cold foam works best with cold brew coffee
Cold foam is the ideal companion for cold brew because it complements the beverage’s unique chemical profile. Cold brew is known for its low acidity and smooth chocolatey notes, which can sometimes feel one-dimensional without a textural contrast.
By adding a dollop of aerated foam, you introduce a creamy element that cuts through the boldness of the concentrated coffee without diluting the temperature. If you were to use hot steamed milk, it would melt the ice instantly and create a lukewarm, unappealing mixture.
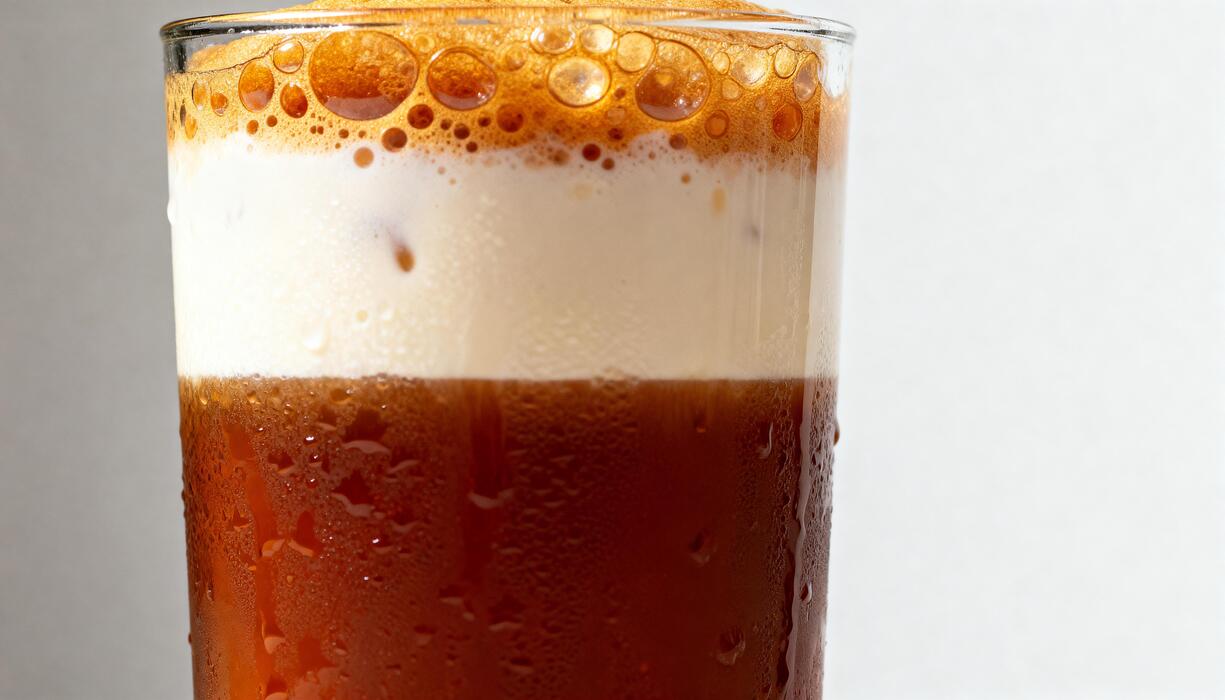
Cold foam stays chilled, ensuring every sip remains refreshing from start to finish. Furthermore, the density of the foam allows it to slowly seep into the dark coffee, creating beautiful visual gradients known as the cascading effect.
This gradual integration means you get a bit of sweet cream and a bit of strong coffee in every mouthful.
Whether you use skim milk for stability or heavy cream for richness, the cold-on-cold combination enhances the overall mouthfeel and elevates a simple glass of iced coffee into a sophisticated, cafe-quality treat.
The texture and flavor profile of a perfect foam
A perfect cold brew foam should strike a balance between a cloud-like lightness and a rich, indulgent flavor. The texture is often described as silky and micro-bubbled, similar to melted marshmallow fluff rather than the large, soapy bubbles found in poorly frothed milk.
When executed correctly, the foam should be thick enough to support garnishes like cocoa powder or cinnamon, yet fluid enough to flow smoothly when you tilt the glass.
Flavor-wise, the foam acts as a customizable canvas; while plain milk is classic, many enthusiasts add vanilla syrup, sea salt, or maple to enhance the experience. This sweetness acts as a perfect counterpoint to the deep, earthy undertones of the cold brew beans.
Achieving this profile requires using very cold milk or cream directly from the refrigerator, as warmer liquid will not hold the air as effectively.
The result is a multi-sensory delight where the initial hit of sweet, airy cream transitions into the robust punch of caffeine, providing a complex and satisfying finish that has made this topping a global sensation for coffee lovers.
Best milk and ingredients for thick foam

Why non-fat milk creates the most volume
When aiming for the tallest, most stable peaks in your cold brew foam, non-fat milk is surprisingly the superior choice. This is primarily due to the unique protein-to-fat ratio found in skim varieties. In dairy, whey and casein proteins act as the structural scaffolding that traps air bubbles.
While fat provides a rich mouthfeel, it actually acts as a destabilizing agent that can cause air bubbles to collapse prematurely. By using non-fat milk, you allow the protein molecules to bond more effectively, creating a lightweight, airy foam that sits perfectly on top of your cold brew without sinking.
To get the best results, ensure your milk is thoroughly chilled before frothing, as cold temperatures help the proteins maintain their integrity.
Using a high-speed handheld frother for approximately thirty seconds will transform skim milk into a voluminous, cloud-like topping that mimics the professional texture found in high-end coffee shops while keeping the overall calorie count significantly lower for your daily caffeine fix.
Best plant-based milks for frothing
Not all dairy alternatives are created equal when it comes to crafting the perfect cold brew topper. If you prefer a plant-based lifestyle, oat milk is the gold standard because it naturally contains a higher carbohydrate and protein content that mimics the behavior of dairy.
For the thickest results, specifically seek out barista-edition versions, which are formulated with added stabilizers and healthy fats to prevent the foam from separating or becoming watery.
Another excellent contender is soy milk, which boasts a high protein density that creates a dense and creamy microfoam capable of holding its shape for several minutes.
Nut milks like almond or cashew tend to produce thinner, more fragile bubbles due to their lower protein levels, so they may require a splash of coconut cream to achieve the desired density.
Always remember to shake your plant-based carton vigorously before pouring to ensure the sediment is well-distributed, which directly impacts the quality and consistency of the final foam you pour over your ice-cold coffee.
Adding heavy cream for a Starbucks-style texture
To replicate the iconic, velvety ‘cold foam’ popularized by major coffee chains, you must incorporate a high-fat component like heavy cream. The secret to that decadent, pourable texture is a balanced mixture of heavy cream and 2% milk, often referred to as a sweet cream base.
The heavy cream provides a luxurious thickness and rich, buttery mouthfeel, while the splash of milk thins the mixture just enough to allow air to be incorporated during the frothing process. This combination creates a foam that is significantly more stable and dessert-like than milk alone.
For an authentic flavor profile, add a teaspoon of vanilla syrup or a pinch of sea salt before you begin frothing. Use an electric whisk until the mixture reaches the consistency of melted ice cream or soft-set whipped cream.
This heavy-duty foam is designed to slowly cascade into the cold brew, creating beautiful white streaks while providing a barrier that prevents the coffee from tasting overly bitter, ensuring every sip is perfectly balanced and creamy.
How to make cold brew foam with a handheld frother

Step-by-step instructions for the wand method
To achieve the perfect cold brew foam using a handheld frother, start by pouring a small amount of cold milk or heavy cream into a deep glass or pitcher.
It is vital to use cold dairy or high-fat alternatives like oat milk specifically designed for baristas to ensure the proteins hold the air properly. Insert the whisk end of the handheld device into the liquid at a slight angle near the bottom.
Turn the power on and slowly move the wand in a circular motion, keeping the head submerged to avoid excessive splashing. As the volume begins to increase, gradually raise the wand so it is just below the surface, which incorporates more air and creates a velvety, micro-foam texture.
Once the foam has doubled in size and looks thick enough to sit on top of your coffee without sinking, turn off the motor before removing it from the glass. Pour this layer gently over your cold brew for a professional, layered cafe-style presentation at home.
How long to froth for the best consistency
Timing is the most critical factor when using an electric wand to create stable cold brew foam. For most handheld frothers, the ideal duration is between 15 to 30 seconds of continuous whisking.
If you stop too early, the bubbles will be too large and will quickly dissipate, leaving you with a thin, watery liquid that lacks the desired creamy mouthfeel.
Conversely, over-frothing for more than 45 seconds can cause the fats to separate or turn the foam into a stiff, butter-like consistency that is difficult to pour smoothly. Aim for the glossy, wet paint look that indicates the air has been evenly distributed throughout the liquid.
If you are using heavy cream to make a flavored cold foam, you may need a slightly shorter duration because the higher fat content stabilizes much faster than skim milk.
Keep a close eye on the volume; once the liquid reaches double its original height, you have likely reached the peak consistency for a perfect drink topper.
Common mistakes to avoid with electric whisks
When learning how to make cold brew foam, many beginners make the mistake of using a shallow container, which leads to a messy kitchen and uneven aeration. Always use a tall vessel to allow the wand to work its magic without spraying milk everywhere.
Another frequent error is removing the frother while it is still running, which causes instant splattering; always click the power button off while the whisk is still submerged.
Additionally, ensure you are using a fresh battery or a full charge, as a weak motor speed will fail to create the necessary friction to trap air bubbles effectively.
Using milk that is too warm is also a common pitfall, as heat changes the protein structure and prevents the foam from holding its shape on top of cold liquids. Finally, avoid overfilling the container; the liquid needs plenty of room to expand as the air is incorporated.
By avoiding these simple technical errors, your handheld frother will consistently produce a dense, luxurious cold foam that rivals any expensive coffee shop beverage.
How to make cold foam using a French press
The pump technique for maximum aeration
To achieve a velvety texture for your cold brew foam, the pump technique is the most critical element of the process. Start by pouring your chilled liquid into the carafe and placing the lid securely on top.
To begin aerating, move the plunger up and down with short, rapid strokes for approximately thirty to forty-five seconds. The goal is to incorporate tiny air bubbles throughout the liquid, transforming it from a flat state into a dense, microfoam consistency that mimics professional espresso bar quality.
You should focus on consistent rhythmic motions rather than extreme force to prevent splashing. As the volume begins to expand and double in size, you can transition to slightly longer strokes to ensure the foam is stable enough to sit atop your coffee without immediately dissolving.
This manual agitation creates a superior structural integrity compared to basic whisking, resulting in a luxurious, cloud-like topper that perfectly complements the bold profile of a glass of cold brew.
Measuring the right milk-to-press ratio
Success when making cold foam depends heavily on using the correct volume of liquid relative to the size of your French press.
For a standard individual serving, aim to fill the carafe with approximately half a cup of milk, ensuring the liquid level is high enough for the mesh filter to make full contact.
If there is too little liquid, the plunger will simply push air without creating the necessary friction for emulsification. Conversely, overfilling the carafe is a common mistake that leads to messy overflows once the foam begins to expand.
Since the volume will increase by nearly double, you must leave ample headspace for the air to integrate properly. Using cold, filtered dairy or high-protein plant-based alternatives like oat or soy will yield the best stabilization results.
By maintaining this precise ratio, you ensure that every pump of the handle contributes to a thick, creamy consistency that enhances your cold brew experience without wasting ingredients or creating a kitchen disaster.
Cleaning your French press after frothing
Once you have finished pouring your delicious cold foam, immediate maintenance is essential to keep your equipment in top condition and prevent milk residue buildup. The fine mesh of the French press filter can easily trap proteins and fats, which may become difficult to remove if they dry.
Start by rinsing the carafe and plunger under warm running water to flush out the bulk of the foam.
For a deeper clean, fill the press halfway with warm water and a small drop of dish soap, then pump the plunger vigorously to create a soapy lather that reaches every corner of the mesh screen.
This internal agitation is the most effective way to clear the tiny holes in the filter. After rinsing thoroughly, disassemble the filter pieces occasionally to ensure no hidden bacteria remain.
Proper cleaning not only extends the lifespan of your press but also ensures that your next batch of cold brew foam remains fresh and free from any unwanted sour flavors.
Alternative ways to froth milk at home

Using a standard kitchen blender
A high-speed kitchen blender is an excellent tool for recreating the thick, velvety texture of commercial cold brew foam right in your own kitchen. To begin, pour about half a cup of cold skim or oat milk into the blender carafe along with your preferred sweetener or flavored syrup.
Secure the lid tightly and pulse the mixture on a high-speed setting for approximately thirty seconds until the liquid doubles in volume and develops a dense, micro-foam consistency.
The rapid rotation of the blades incorporates a significant amount of air very quickly, which is essential for achieving that sought-after stiff peak texture that sits perfectly atop a glass of iced coffee.
Once the blending process is complete, let the foam rest for a few seconds to stabilize before gently spooning it over your cold brew.
This method is particularly effective because the sheer power of the motor creates a uniform bubble structure that resists collapsing even when it comes into contact with the ice and coffee below.
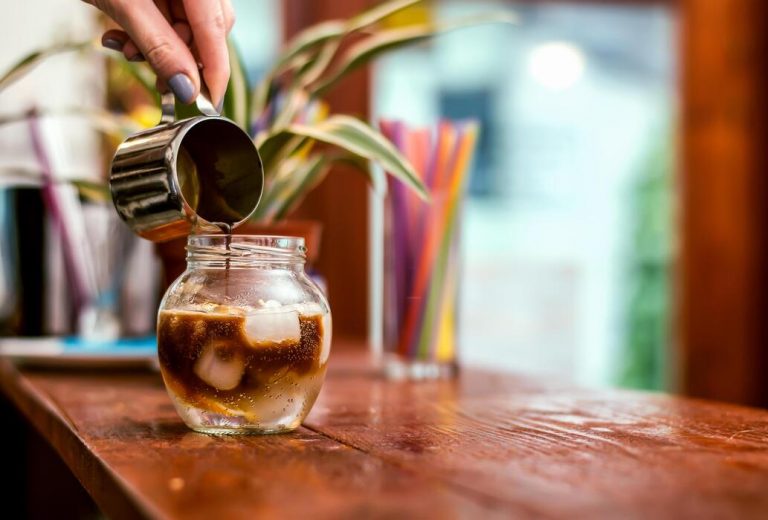
The mason jar shake method
If you do not own specialized equipment, the mason jar shake method is the most accessible way to generate cold foam using basic physics. Start by filling a clean glass jar no more than halfway with cold milk to ensure there is plenty of headspace for aeration during the process.
Tighten the lid securely to prevent any leaks and shake the jar vigorously with a vertical motion for at least sixty seconds. You will notice the milk expanding as air is trapped within the proteins, creating a light and frothy layer.
For the best results, use non-fat milk or specialized barista-blend plant milks, as these contain stabilizers that hold air bubbles more effectively than whole dairy milk.
While the bubbles produced by shaking are slightly larger than those from a motorized whisk, this technique still delivers a refreshing and creamy mouthfeel that elevates your home-brewed experience.
It is a low-tech solution that requires nothing more than a bit of physical effort and a common household container to achieve impressive results.
Automatic milk frother settings for cold foam
Many modern electric milk frothers come equipped with a dedicated cold stir setting, which is the gold standard for effortless home preparation.
Unlike the heat cycle used for lattes, the cold foam function rotates the whisk without engaging the heating element, keeping the milk at a temperature that preserves its natural sweetness and structural integrity.
To use this feature, simply pour your cold milk up to the indicated maximum line and press the start button, usually indicated by a blue light or a specific snowflake icon.
The machine will use a magnetic induction whisk to create a highly stable, silken micro-foam that mimics the premium toppings found at high-end coffee shops. This automated approach ensures a consistent result every time without the risk of over-processing the milk.
Because the whisking is constant and controlled, the resulting foam is incredibly smooth and integrates beautifully with the bold, chocolatey notes of a slow-steeped cold brew, providing a professional finish with the simple press of a button.
Recipes for flavored cold brew foams
How to make vanilla sweet cream cold foam
To replicate the coffeehouse experience at home, start by whisking together heavy cream, 2% milk, and vanilla syrup in a precise 3:2:1 ratio. This specific combination ensures the foam is light enough to sit atop your cold brew while remaining rich enough to resist dissolving instantly.
For the best results, use an electric milk frother or a handheld immersion blender to aerate the liquid until it reaches a thick, pourable consistency similar to melted ice cream.
If you do not have a frother, you can achieve a similar effect by shaking the ingredients vigorously in a sealed mason jar for about sixty seconds.
The key is to use cold ingredients directly from the refrigerator, as warmth will prevent the proteins and fats from stabilizing into a velvety microfoam. Once the foam is stiff, slowly pour it over your iced cold brew to create those signature cascading layers.
This simple technique provides a professional finish and a balanced sweetness that perfectly complements the bold, chocolatey notes of a dark roast cold brew concentrate.
Salted caramel foam recipe
Elevate your morning caffeine routine by crafting a savory-sweet topping that uses high-quality caramel sauce and sea salt as its primary flavor profile. Begin the process by mixing two tablespoons of heavy cream with one tablespoon of milk and a generous squeeze of caramel.
Add a pinch of fine sea salt or flaky Maldon salt to the mixture; the salt is crucial as it cuts through the sugar and enhances the deep, buttery notes of the caramel.
Use a high-speed frother to whip the mixture until it doubles in volume and develops soft, glossy peaks. For an extra layer of decadence, you can drizzle a small amount of extra caramel around the inside of your glass before adding the ice and coffee.
This foam works exceptionally well when paired with nutty or toasted coffee beans, creating a complex flavor bridge between the salty topping and the smooth beverage base.
Always serve immediately to enjoy the contrast between the chilled, aerated foam and the crisp, refreshing cold brew underneath, ensuring every sip is perfectly seasoned.
Seasonal flavors like pumpkin spice and cinnamon
Transform your cold brew into a seasonal treat by incorporating warm spices and real purees into your foam base. For a classic autumn variation, whisk one tablespoon of pumpkin puree and pumpkin pie spice into your cream and milk mixture before frothing.
If you prefer a lighter, year-round option, a cinnamon-infused foam can be created by adding ground cinnamon and maple syrup to the liquid.
Because spices can sometimes be gritty, it is helpful to strain the mixture or ensure it is thoroughly blended using a high-powered frother to maintain a silky-smooth mouthfeel. These seasonal foams act as a fragrant aromatic layer, hitting your senses before you even take a sip of the coffee.
You can further customize these recipes by using brown sugar or honey as natural sweeteners that pair beautifully with the earthy notes of the spices.
Finish the drink with a light dusting of cinnamon or nutmeg on top for a visually appealing, café-quality presentation that brings the cozy flavors of the season to your glass, regardless of the temperature outside.
Tips for a professional coffee shop finish
How to pour foam so it sits on top of the coffee
To achieve a distinct, layered look where the cold foam rests elegantly atop your cold brew, the technique used during the pour is just as important as the foam’s consistency. Start by filling your glass with ice and cold brew, leaving about an inch of space at the top.
When you are ready to add the foam, hold a large spoon horizontally over the glass, just touching the surface of the coffee. Gently pour the aerated milk over the back of the spoon to break the fall and disperse the weight.
This prevents the foam from plunging into the liquid and mixing prematurely. A slow, steady stream ensures the density barrier remains intact, creating that iconic sharp line between the dark coffee and white topping. If your foam is properly aerated to a meringue-like texture, it should float effortlessly.
Avoid pouring too quickly, as the force can cause the foam to dissolve into the brew, ruining the aesthetic separation you desire.
The ideal temperature for your milk and coffee
Temperature control is the secret weapon for maintaining a stable foam structure that does not wilt or melt away instantly. For the best results, ensure your cold brew is chilled to between 35°F and 40°F before you even think about adding the topping.
Similarly, your milk or cream must be pulled directly from the refrigerator right before frothing; cold proteins and fats hold air bubbles much more effectively than room-temperature alternatives. Using a chilled frothing pitcher can also help maintain these low temperatures during the aeration process.
If the coffee is too warm, it will rapidly melt the tiny air bubbles in the foam, leading to a watery mess rather than a thick head. By keeping both components at an optimal icy temperature, you ensure the molecular structure of the foam remains rigid and voluminous.
This thermal consistency allows the drink to maintain its professional appearance and refreshing mouthfeel from the first sip down to the very last drop in the glass.
Garnishing your cold brew for better presentation
Elevating your homemade cold brew to a professional standard requires a final touch of visual flair and aromatic enhancement. Once your foam is perfectly layered, consider a light dusting of cocoa powder or cinnamon applied through a fine-mesh sieve for an even, elegant coating.
For a more modern aesthetic, a drizzle of salted caramel or chocolate syrup can be patterned over the foam, though you must be careful not to use too much weight, or the garnish will sink.
Nutmeg or a few crushed coffee beans can add a sophisticated scent that hits the nose before the first sip.
If you want to lean into seasonal trends, a small sprig of mint or a dehydrated orange slice adds a pop of color that contrasts beautifully with the creamy white foam. These small details provide a sensory experience that mimics high-end cafes, making the drink feel like a luxury treat.
Always apply garnishes immediately after pouring the foam to ensure they adhere to the surface properly.
Frequently Asked Questions
What is the best milk for making cold brew foam?
Non-fat (skim) milk or 2% milk typically creates the stiffest, longest-lasting foam because of their higher protein-to-fat ratio. For dairy-free options, barista-edition oat milk or soy milk are the most effective at holding bubbles.
How do I make cold brew foam without a frother?
You can easily make foam by shaking cold milk in a tightly sealed mason jar for 30-60 seconds until it doubles in volume. Alternatively, use a French press by pumping the plunger up and down rapidly through the milk until it becomes thick and aerated.
What ingredients do I need for sweet cream cold foam?
The standard Starbucks-style recipe uses a mix of heavy cream, 2% milk, and vanilla syrup. A common ratio is 3 parts heavy cream to 2 parts milk and 1 part syrup, frothed together until it reaches a thick, pourable consistency.
Can I use an electric handheld milk frother for cold foam?
Yes, an electric handheld whisk is the most popular tool for making cold brew foam at home. Simply submerge the whisk in a small amount of cold milk at a slight angle and froth for about 15-30 seconds until the foam is dense.
Why won’t my cold foam stay on top of the coffee?
If your foam sinks immediately, it likely hasn’t been aerated enough or the fat content is too low to provide structure. Ensure you are using very cold milk and frothing until the texture is thick like melted ice cream before pouring it slowly over the back of a spoon.
How do I flavor my cold brew foam?
You can add flavor by mixing in liquid syrups like vanilla, caramel, or peppermint before frothing. For a more natural approach, whisk in a pinch of cinnamon, cocoa powder, or a dash of maple syrup to the milk before you begin the aeration process.
Conclusion
Creating the perfect cold brew foam at home is a simple yet effective way to elevate your morning coffee routine. By choosing high-quality ingredients and mastering basic frothing techniques, you can achieve a luxurious, cafe-style texture in minutes. Whether you prefer classic dairy or a dairy-free alternative, the possibilities for customization are endless. Now that you know the secrets, it is time to experiment with flavors and enjoy your creamy, handcrafted creation today.