How To Make Sweet Cream Foam Starbucks
Craving that velvety, cloud-like topping on your favorite cold brew? You don’t need a green apron to enjoy it. Learning how to make sweet cream foam Starbucks style is surprisingly simple and requires only three basic ingredients you likely already have. Whether you want to save money or customize your sweetness, this guide provides the exact ratios for that iconic texture. We will show you how to whip up a batch in seconds so you can upgrade your morning coffee today.
What is Starbucks Vanilla Sweet Cream Cold Foam?
The difference between sweet cream and cold foam
Understanding the distinction between these two components is essential for anyone learning how to make sweet cream foam Starbucks style at home.
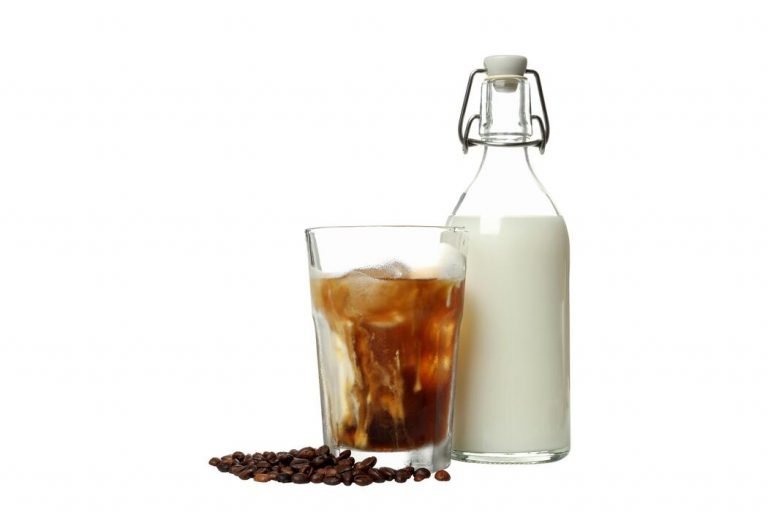
Standard vanilla sweet cream is a liquid mixture made from heavy cream, 2% milk, and vanilla syrup, which acts as a decadent creamer that swirls beautifully through the drink.
In contrast, the cold foam version is created by taking that same liquid base and aerating it using a high-speed blender or handheld frother until it reaches a thick, pourable consistency similar to melted ice cream.
While regular cold foam is often made with nonfat milk to create a stiff, meringue-like peak, the sweet cream version relies on the high fat content of the heavy cream to achieve a velvety micro-foam texture.
This specific aeration process ensures that the topping sits gracefully on top of your iced coffee before slowly cascading down in marbleized streaks. By mastering this aeration technique and ingredient ratio, you can replicate the signature mouthfeel that distinguishes a professional Starbucks beverage from a standard homemade iced coffee.
Why this topping is popular for iced coffee
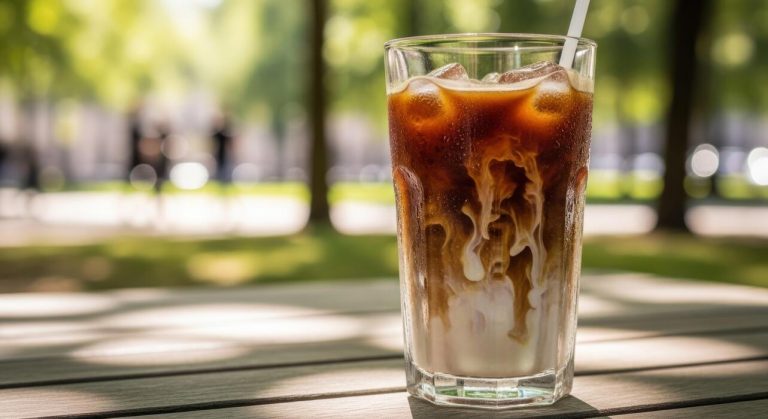
The immense popularity of this topping stems from its ability to transform a bitter cold brew into a sophisticated, dessert-like experience without the need for excessive stirring.
Unlike traditional creamers that instantly cloud the entire beverage, this dense foam creates a distinctive layering effect that allows the drinker to experience different textures and temperatures in every sip.
As you tilt the cup, the cold, sweetened foam hits your palate first, followed by the bold, crisp notes of the coffee underneath. This creates a balanced flavor profile where the natural acidity of the beans is mellowed by the rich dairy.
Furthermore, the visual appeal of the white foam slowly bleeding into the dark coffee makes it a social media favorite. Many enthusiasts prefer it because it provides a luxurious mouthfeel that feels more indulgent than standard milk.
Whether you are using a straw or drinking from a sip lid, the foam provides a consistent sweetness that lingers, making it the ultimate customization for any iced caffeine fix.
The exact flavor profile you are trying to match
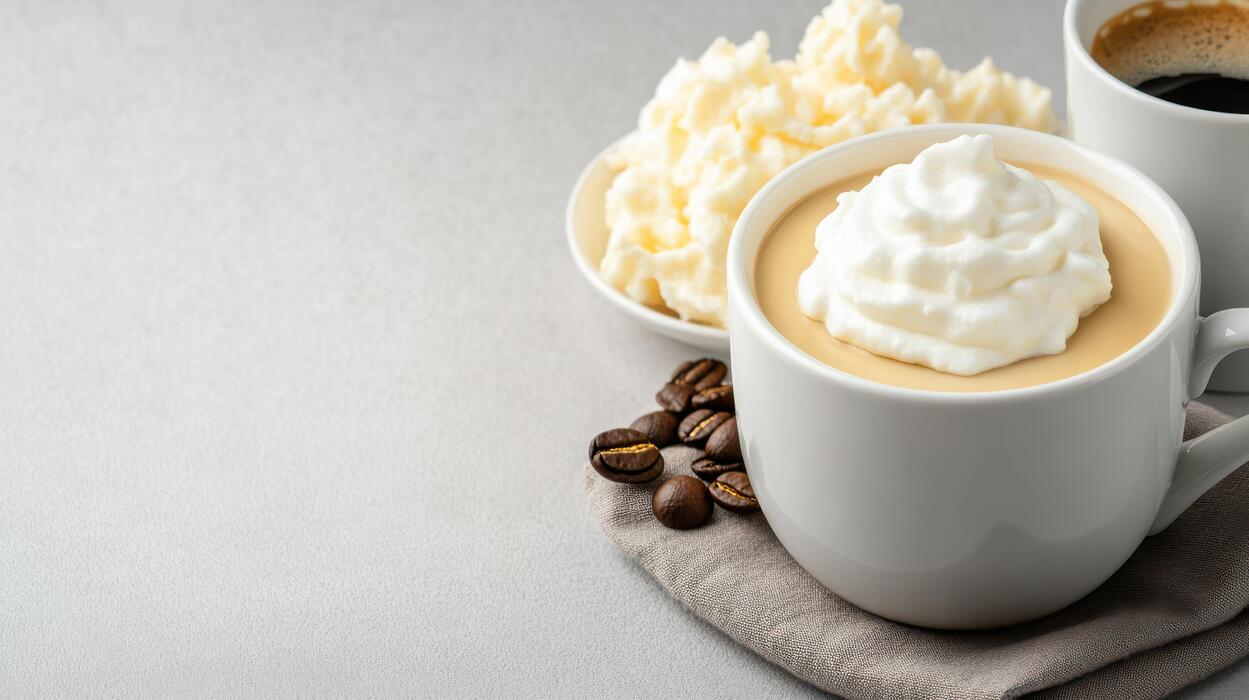
To successfully recreate this at home, you must target a specific flavor profile that balances intense sweetness with a clean, floral vanilla finish. The Starbucks version is famous for its silky, custard-like taste which is achieved through a precise ratio of vanilla syrup to heavy cream.
It should not taste like plain whipped cream; instead, it should have a deeper, more complex sweetness that mimics a high-quality vanilla bean ice cream. The saltiness of the coffee provides a necessary contrast to the high sugar content of the foam, ensuring the drink isn’t cloying.
When matching the profile, ensure your vanilla syrup is potent enough to cut through the richness of the fat. The goal is a lingering marshmallow-like sweetness that enhances rather than masks the coffee’s notes.
Achieving this requires using fresh, cold ingredients and avoiding over-whipping, which can turn the mixture into butter. By focusing on this specific balance of sugar, fat, and aeration, you can produce a topping that perfectly mirrors the iconic Starbucks sensory experience in your own kitchen.
Ingredients for the Copycat Starbucks Recipe

The 2% milk and heavy cream ratio
To achieve that signature velvety texture found in a Starbucks cold brew, you must master the precise balance of liquids.
The secret lies in a specific ratio of heavy whipping cream to 2% milk, which creates a foam that is thick enough to sit atop your coffee but fluid enough to sip through a lid.
For a single batch, combine one cup of heavy cream with half a cup of 2% milk.
This combination is essential because the high fat content in the heavy cream provides the stable structure needed for aeration, while the lower fat content in the 2% milk prevents the mixture from turning into whipped butter.
When you whisk these together, aim for a consistency that resembles melted vanilla ice cream. Using a hand frother for approximately thirty seconds will yield the best results.
This specific dairy blend ensures that your sweet cream remains pourable yet rich, perfectly mimicking the authentic Starbucks mouthfeel that fans crave in their daily caffeine fix.
Choosing the right vanilla syrup
The distinct flavor profile of Starbucks sweet cream comes almost entirely from the quality and quantity of the sweetener used. To replicate the taste at home, you should utilize a high-quality vanilla simple syrup rather than just vanilla extract and sugar.
The standard recipe calls for approximately three to four tablespoons of vanilla syrup for every batch. If you want the most accurate copycat experience, look for brands like Fontana, which is the actual supplier for the coffee giant, or Torani for a widely available alternative.
The syrup serves two purposes: it provides the floral vanilla aroma and ensures the sugar is already dissolved, preventing a grainy texture in your foam. If you prefer a more natural approach, you can create a homemade syrup by simmering equal parts water and sugar with a split vanilla bean.
This step is vital because the sweetness acts as a stabilizer for the air bubbles created during frothing, resulting in a glossy and fragrant finish that elevates any iced beverage to a professional barista standard.
Optional salt and flavor variations
Once you have mastered the foundational recipe, you can customize your sweet cream to match seasonal Starbucks favorites. To create the popular salted caramel cream cold foam, simply add a half teaspoon of sea salt and two tablespoons of caramel syrup to your base mixture.
The addition of sea salt is a game-changer as it cuts through the richness of the dairy and enhances the sweetness of the vanilla. For those who enjoy holiday flavors, consider whisking in a dash of pumpkin spice or peppermint extract during the frothing process.
You can even experiment with non-dairy alternatives, though they may not foam as densely as the original version. Always ensure your ingredients are chilled before mixing, as cold proteins and fats hold air significantly better than room-temperature ones.
Adding these small variations allows you to enjoy a versatile coffee shop experience from the comfort of your kitchen, saving money while satisfying your specific cravings for unique, gourmet textures and complex flavor profiles every single morning.
How to Make Sweet Cream Foam at Home

Step-by-step mixing instructions
To replicate the signature Starbucks flavor at home, you must start with the correct ingredient ratios. Begin by combining half a cup of heavy whipping cream with one-quarter cup of 2% milk and three tablespoons of vanilla syrup.
This specific combination of dairy creates the ideal fat content necessary for that luxurious, velvet-like consistency. Pour these ingredients into a small glass pitcher or a mason jar.
It is vital to use chilled ingredients straight from the refrigerator, as cold fats emulsify much more effectively than those at room temperature. Use a long spoon to stir the mixture gently until the syrup is fully incorporated into the milk and cream base.
If you prefer a stronger vanilla profile, you can adjust the syrup slightly, but keeping the ratio of heavy cream to milk is the secret to achieving that authentic, pourable density.
Once your base is blended, you are ready to move on to the aeration phase to create that iconic cloud-like topper for your cold brew or iced coffee.
How to get the perfect frothy texture
The transformation from liquid cream to thick foam requires the right tools and technique. For the best results, use a handheld milk frother submerged just below the surface of the liquid.
Tilt the container slightly and turn the frother on, moving it up and down to incorporate air for approximately thirty to forty-five seconds. You are looking for the mixture to double in volume and develop a thick, pourable consistency that resembles wet paint or melted ice cream.
Avoid over-frothing, as this will turn your sweet cream into stiff whipped cream, which won’t blend as beautifully with your coffee.
If you do not have a handheld wand, you can achieve a similar effect by shaking the mixture vigorously in a sealed mason jar for one minute or using a French press by pumping the plunger rapidly.
The goal is to create micro-bubbles that allow the foam to sit gracefully on top of the drink before slowly cascading down the sides of the glass, mimicking the professional barista experience perfectly.
Storing your homemade sweet cream for later use
If you find yourself with leftover sweet cream, you can easily save it for your next caffeine fix. Transfer the un-frothed liquid base into an airtight container or a glass jar with a secure lid.
It is important to store the mixture in the coldest part of your refrigerator, typically the back of the middle shelf, rather than the door. When stored properly, your homemade vanilla sweet cream will remain fresh for up to five days, or until the expiration date on your dairy cartons.
Note that the ingredients may naturally separate over time, so always give the jar a quick shake or stir before you plan to froth it. Never attempt to store the cream after it has already been frothed, as the air bubbles will collapse and the texture will become watery.
By keeping a pre-mixed batch of the liquid base ready to go, you can enjoy a Starbucks-quality beverage in seconds every morning without having to measure out individual ingredients while you are still waking up.
Best Tools for Frothing Your Sweet Cream
Using a handheld milk frother
For those seeking the most authentic Starbucks experience at home, a handheld milk frother is the ultimate solution. This compact tool allows for precise control over the aeration process, ensuring you achieve that signature velvety texture.
To begin, combine your heavy cream, milk, and vanilla syrup in a tall glass or pitcher. Submerge the frother tip just below the surface and turn it on, moving it up and down to incorporate air and create volume.
The high-speed rotation quickly transforms the liquid into a thick, pourable foam in about thirty seconds. One of the primary benefits of this method is the minimal cleanup required, as you only need to rinse the whisk attachment.
For the best results, ensure your dairy components are chilled straight from the refrigerator, as cold fats stabilize the bubbles more effectively. This affordable gadget is a staple for any home barista looking to top their cold brew with professional-grade sweet cream without investing in bulky equipment or expensive machinery.
Making cold foam in a French press
If you do not own an electric gadget, a French press is a surprisingly effective manual tool for creating dense, luxurious sweet cream foam.
Start by pouring your prepared sweet cream mixture into the carafe, ensuring it does not fill more than one-third of the container to allow room for expansion. Insert the plunger and use short, rapid pumps to force air through the mesh filter.
This mechanical action breaks down the milk proteins and fats, resulting in a remarkably stable foam that mimics the texture of Starbucks’ cold foam perfectly. Continue pumping for approximately forty-five seconds until the volume has nearly doubled and the mixture feels heavy.
The fine mesh screen of the French press is the secret to creating micro-bubbles, which produce a smoother mouthfeel than larger, soapy bubbles. Once finished, let the foam sit for a moment to settle before spooning it over your iced coffee.
This method is ideal for making larger batches when serving guests, providing a consistent and decadent finish every time.
Using a high-speed blender or Aeroccino
For a truly hands-off approach that guarantees consistent results, a high-speed blender or an Aeroccino is your best bet. When using a blender, pour your sweet cream base into the jar and pulse on a medium-to-high setting for roughly fifteen to twenty seconds.
The powerful blades create a vortex that emulsifies the ingredients, resulting in a thick, cloud-like consistency that holds its shape atop your drink. If you prefer a specialized appliance, the Nespresso Aeroccino features a dedicated cold froth setting specifically designed for this purpose.
Simply pour the mixture to the lower fill line and press the button for a few seconds until the blue light indicates the cold cycle. These automated methods are perfect for busy mornings when you want a high-quality beverage without manual effort.
Both tools ensure the vanilla and cream are perfectly integrated, preventing the syrup from sinking to the bottom. Utilizing these high-performance devices ensures your homemade sweet cream foam is indistinguishable from the version served by professional baristas at your local coffee shop.
Tips for the Thickest Cold Foam Texture

Why cold temperature matters for stability
To replicate the luxurious Starbucks texture, you must ensure your ingredients and equipment are as cold as possible. Chilling your heavy cream and milk right until the moment of mixing is essential because cold fat molecules bond more effectively, creating a stable structure that holds air bubbles without collapsing.
If your cream reaches room temperature, the proteins denature and the fat softens, resulting in a sad, liquid mess that sinks immediately into your coffee. For the best results, try placing your frothing pitcher or glass jar in the freezer for five minutes before you begin.
Using a cold vessel prevents the friction from an electric frother from warming the mixture prematurely. This temperature control ensures that the sweet cream maintains its stiff peaks and velvety mouthfeel for several minutes, allowing it to sit beautifully atop your cold brew just like the professional version.
Remember, heat is the ultimate enemy of thick foam stability and structural integrity.
How to fix runny or thin foam
If your sweet cream is too thin, the most common culprit is an incorrect ratio of heavy whipping cream to 2% milk. Starbucks uses a specific blend, but for home use, you should increase the heavy cream ratio to at least two parts cream for every one part milk.
If it remains runny, you may be over-aerating or under-mixing. Use a high-speed handheld frother and submerge the whisk head completely to create a vortex rather than just splashing the surface.
If you see large, soapy bubbles, tap the container on the counter to pop them and continue whisking until the texture becomes uniform.
Another professional trick is to add a small pinch of xanthan gum or a teaspoon of instant pudding mix, which acts as a stabilizer to thicken the foam instantly.
Always ensure you are using fresh, high-quality ingredients, as older dairy loses its ability to emulsify and hold the necessary air required for that signature thick, pourable cloud texture.
The best milk brands for high fat content
The secret to that iconic density lies in the fat content of your dairy sources. When selecting brands, look for heavy whipping cream with at least 36% milkfat to ensure maximum thickness.
Premium brands like Horizon Organic, Organic Valley, or local grass-fed dairies often have a higher solids content than generic store brands, which leads to a noticeably richer foam. For the milk component, avoid skim or 1% milk, as they lack the lipids necessary to support the heavy cream’s weight.
Instead, stick to a high-quality 2% milk or even whole milk for an extra decadent finish. Some baristas swear by Fairlife ultra-filtered milk because its higher protein-to-sugar ratio creates a much more resilient foam structure that resists melting.
By investing in top-tier dairy products with minimal additives, you ensure that your homemade sweet cream has the necessary chemical composition to fluff up perfectly, providing that professional, pillowy layer that defines the Starbucks experience at home.
Ways to Customize Your Sweet Cream Foam
How to make pumpkin spice cold foam
To recreate the seasonal favorite at home, start with your standard sweet cream base of heavy cream and milk. The secret to the perfect pumpkin spice cold foam lies in the addition of real pumpkin puree and warm spices.
Whisk in one tablespoon of pumpkin puree, a teaspoon of vanilla syrup, and a generous pinch of pumpkin pie spice—which typically includes cinnamon, nutmeg, ginger, and cloves. For the best texture, ensure all ingredients are chilled before you begin frothing.
Use an electric handheld frother or a high-speed blender to aerate the mixture until it reaches a thick, velvety consistency that sits atop your coffee.
If you prefer a sweeter finish, you can add a drizzle of condensed milk or extra maple syrup to balance the earthy notes of the pumpkin.
This customized topping pairs exceptionally well with cold brews and iced Americanos, providing a rich, autumnal flavor profile that rivals any professional barista’s creation while allowing you to control the sugar content.
Making a salted caramel version
Transforming your basic sweet cream into a decadent salted caramel topping requires a careful balance of salt and sugar to enhance the creamy notes. Begin by adding two tablespoons of high-quality caramel sauce or syrup to your heavy cream and milk mixture.
To achieve that signature savory-sweet contrast, incorporate a small pinch of fine sea salt or pink Himalayan salt into the liquid before frothing. The salt acts as a flavor enhancer, cutting through the richness of the dairy and making the caramel notes pop.
For a professional finish, froth the mixture until it develops soft peaks and a glossy sheen. This version is particularly effective when layered over iced lattes or nitro cold brews, where the saltiness can complement the natural bitterness of the coffee beans.
You can further customize this by adding a dash of vanilla extract to deepen the complexity. Always serve immediately to ensure the foam maintains its structural integrity and does not dissolve too quickly into the underlying beverage.
Dairy-free and vegan alternatives
Achieving a thick, luxurious foam without traditional dairy requires selecting plant-based milks with high fat and protein content. The most effective combination for a vegan sweet cream involves mixing full-fat coconut milk with barista-blend oat milk.
The coconut milk provides the necessary fat for stability, while the oat milk contributes a natural sweetness and smooth texture. Combine these with a splash of agave nectar or simple syrup and a hint of vanilla bean paste for flavor.
When frothing, it is crucial to use a high-speed frother as plant-based proteins react differently than dairy; you may need to froth for a longer duration to achieve the desired micro-foam.
Another excellent option is using a heavy silk or soy-based creamer specifically designed for coffee, as these often contain emulsifiers that help maintain a stable, airy structure.
These dairy-free alternatives allow you to enjoy a creamy, indulgent topping that is completely plant-based, ensuring that dietary restrictions do not limit your ability to craft a delicious, customized coffee experience at home.
Best Drinks to Pair with Sweet Cream Foam
Classic cold brew and iced Americanos
When learning how to make sweet cream foam Starbucks style, the most iconic pairing is undoubtedly the classic Cold Brew. The dense, velvety texture of the foam sits beautifully atop the dark, robust coffee, creating a visual marble effect as it slowly cascades down.
For a professional finish, pour your homemade sweet cream foam over an Iced Americano to mellow out the intense espresso notes without the need for heavy liquid creamers.
The key is to use high-quality vanilla syrup in your foam mixture to replicate that signature Starbucks sweetness that cuts through the bitterness of the roast. This combination allows you to control the sugar content while maintaining a luxurious mouthfeel.
Many enthusiasts recommend using a handheld milk frother for at least thirty seconds to ensure the foam is stiff enough to float on the cold brew surface.
By mastering this pairing, you achieve a sophisticated, cafe-quality beverage that balances bold caffeine kicks with a silky, dessert-like topping that enhances every single sip.
Adding foam to iced matcha lattes
Integrating sweet cream foam into an Iced Matcha Latte is a game-changer for fans of earthy, botanical flavors. The natural grassiness of the matcha powder is perfectly complemented by the richness of heavy cream and the sweetness of vanilla.
To recreate this popular customization at home, whisk your matcha thoroughly with a small amount of hot water before adding ice and your milk of choice. Leave about an inch of space at the top of the glass for your aerated sweet cream topping.
This specific pairing creates a multi-layered experience where you first taste the cold, sugary foam followed by the refreshing, vibrant tea underneath. For an extra boost, try adding a pinch of sea salt to your foam to create a salted cream version that highlights the matcha’s unique profile.
This method ensures that the drink remains light and refreshing while providing the creamy indulgence associated with the Starbucks experience. It is a visually stunning drink that tastes as good as it looks on social media.
The best Starbucks secret menu combinations
Once you have mastered the basic recipe for sweet cream foam, you can explore the world of secret menu combinations that elevate standard drinks into gourmet treats. One highly recommended pairing is adding the foam to an Iced White Chocolate Mocha for a double-dose of creamy decadence.
Another fan favorite involves topping a Pink Drink with vanilla sweet cream foam to create a flavor profile reminiscent of strawberry cheesecake or starburst candy.
If you prefer something warmer in tone, try adding the foam to an Iced Chai Tea Latte; the spices in the chai blend beautifully with the vanilla-infused cream, creating a liquid ginger cake sensation.
To ensure your secret menu creations are successful, always use a ratio of two parts heavy cream to one part 2% milk when making your foam. This specific density prevents the foam from dissolving too quickly into the flavored syrups.
These combinations allow for endless creativity, making your home kitchen feel like a high-end coffee shop with every specialized drink you assemble.
Frequently Asked Questions
What are the ingredients in Starbucks vanilla sweet cream cold foam?
The authentic Starbucks recipe uses a specific 2:3:1 ratio consisting of heavy cream, 2% milk, and vanilla syrup. This combination creates a rich, pourable cream that can be frothed into a thick, cloud-like topping.
How do I make the sweet cream foam at home without a milk frother?
If you don’t have an electric frother, you can pour the ingredients into a glass jar, tighten the lid, and shake vigorously for 30-60 seconds. Alternatively, using a French press by pumping the plunger up and down rapidly will create a very dense, professional-style foam.
What is the secret ratio for the perfect sweet cream consistency?
To mimic the Starbucks texture, use 3 parts heavy whipping cream, 2 parts 2% milk, and 1 part vanilla syrup. This ratio ensures the foam is heavy enough to sit on top of the coffee while still being fluid enough to slowly cascade down into the drink.
Can I make a dairy-free version of Starbucks sweet cream foam?
Yes, you can substitute the dairy with a mix of full-fat coconut milk and oat milk, though it may not hold its peak as long. For the best results, ensure the plant-based milks are chilled and use a high-speed frother to incorporate enough air.
How long does homemade sweet cream last in the fridge?
You can store the unfrothed liquid mixture in an airtight container for up to 5 days, or until the expiration date on your milk cartons. For the best texture, always wait to froth the cream until right before you are ready to serve your coffee.
Why is my sweet cream foam not getting thick?
The most common reason is using milk that isn’t cold enough or having too much 2% milk relative to the heavy cream. Ensure your heavy whipping cream is straight from the refrigerator and that it has a high fat content to maintain the structure of the bubbles.
Conclusion
Mastering the art of Starbucks-style sweet cream foam at home is both simple and rewarding. By combining heavy cream, milk, and vanilla syrup with the right frothing technique, you can elevate any cold brew or iced coffee to café quality. Experiment with different flavors to find your perfect blend. Now that you have the secret recipe, skip the lines and enjoy this velvety treat anytime. Grab your frother and start crafting your signature drink today.