How To Make Iced Coffee With Cream
How to make iced coffee with cream is a common question for anyone who wants a rich, cold brew without watered-down flavor. The core challenge is balancing strong coffee with creamy texture without bitterness. You’re in the right place: we’ll cover the best brewing method, chilling technique, and cream ratio to deliver a smooth, indulgent drink every time.
Why Add Cream to Iced Coffee?
Cream adds richness without bitterness
When you add cream to iced coffee, you instantly transform the flavor profile by introducing a smooth, velvety texture that cancels out bitter notes. Coffee, especially when brewed hot and poured over ice, can develop sharp, acidic undertones.
Cream’s natural fat content coats your palate and softens these harsh edges, leaving behind a mellow, satisfying taste. To get the best result, pour your freshly brewed coffee over a full glass of ice, then add 1 to 2 tablespoons of heavy cream or half-and-half.
Stir thoroughly so the cream integrates evenly, preventing any oily separation. For a dairy-free option, try full-fat coconut cream or oat creamer, which mimic this richness without watering down the coffee. The key is to use cream that’s cold from the fridge so it doesn’t melt your ice too fast.
This technique makes your iced coffee taste smooth and balanced, never bitter or watery, even with strong brews.
Cream balances acidity in cold brew
Cold brew coffee is naturally less acidic than hot-brewed coffee, but it can still have a bright, tangy edge that some find unpleasant. Adding cream is the perfect counterbalance because the milk fats bind with the coffee’s acids, neutralizing their sharpness.
For a creamier cold brew, start by steeping coarse-ground coffee in cold water for 12 to 24 hours, then strain. Fill a glass with ice, pour in the cold brew concentrate, and add a splash of heavy cream or a rich creamer.
The cream softens the acidity while highlighting the coffee’s natural chocolatey or nutty notes. If you prefer a lighter texture, use whole milk or a barista-style oat milk, which froths well and blends seamlessly.
Always stir the cream in slowly to avoid curdling, especially if your cold brew is very concentrated. This approach yields a smooth, sippable iced coffee that feels refreshing without being sour, making it ideal for sensitive stomachs or those who want a milder caffeine kick.
Cream makes iced coffee feel indulgent
Adding cream elevates a simple iced coffee into a luxurious, dessert-like treat that satisfies cravings without extra sugar. The rich, creamy texture mimics the mouthfeel of a latte or frappé, turning your morning routine into a small moment of self-care.
To achieve this indulgence, use full-fat cream or a vanilla-infused creamer, and consider adding a pinch of sea salt to enhance the sweetness. Pour the cream slowly over the ice after adding the coffee so it creates a beautiful marbled effect, then stir gently.
For extra decadence, top with a dollop of whipped cream or a drizzle of caramel. This technique works especially well with dark roast coffee, which has deeper flavor notes that pair beautifully with cream’s richness.
The result is a creamy, satisfying beverage that feels like a splurge but is easy to make at home. You can also adjust the cream amount to control how rich you want it, making every cup customizable and rewarding.
Best Coffee Base for Iced Coffee with Cream

How to brew strong hot coffee for iced coffee
For the richest iced coffee with cream, start with a double-strength hot brew. Use twice the amount of coffee grounds you normally would for hot coffee—about 4 tablespoons per 6 ounces of water.
Brew directly into a heatproof carafe, then cool it rapidly by pouring it over a full cup of ice in your serving glass. This method prevents dilution while locking in bold flavor. For best results, use a medium-dark roast and grind just before brewing.
Once cooled, add your cream slowly, stirring gently to integrate without breaking the fat. The key is to brew strong enough so the coffee stands up to the cream’s richness. Let the hot coffee sit for 5 minutes before icing to avoid shocking the glass.
This technique delivers a smooth, full-bodied base that pairs perfectly with any cream or milk.
Cold brew concentrate as a creamy base
Cold brew concentrate offers a silky, low-acid foundation that blends effortlessly with cream. To make it, combine 1 cup of coarse-ground coffee with 4 cups of cold water in a jar, steep for 12-24 hours at room temperature, then strain through a fine-mesh sieve or cheesecloth.
The resulting concentrate is twice as strong as regular coffee, so dilute it 1:1 with water or milk. For a creamy iced coffee, fill a glass with ice, add ½ cup concentrate, then top with ½ cup whole milk or heavy cream. Stir gently to marry the flavors.
The natural sweetness and smooth body of cold brew mean you can skip added sugar—the cream provides enough richness. This base is ideal for those who prefer a mellow, velvety drink without bitterness.
Instant coffee shortcut for quick iced coffee
When time is tight, instant coffee delivers a fast, foolproof iced coffee base that still works beautifully with cream. Dissolve 2 teaspoons of high-quality instant coffee granules in 2 tablespoons of hot water to create a concentrated slurry. Stir until fully dissolved—no lumps allowed.
Pour this over a glass filled with ice, then add ¾ cup cold milk or cream. The key is to mix the slurry thoroughly before icing to ensure even flavor distribution. For extra creaminess, use half-and-half or a splash of heavy cream.
This method takes under 2 minutes and produces a surprisingly smooth result when you choose a premium instant brand. Adjust strength by adding more or less granules. The result is a quick, satisfying iced coffee that doesn’t compromise on flavor or texture.
How to Make Iced Coffee with Cream: Step-by-Step
Brew and cool your coffee properly
Start with freshly brewed coffee for the best flavor. Brew it double strength by using twice the amount of coffee grounds you normally would for hot coffee; this ensures the flavor isn’t diluted by the ice.
Allow the hot coffee to cool to room temperature before pouring over ice to prevent rapid melting that waters down your drink. You can speed this up by refrigerating it for 15-20 minutes or placing the pot in an ice bath.
For an even smoother result, brew coffee the night before and chill it overnight. Avoid pouring hot coffee directly onto ice, as this creates a weak, bitter taste. Once cooled, your concentrated coffee is ready to become a creamy, refreshing iced coffee.
Fill a glass with ice and pour coffee
Choose a tall glass and fill it to the top with large ice cubes; they melt slower than crushed ice, preserving your coffee’s strength. Pour your cooled, double-strength coffee over the ice, leaving about an inch of space at the top for cream.
For a smoother texture, pour the coffee slowly down the side of the glass rather than directly onto the ice, which reduces agitation and bitterness. If you prefer a sweeter drink, stir in simple syrup, flavored syrup, or sugar before adding cream, as sweeteners dissolve more easily in warm liquid.
Let the coffee sit for 30 seconds to allow the ice to slightly chill it further, then proceed to add your cream.
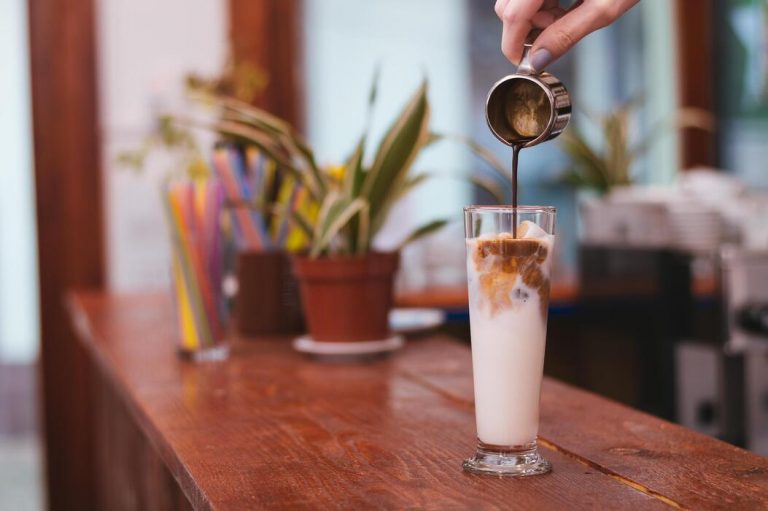
Add cream and stir gently
Now it’s time to finish your drink with cream. Use heavy cream, half-and-half, or your favorite non-dairy alternative like oat or almond milk for a creamy texture.
Pour 2-3 tablespoons of cream slowly over the back of a spoon held just above the coffee surface; this creates a beautiful layered effect and prevents the cream from sinking too quickly. For a richer flavor, use full-fat cream or a splash of vanilla extract.
Stir the cream gently with a long spoon, just 2-3 times, to combine without over-mixing—this keeps the drink light and not muddy. Taste and adjust cream or sweetness as desired. Serve immediately with a straw and enjoy your perfectly balanced, creamy iced coffee.
Types of Cream to Use for Iced Coffee
Heavy cream for thick, rich texture
For an indulgent, decadent iced coffee, heavy cream is your top choice. With a fat content of 36-40%, it adds a thick, velvety richness that transforms your brew into a dessert-like treat. To use it, pour a small amount—about 1 to 2 tablespoons per 8-ounce serving—directly into your chilled coffee.
Stir gently, as heavy cream blends easily but can create a luxurious, almost milkshake-like consistency. Because it’s so rich, you’ll likely need less sweetener; the cream’s natural sweetness pairs beautifully with a touch of vanilla or caramel syrup.
One tip: chill the cream beforehand to prevent curdling when added to cold coffee. Heavy cream also creates a stunning swirled effect when poured slowly over ice, making your drink visually appealing. Remember, it’s high in calories and saturated fat, so use sparingly if you’re watching your intake.
For a keto-friendly option, skip the sweetener or use a sugar-free syrup. This type of cream works best for small, strong coffees like espresso shots or cold brew, where its boldness can shine without overwhelming the flavor. Enjoy a truly luxurious iced coffee experience.
Half-and-half for balanced creaminess
When you want balanced creaminess without the heaviness, half-and-half is your ideal go-to. It’s a blend of equal parts whole milk and light cream, typically with 10-18% fat, offering a smooth, velvety texture that’s lighter than heavy cream but richer than milk.
To incorporate it, pour 2-4 tablespoons into your iced coffee, adjusting based on your preference for richness. Half-and-half blends seamlessly, requiring no special technique—just stir it in for a consistent, mellow creaminess that enhances the coffee’s natural flavors.
Because it’s less thick, it won’t overpower the brew, making it perfect for lighter roasts or larger iced coffee servings. For a classic touch, add a dash of vanilla extract or a simple syrup.
One common issue is curdling when added to hot coffee, but since you’re using cold brew or chilled coffee, this is rarely a problem. Half-and-half also works well for layering: pour it over ice before adding coffee to create a beautiful gradient.
It’s a versatile choice that suits most dietary preferences, offering a satisfying middle ground for everyday iced coffee enjoyment.
Non-dairy creamers like oat or coconut cream
For a plant-based twist, non-dairy creamers like oat or coconut cream are excellent options for creamy iced coffee. Oat cream is particularly popular due to its smooth, neutral flavor that mimics dairy’s richness without overpowering the coffee.
Use 3-4 tablespoons per serving, and stir well—oat cream blends easily and adds a subtle sweetness. Coconut cream, on the other hand, provides a thicker, tropical richness with a distinct coconut taste. Start with 2-3 tablespoons, as it’s more concentrated, and mix thoroughly to avoid clumps.
Both options are dairy-free, lactose-free, and often lower in calories than heavy cream. For best results, chill the creamers beforehand to prevent separation when added to cold coffee. You can also flavor them by blending with vanilla or cocoa powder.
One tip: if using canned coconut cream, shake it well before opening. These creamers are ideal for those with dietary restrictions or anyone seeking a unique, creamy texture without animal products. They also froth beautifully, so consider using a frother for a café-style finish.
Enjoy a deliciously creamy, plant-based iced coffee.
Tips for Preventing Watery Iced Coffee

Use coffee ice cubes to avoid dilution
One of the most effective ways to keep your iced coffee from becoming watery is to replace regular ice cubes with frozen coffee. Simply brew a strong batch of coffee, let it cool to room temperature, then pour it into ice cube trays and freeze.
When you’re ready to make your iced coffee, use these coffee cubes instead of water-based ice. This ensures that as the cubes melt, they intensify the coffee flavor rather than watering it down.
For the best results, use a double-strength brew for your ice cubes, as the melting process will still slightly dilute the final drink. You can also experiment with adding a splash of cream or milk to the ice cube mixture before freezing for a creamy, pre-flavored cube.
Store the cubes in a sealed freezer bag to prevent them from absorbing other odors. This simple swap makes a huge difference, especially if you enjoy sipping your iced coffee slowly.
Chill coffee before pouring over ice
To prevent rapid melting and dilution, always cool your freshly brewed coffee before adding it to ice. Hot coffee poured directly over ice will cause the ice to melt quickly, resulting in a watery, weak drink.
Instead, let your coffee cool to room temperature for 15–20 minutes, then refrigerate it for at least an hour until it’s completely chilled.
If you’re short on time, you can use a cold brew concentrate which is already cold and highly concentrated, perfect for pouring over ice without melting it too fast.
Another quick method is to brew your coffee double-strength and then dilute it with ice, but pre-chilling the coffee still gives you better control. Once your coffee is cold, pour it over a full glass of ice—this minimizes initial temperature shock and keeps the ice intact longer.
Your final iced coffee will stay bold, creamy, and refreshing without that watery aftertaste.
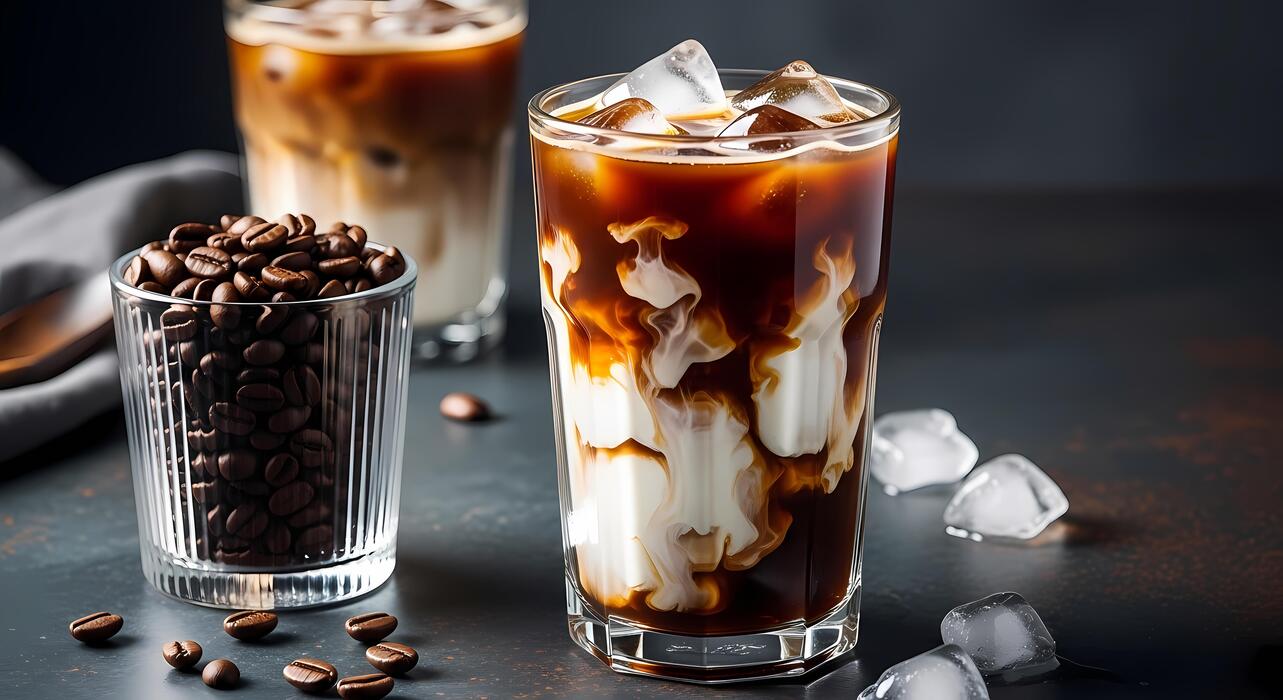
Add cream last to control consistency
For the perfect creamy iced coffee, always pour your cream or milk in last after the coffee has already been mixed with ice.
Adding cream first can cause it to separate or curdle when hit with hot or even warm coffee, and it also makes it harder to gauge the right amount of dilution. By adding cream last, you can stir and adjust the consistency to your preference without over-diluting the coffee.
Start with a small amount—about one to two tablespoons—then taste and add more as needed. This method also helps preserve the coffee’s bold flavor while allowing the cream to gently blend in.
For an even smoother texture, use heavy cream or half-and-half instead of milk, as they are less likely to thin out the drink. If you’re using flavored creamers, add them last to maintain their sweetness and avoid masking the coffee’s natural notes.
This simple step ensures a rich, balanced, and non-watery iced coffee every time.
Flavor Variations for Creamy Iced Coffee
Vanilla sweet cream iced coffee recipe
To make a vanilla sweet cream iced coffee, start by preparing the cream base. In a small jar, combine 1/2 cup heavy cream, 2 tablespoons of sweetened condensed milk, and 1 teaspoon of vanilla extract. Shake or whisk until smooth.
Brew a strong cup of coffee (double-strength works best) and let it cool slightly. Fill a tall glass with ice cubes, pour the coffee over the ice, leaving about an inch of space at the top.
Slowly pour the vanilla sweet cream over the back of a spoon to create a layered effect. Stir gently before drinking to blend the flavors. For a lighter version, substitute half-and-half for the heavy cream, or use vanilla-flavored almond milk for a dairy-free option.
Adjust sweetness by adding more condensed milk for extra richness. This method delivers a creamy, indulgent iced coffee that’s perfect for hot mornings or a refreshing afternoon treat.
Caramel or mocha cream iced coffee
For a caramel or mocha cream iced coffee, begin by making a flavored cream. In a bowl, whip 1/2 cup heavy cream with 2 tablespoons of caramel sauce (for caramel version) or 1 tablespoon of cocoa powder plus 1 tablespoon of chocolate syrup (for mocha). Whisk until soft peaks form.
Brew a strong cup of coffee and let it cool. Fill a glass with ice, pour the coffee over, and top with a generous dollop of the flavored cream. Drizzle extra caramel or chocolate syrup on top for garnish.
For a richer mocha, stir 1 tablespoon of instant espresso powder into the cream before whipping. This creates a decadent, café-style drink at home. Adjust sweetness by using sugar-free syrups or dark cocoa powder. The cream floats beautifully, offering a silky texture that melts into the coffee as you sip.
Perfect for a dessert-like twist on classic iced coffee.
Spiced cream iced coffee with cinnamon
To craft a spiced cream iced coffee with cinnamon, infuse your cream with warm spices. Combine 1/2 cup heavy cream, 1 tablespoon of maple syrup or honey, 1/2 teaspoon of cinnamon, 1/4 teaspoon of nutmeg, and a pinch of cayenne or cardamom for a subtle kick.
Whisk or shake until well blended. Brew a strong coffee and let it cool. Fill a glass with ice, pour the coffee, and top with the spiced cream. For extra depth, stir 1 teaspoon of vanilla extract into the cream.
Garnish with a cinnamon stick or a dusting of ground cinnamon. This variation offers a cozy, aromatic flavor that pairs perfectly with the cold brew. Adjust spice levels to your taste—add more cinnamon for sweetness or cayenne for heat.
The cream’s richness balances the spices, creating a warming yet refreshing iced coffee ideal for fall or any time you crave a unique twist.
Common Mistakes When Making Iced Coffee with Cream
Using too much cream and losing coffee flavor
A common misstep is pouring cream until the coffee turns pale, which masks the brew’s natural notes. To avoid losing coffee flavor, start with just 1 to 2 tablespoons of heavy cream or half-and-half per 8-ounce serving. Taste before adding more—you can always increase, but you cannot remove excess.
Remember that cold coffee tastes less bitter than hot, so you need less cream to balance it. If you prefer a richer texture, opt for full-fat cream and use a smaller amount. For a lighter option, try oat milk or almond milk creamer which add body without overwhelming.
Always choose a bold or dark roast coffee, as its robust profile stands up better to cream. By measuring carefully, you preserve the coffee’s character while achieving a smooth, satisfying drink.
Adding cream to hot coffee over ice
Pouring hot coffee directly over ice with cream leads to uneven dilution and a watery, lukewarm result. Instead, cool your brewed coffee first by letting it sit at room temperature for 10 minutes, or refrigerate it for 30 minutes.
Alternatively, use the Japanese iced coffee method: brew a double-strength batch directly onto a full glass of ice. This locks in flavor without melting the cubes. If you must add cream, stir it into the cooled coffee before pouring over ice to ensure even distribution.
For an extra creamy texture, shake the coffee and cream together in a sealed jar with ice for 15 seconds. This technique emulsifies the cream, preventing separation and ensuring every sip is balanced and refreshing.
Skipping the stir and getting uneven taste
Failing to stir after adding cream results in clumps of cream floating on top and bitter coffee below. To achieve even taste, always mix thoroughly—use a long spoon to stir for at least 10 seconds, or seal your glass and shake for a few seconds.
For a professional touch, froth the cream with a milk frother or whisk before adding it to the coffee; this incorporates air and blends seamlessly. If you use a straw, stir with it after each sip to maintain consistency.
Another trick: pour the cream slowly while stirring continuously to create a uniform emulsion. Avoid stirring only at the top; reach the bottom of the glass to integrate all layers. With proper mixing, you get a consistently creamy, flavorful iced coffee from first to last sip.
Frequently Asked Questions
What’s the easiest way to make iced coffee with cream at home?
Brew a strong cup of coffee (double strength is best), let it cool to room temperature, then pour it over a glass filled with ice. Add a splash of heavy cream or half-and-half, stir, and sweeten to taste with sugar or simple syrup.
Can I use cold brew instead of hot brewed coffee for iced coffee with cream?
Yes, cold brew is an excellent choice because it’s naturally smoother and less acidic. Simply pour your cold brew concentrate over ice, then add cream and any sweetener. Dilute with a little water or milk if needed.
How much cream should I add to my iced coffee?
Start with 1 to 2 tablespoons of heavy cream, half-and-half, or whole milk per 8-ounce serving. Adjust based on how creamy you like it—more for a richer texture, less for a lighter coffee flavor.
What’s the best cream to use for iced coffee?
Heavy cream or half-and-half gives the richest, most indulgent texture, but whole milk or oat milk are lighter options. For a dairy-free version, try coconut cream or a barista-style oat milk.
How do I prevent my iced coffee from getting watery when I add cream?
Use coffee ice cubes (freeze leftover coffee in an ice tray) so they melt without diluting the flavor. Also, chill your brewed coffee completely before pouring over ice, and add cream just before serving.
Should I sweeten iced coffee with cream before or after adding ice?
Sweeten before adding ice for better dissolution. Stir sugar or simple syrup into the warm coffee, then let it cool. If using cold brew, stir sweetener into the concentrate before pouring over ice and adding cream.
Can I make iced coffee with cream using instant coffee?
Yes, dissolve 1 to 2 teaspoons of instant coffee in a small amount of hot water, then pour over ice. Add cream and sweetener to taste. For a smoother result, use cold water and shake with ice in a jar.
How do I make a creamy iced coffee without it separating?
To prevent cream from curdling or separating, ensure your coffee is fully cooled before adding cream, and use full-fat cream (like heavy cream) which blends better. Stir gently or shake in a sealed container for a uniform texture.
Conclusion
Making iced coffee with cream is simple and rewarding. The key takeaways are to brew strong coffee, let it cool to avoid dilution, and pour it over plenty of ice before adding your cream. Experiment with ratios to find your perfect balance of bold coffee and smooth, rich cream. Ditch the pricey coffee shop runs and treat yourself to a refreshing, custom-made glass at home. You have the recipe—now enjoy every sip.