How To Make Cold Brew From Ground Coffee
Making smooth, barista-quality cold brew at home is surprisingly simple and much cheaper than the coffee shop. If you have a bag of ground coffee and a jar, you are already halfway there. This guide skips the fluff to show you exactly how to transform those grounds into a bold, low-acid concentrate using just water and time. From the perfect coffee-to-water ratio to the best steeping secrets, you will learn how to master this refreshing brew today.
What is Cold Brew Coffee and Why It Matters
The Difference Between Cold Brew and Iced Coffee
Understanding the distinction between these two beverages is essential for anyone learning how to make cold brew from ground coffee. While iced coffee is simply hot-brewed coffee poured over ice, cold brew relies on time rather than temperature to extract flavor.
This fundamental shift in the brewing process creates a profile that is naturally sweeter and significantly less acidic. When you steep coarse grounds in room temperature or cold water for 12 to 24 hours, you avoid the chemical reactions triggered by boiling water that often lead to bitterness.
This results in a concentrated coffee base that is incredibly smooth and versatile. Unlike traditional iced coffee, which can taste watered down as the ice melts, cold brew maintains a robust body and a rich mouthfeel.
By mastering this slow-steeping method, you ensure a consistent, cafe-quality result that serves as the perfect foundation for various drinks, whether you prefer it black, diluted with water, or mixed with your favorite creamy milk alternatives.
Benefits of the Cold Extraction Process
The cold extraction process offers several practical advantages for the home brewer, primarily focusing on digestive comfort and flavor stability. Because cold water does not extract the same oils and acids as hot water, the final product is roughly 60% less acidic than traditional drip coffee.
This makes it an ideal solution for coffee lovers who suffer from acid reflux or sensitive stomachs. Furthermore, the extended shelf life of cold brew concentrate is a major convenience factor; a single batch can stay fresh in your refrigerator for up to two weeks.
This allows you to prepare a large quantity over the weekend and enjoy instant, delicious coffee throughout the busy work week. The process also highlights the unique tasting notes of the beans, providing a mellow and chocolatey profile that is often lost during high-heat brewing.
By choosing cold extraction, you are prioritizing a smoother caffeine delivery that is easier on your body while maximizing the natural sweetness inherent in your chosen coffee grounds.
Why Pre-Ground Coffee Works for This Method
Many beginners wonder if they need expensive equipment, but the reality is that standard coarse ground coffee is perfectly suited for this method. Cold brew is a forgiving process that thrives on a larger particle size, which prevents the over-extraction and cloudiness often found in finer grinds.
Using pre-ground coffee simplifies the workflow, making it an accessible and cost-effective way to enjoy premium beverages at home. Since the immersion time is so long, the water has ample opportunity to penetrate the grounds, ensuring a full extraction even without the precision of a burr grinder.
This makes it the ultimate solution for those who want a low-maintenance brewing routine without sacrificing quality. Additionally, because the flavor is so concentrated, you can use affordable bulk coffee and still achieve a luxurious, high-end taste.
By leveraging the slow-soaking nature of this technique, you can transform everyday grocery store grounds into a sophisticated concentrate, proving that simplicity and patience are the most important ingredients in a perfect cup of homemade cold brew.
Essentials You Need to Start Brewing

Choosing the Right Ground Coffee Roast
To achieve a smooth flavor profile when learning how to make cold brew from ground coffee, selecting the appropriate roast is the most critical first step. You should prioritize a coarse grind size that resembles sea salt to prevent over-extraction and bitterness during the long steeping process.
While personal preference varies, a medium to dark roast generally performs best because the cold extraction method highlights chocolatey, nutty, and caramel notes while muting harsh acidity. Avoid finely ground espresso blends, as these will lead to a cloudy, silt-filled concentrate that is difficult to filter correctly.
Using freshly roasted beans ground specifically for cold brew ensures that the natural oils and aromatic compounds remain intact, providing a rich and full-bodied beverage.
If you are buying pre-ground coffee, look for labels specifically mentioning cold brew or French press compatibility to guarantee the texture is coarse enough to allow water to flow freely between the particles for a clean finish.
Required Kitchen Tools and Equipment
The beauty of making cold brew at home lies in its simplicity, requiring only a few essential kitchen tools to get started.
You will need a large glass jar or pitcher to act as your primary steeping vessel; glass is preferred over plastic to ensure no off-flavors leach into the coffee during the twelve to twenty-four hour brew time.
A fine-mesh strainer combined with a paper coffee filter or a dedicated nut milk bag is necessary to separate the grounds from the liquid once the steeping is complete.
To maintain the perfect balance of flavors, using a digital kitchen scale is highly recommended to measure a consistent 1:4 or 1:5 coffee-to-water ratio. If you do not have a dedicated cold brew system, a standard French press works exceptionally well as an all-in-one solution for both steeping and plunging.
Having a long-handled spoon for stirring the grounds ensures every particle is fully saturated, which is vital for a uniform and successful extraction process.
The Importance of Filtered Water Quality
Since cold brew is composed of approximately ninety-eight percent water, the quality of your liquid base significantly impacts the final taste of your concentrate.
You should always use freshly filtered water rather than straight tap water to avoid the presence of chlorine, minerals, or metallic undertones that can mask the delicate nuances of the coffee beans.
Using a charcoal-filtered pitcher or a reverse osmosis system removes impurities while retaining the necessary mineral balance that aids in the extraction of flavors.
The temperature of the water should be cool or room temperature when you begin the process; never use hot water, as this changes the chemical breakdown and introduces the acidity that cold brewing is designed to avoid.
Starting with clean, neutral-tasting water ensures that the natural sweetness and low-acid characteristics of the cold brew process are the stars of the show.
Consistent water quality allows you to replicate your favorite recipes with precision, ensuring every batch you produce is refreshing, crisp, and professional in its overall flavor profile.
The Best Cold Brew Ratio for Ground Coffee
How to Calculate the Coffee-to-Water Ratio
Finding the perfect balance between your coffee grounds and water is the most critical step in mastering the cold brew method. To achieve a smooth, cafe-quality result at home, the industry standard is to use a weight-based measurement rather than volume.
A highly recommended starting point for general brewing is a 1:8 ratio, which translates to one part coffee for every eight parts water. For example, if you are using 100 grams of coarsely ground coffee, you will need to add 800 grams of filtered water.
Using a digital kitchen scale ensures total precision, as different roasts have varying densities that can make measuring by cups or scoops inaccurate. This specific ratio provides enough liquid to fully saturate the grounds without over-extracting the bitter compounds, resulting in a clean and balanced profile.
Always ensure your water is filtered and at room temperature to maintain the integrity of the beans during the long steeping process.
Making a Strong Cold Brew Concentrate
If you prefer a versatile brew that can be customized with milk or hot water, you should aim for a strong cold brew concentrate. This is typically achieved using a 1:4 or 1:5 ratio, which creates a dense, syrupy liquid packed with intense flavor and high caffeine content.
To prepare this, combine one cup of coarsely ground coffee with four cups of water and allow it to steep for at least 12 to 18 hours.
Because the concentration is so high, it is essential to use a dual-filtration method or a fine mesh bag to remove all sediment, ensuring a silky texture.
The primary benefit of brewing a concentrate is its extended shelf life; you can store it in an airtight glass jar in your refrigerator for up to two weeks.
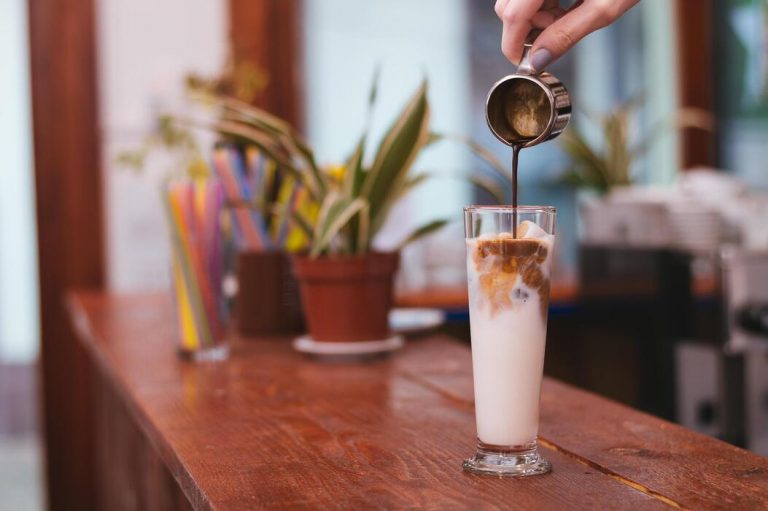
When you are ready to serve, simply dilute the concentrate with equal parts water, cream, or oat milk to find your personal strength preference.
Ready-to-Drink Ratios for Beginners
For those who want a simple, hassle-free experience without the need for dilution, a ready-to-drink ratio is the best approach. A 1:12 or 1:15 ratio is ideal for beginners because it produces a lighter, refreshing cup that can be enjoyed straight from the filter.
To make this, mix one ounce of coffee with twelve to fifteen ounces of water. This lower concentration is much more forgiving for novice brewers, as it reduces the risk of creating a brew that is overwhelmingly strong or bitter.
It is particularly effective when using medium to light roast beans, as the higher water volume helps to highlight the delicate floral or fruity notes that are often lost in heavier concentrates. Once the steeping time is complete, simply strain the mixture and pour it over ice.
This method is the fastest way to enjoy a crisp glass of coffee while learning how different steeping times affect the final flavor profile.
Step-by-Step Guide to Making Cold Brew at Home
Mixing Your Grounds and Water
To begin your cold brew journey, you must start with the correct ratio to ensure a balanced extraction. Aim for a coarse grind size, similar to sea salt, to prevent the coffee from becoming overly bitter or cloudy.
Use a standard ratio of one cup of coffee grounds to four cups of filtered water for a versatile concentrate. Place your dry grounds into a large glass jar or a dedicated cold brew carafe. Slowly pour the cool, filtered water over the grounds, making sure to saturate every particle.
Instead of shaking the container vigorously, use a long spoon to gently stir the mixture, ensuring there are no dry pockets trapped at the bottom. This initial contact is crucial because it sets the stage for the long infusion process.
By using room temperature or cold water rather than hot, you avoid extracting the acidic oils that characterize traditional drip coffee, resulting in a much smoother, chocolatey profile that is easy on the stomach.
Steeping Times for Maximum Flavor
Patience is the secret ingredient when making cold brew at home. Once your mixture is prepped, cover the container and let it sit undisturbed. For the most robust flavor profile, you should steep your coffee for 12 to 18 hours.
If you prefer a lighter, more floral notes, stick to the lower end of that range. However, for a deep, rich concentrate that holds up well against ice and milk, a 15-hour steep at room temperature is often considered the sweet spot.
You can also choose to refrigerate the brew while it steeps, but keep in mind that the cold temperature slows down extraction, meaning you may need to extend the time to 24 hours.
Avoid steeping for longer than 24 hours, as this can lead to over-extraction, introducing woody or metallic flavors that ruin the batch. Finding your personal preference requires some experimentation, but staying within these proven time frames ensures a consistently delicious and caffeinated result every morning.
How to Filter Your Brew Properly
After the steeping process is complete, the final step is to separate the liquid from the spent grounds. To achieve a clean, sediment-free cup, you should filter the mixture twice. Start by pouring the brew through a fine-mesh sieve to remove the largest particles.
For the second pass, line the sieve with a paper coffee filter or a cheesecloth to catch the finer silts that cause cloudiness. Do not squeeze the grounds during this process, as forcing the liquid through can release bitter tannins and unwanted sediment into your final product.
Let gravity do the work naturally. Once filtered, you are left with a potent cold brew concentrate. You can store this in a sealed glass bottle in the refrigerator for up to two weeks without losing significant quality.
When you are ready to serve, simply dilute the concentrate with water or milk using a one-to-one ratio. This filtering method guarantees a professional-grade beverage that is incredibly smooth, refreshing, and entirely free of grit.
Common Mistakes to Avoid When Using Ground Coffee

How to Prevent Bitter or Sour Results
To ensure your cold brew tastes smooth rather than unpleasantly bitter or sour, you must master the balance between extraction time and water quality. Bitterness often stems from over-extraction, which happens when the grounds sit in water for more than twenty-four hours.
Conversely, a sour or weak profile usually indicates under-extraction, often caused by pulling the brew too early or using refrigerated water that is too cold to pull out the necessary oils.
You should aim for a steeping window of 12 to 18 hours at room temperature to achieve that signature chocolatey profile. Additionally, always use filtered water to avoid the harsh chemical notes found in tap water, which can interact poorly with coffee acids.
By maintaining a consistent 1:4 or 1:5 coffee-to-water ratio, you create a concentrated base that remains flavorful without becoming overwhelming. Monitoring these variables ensures a balanced cup every time you brew at home.
Why You Should Never Use Fine Grounds
The most frequent error when learning how to make cold brew from ground coffee is selecting a fine or medium-fine grind size. Fine grounds are designed for rapid extraction methods like espresso, but in a long-term immersion process, they lead to a muddy, over-extracted, and gritty beverage.
Because the water remains in contact with the coffee for nearly a full day, you must use a coarse, sea salt-like consistency to slow down the extraction process.
Coarse grounds allow water to flow freely around the particles, extracting sweetness and depth without pulling out the astringent tannins found deep within the bean.
Furthermore, using fine grounds makes the filtration process nearly impossible, as they clog paper filters and pass through mesh strainers, leaving a thick layer of sediment at the bottom of your jar.
Stick to extra-coarse grinds to guarantee a clean, crisp finish and a much easier cleanup phase after the steeping is complete.
Temperature Control During the Steeping Phase
Temperature plays a pivotal role in the chemical reactions that occur while your coffee grounds soak. Many beginners mistakenly place their brewing vessel directly into the refrigerator immediately after mixing.
However, cold temperatures significantly slow down the extraction of flavor compounds, often leading to a thin and acidic result that lacks body. For the most robust flavor, it is highly recommended to steep your grounds at room temperature for the duration of the process.
This allows the water to efficiently draw out the rich aromatic oils and sugars that define a high-quality cold brew. If you prefer a lighter profile, you can utilize the fridge, but you must extend the steeping time to at least 24 hours to compensate for the lack of heat.
Once the extraction is finished and the grounds are filtered out, you should then store the concentrate in the refrigerator to preserve its freshness and prevent spoilage or flavor degradation over the following week.
How to Store and Serve Your Cold Brew
Best Ways to Keep Cold Brew Fresh
Once you have successfully mastered how to make cold brew from ground coffee, proper storage is essential to preserve those smooth, chocolatey flavor notes you worked so hard to extract.
The most effective way to maintain quality is by using an airtight glass container, such as a Mason jar or a specialized glass carafe with a silicone seal. Glass is non-porous and will not absorb odors from your refrigerator, ensuring your coffee tastes exactly as intended.
It is vital to minimize oxygen exposure, so try to choose a vessel that matches the volume of your brew to reduce the headspace inside the bottle.
Always store your concentrate in the coldest part of the refrigerator rather than the door, as temperature fluctuations can lead to faster degradation of the oils. If you notice any sourness or a loss of aroma, it is a sign that oxidation has begun.
Keeping your brewing equipment and storage jars perfectly clean and sanitized will also prevent any bacterial growth, allowing you to enjoy a consistently crisp and refreshing caffeine kick every morning.
How Long Does Homemade Cold Brew Last?
Understanding the shelf life of your DIY beverage is a key part of learning how to make cold brew from ground coffee at home. Generally, a pure cold brew concentrate will remain fresh and delicious for up to 7 to 10 days when kept refrigerated in a sealed container.
However, for the absolute peak flavor profile, most baristas recommend consuming your batch within the first week. If you have already diluted the concentrate with water, the shelf life drops significantly to about 2 or 3 days, as the added water accelerates the oxidation process.
You should always perform a quick scent and sight check before pouring a glass; if the liquid appears unusually cloudy or develops a fermented, vinegary smell, it is time to discard it and start a fresh batch.
To extend the life of your coffee even further, consider freezing leftover brew into ice cubes. This clever hack prevents waste and ensures that your future iced coffees are never watered down, providing a convenient way to enjoy your homemade creation well beyond the standard weekly window.
Dilution Tips for the Perfect Cup
The final step in the process of how to make cold brew from ground coffee is mastering the art of dilution to suit your personal palate. Because the immersion method creates a potent concentrate, drinking it straight can be overwhelming.
A standard starting point is a 1:1 ratio of concentrate to water or milk, which provides a balanced strength for most drinkers. If you prefer a lighter, more refreshing beverage, try a 1:2 ratio to let the subtle floral notes shine through.
For those who enjoy a creamy texture, swapping water for oat milk or almond milk adds a natural sweetness that complements the low acidity of the cold brew. When serving, always pour your concentrate over fresh ice to keep the drink chilled without immediate melting.
If you find the brew too bitter, a tiny pinch of salt can neutralize the remaining tannins, while a splash of simple syrup can enhance the body.
Experimenting with these ratios allows you to customize every cup, transforming your basic kitchen experiment into a professional-grade coffee experience that rivals any local cafe or high-end roastery.
Ways to Customize Your Cold Brew Flavor
Adding Natural Sweeteners and Syrups
Once you have successfully learned how to make cold brew from ground coffee, the next step is perfecting the sweetness to match your palate. Because cold brew is less acidic than hot coffee, you may find you need less sugar overall.
To ensure a smooth texture, avoid using granulated sugar, which struggles to dissolve in cold liquids. Instead, opt for homemade simple syrups made by simmering equal parts water and sugar.
You can elevate the profile by using natural sweeteners like honey, agave nectar, or maple syrup, which provide a distinct earthiness that complements the chocolatey notes typical of cold brew. For a gourmet touch, whisk in a drop of pure vanilla extract or almond essence before serving.
If you are watching your calorie intake, liquid stevia or monk fruit drops are excellent alternatives that integrate seamlessly without leaving a gritty residue at the bottom of your glass, ensuring every sip is perfectly balanced and refreshing.
Best Milk and Dairy-Free Alternatives
The rich, concentrated nature of cold brew makes it the perfect canvas for various creamy additions. Traditional whole milk or heavy cream offers a classic, velvety mouthfeel that cuts through the caffeine intensity beautifully. However, many enthusiasts prefer the unique flavor profiles of plant-based milks to enhance their beverage.
Oat milk is widely considered the top choice for cold brew due to its natural sweetness and thick consistency, which mimics dairy more closely than thinner alternatives. Unsweetened almond milk provides a subtle nuttiness, while coconut milk adds a tropical flair that pairs exceptionally well with darker roasts.
For a frothy, cafe-style experience, try using a handheld milk frother on your cold milk before pouring it over the ice.
This simple technique creates a luxurious layer of foam that sits atop the dark coffee concentrate, providing a professional aesthetic and a more complex texture that makes your home-brewed coffee feel like a high-end treat.
Infusing Spices During the Brewing Process
One of the most effective ways to customize your drink is to introduce flavor at the very beginning. When figuring out how to make cold brew from ground coffee, consider mixing dry spices directly into your coffee grounds before adding water.
This infusion method allows the flavors to develop slowly over the 12 to 24-hour steeping period, resulting in a deep, integrated taste. A cinnamon stick or a teaspoon of ground cinnamon adds a warm, woody sweetness that is perfect for year-round drinking.
For a more adventurous profile, try adding crushed cardamom pods or a pinch of ground ginger to create a spicy, aromatic blend. Even a small amount of unsweetened cocoa powder mixed into the grounds can enhance the natural mocha notes of the beans.
Remember to use a fine-mesh filter or a double-straining process when your brew is finished to ensure that any fine spice particles are removed, leaving you with a clean, flavorful, and incredibly smooth customized cold brew.
Frequently Asked Questions
What is the best coffee-to-water ratio for cold brew?
A standard ratio is 1:8 for a ready-to-drink brew or 1:4 if you want a concentrated base. For every cup of ground coffee, use 4 to 8 cups of filtered water depending on your preferred strength.
Does the grind size matter when using ground coffee for cold brew?
Yes, a coarse grind similar to sea salt is ideal for cold brew. If you only have pre-ground coffee (which is usually medium), reduce the steeping time slightly to avoid over-extraction and bitterness.
How long should I steep ground coffee to make cold brew?
You should let the coffee grounds steep in water for 12 to 24 hours at room temperature or in the refrigerator. Steeping for less than 12 hours may result in a weak flavor, while longer than 24 hours can make it bitter.
Do I need a special machine to make cold brew from ground coffee?
No special equipment is required; you can simply use a glass jar or pitcher. After steeping, you just need to strain the mixture through a fine-mesh sieve, cheesecloth, or a paper coffee filter.
Should I steep cold brew on the counter or in the fridge?
Both methods work, but steeping on the counter is faster and often yields a brighter flavor profile. Steeping in the fridge takes longer (closer to 24 hours) but ensures the beverage is cold and ready to serve immediately.
How do I filter the grounds out of the coffee once it’s finished?
The easiest way is to pour the brew through a fine-mesh strainer to catch the large grounds, followed by a paper filter or a clean kitchen towel to remove the fine sediment. This ensures a smooth, clean cup of coffee.
How long does homemade cold brew stay fresh?
Once filtered, cold brew concentrate can be stored in an airtight container in the refrigerator for up to two weeks. If you have already diluted the coffee with water, it is best consumed within 2 to 3 days.
Conclusion
Making cold brew at home is a simple process that transforms standard ground coffee into a smooth, low-acid treat. By mastering the right coffee-to-water ratio and allowing ample steeping time, you can create a versatile concentrate that rivals your favorite cafe. Whether you prefer it black or over ice with cream, the results are consistently refreshing. Now that you know the basics, grab your favorite beans and start brewing your own delicious batch today.