How To Froth Milk French Press
how to froth milk french press is a simple, reliable way to create café-style foam at home without special equipment. If you want creamy milk for lattes, cappuccinos, or hot chocolate, this guide shows exactly what to do, what temperature works best, and how to avoid common mistakes. You’ll learn the fast method, the best milk choices, and how to get smooth, stable froth every time, right now. You’re in the right place for a clear, practical solution.
What You Need to Froth Milk in a French Press
Best type of milk to use
For the best froth, start with cold milk and choose a type that matches your texture goal. Whole milk is usually the easiest for French press frothing because its fat and protein create a stable, creamy foam with good volume.
If you want a lighter result, 2% milk still froths well, though the foam may be slightly less rich. Non-dairy milks can work too, but look for brands labeled barista or froth-friendly because they contain added proteins or stabilizers that improve foam.
Avoid ultra-low-protein options when possible, since they tend to collapse quickly. Also, fresh milk generally performs better than older milk. For a smoother finish, use milk that is chilled but not frozen, and avoid overheating it afterward.
If you’re experimenting, test small amounts first so you can learn which milk gives you the texture and flavor you like most in coffee drinks.
French press size and plunger setup
A French press works best when there is enough room for the milk to expand as you pump. Choose a press that is at least twice the volume of the milk you plan to froth, since milk can rise a lot as air is incorporated.
For example, if you want to froth 1 cup of milk, a larger press helps prevent spills and gives you better control. Before you begin, make sure the plunger moves smoothly and evenly; a stiff or loose plunger can make frothing inconsistent.
Pour in only the amount of milk you need, usually filling the press no more than one-third full. That leaves space for foam to form without overflowing. Hold the lid firmly and use a steady up-and-down motion rather than aggressive pumping, which can create large bubbles instead of microfoam.
Stop once the milk has roughly doubled in volume and looks velvety, then tap the press lightly on the counter to settle the foam before pouring.
Optional tools for better results
You can froth milk with just a French press, but a few simple tools can make the process easier and give you better control.
A microwave or small saucepan helps you warm the milk after frothing if you prefer it hot, though many people heat the milk first to improve foam stability. A thermometer is useful if you want to avoid overheating, since milk tastes best when it is warm, not scalded.
A measuring cup helps you pour the right amount so the press has enough space for foam expansion. If you want finer foam, a fine mesh spoon can help skim off larger bubbles before pouring.
A timer is also handy because French press frothing usually takes only 20 to 30 seconds of pumping, and overdoing it can break down the foam. Finally, keep a towel or cloth nearby for drips and spills, especially while you’re learning the right speed and pressure for your setup.
How to Froth Milk with a French Press Step by Step
Heat the milk to the right temperature
Start with cold milk and heat it gently before frothing. The ideal range is about 140–155°F (60–68°C), which is hot enough to create stable foam without scalding or dulling the taste.
If you do not have a thermometer, heat the milk until it is steaming and the container feels very warm but still comfortable to hold for a few seconds. Do not boil the milk, since overheated milk can taste flat and froth poorly.
For best results, use whole milk for a richer foam, or try oat milk or other barista-style alternatives if you prefer dairy-free options. Warm milk froths more evenly and gives you a smoother, creamier finish in your French press.
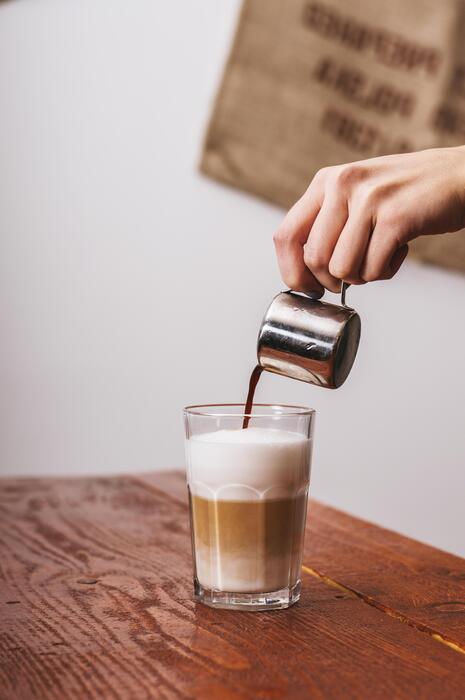
Pour milk into the French press
Pour the heated milk into a clean French press, filling it only one-third to halfway full. Leaving extra space is important because the milk will expand as air is pumped into it. If the press is too full, the foam can overflow and become uneven.
Make sure the plunger and mesh are in good condition, since a clean, well-fitting filter helps build better texture. You can also warm the French press briefly with hot water before adding milk to help maintain temperature longer.
Avoid adding flavorings or sugar at this stage if you want the strongest foam, because they can slightly change the structure. A moderate fill level gives you better control and more consistent frothing.
Pump the plunger to create foam
Place the lid on the French press and move the plunger up and down with steady, quick strokes. Aim for about 20–40 pumps, depending on how much foam you want.
Start with short, brisk motions, and keep the plunger just under the surface of the milk to pull in air effectively. You should notice the milk volume increasing and the texture becoming lighter and thicker.
If you pump too fast or too aggressively, the foam can turn dry and bubbly instead of smooth. If it feels like the plunger is sticking, slow down slightly and make sure the milk level is not too high.
Keep going until the milk looks velvety and has a fine layer of microfoam on top.
Tap and swirl for a smoother texture
After frothing, gently tap the French press on the counter a few times to pop any large bubbles trapped in the foam. Then swirl the milk in a circular motion to help the foam and liquid blend into a smoother, more glossy texture.
This step is key if you want café-style milk that pours well into coffee or espresso. If the foam looks too stiff, give it a few more swirls until it becomes silky and even.
For a latte, pour immediately while the texture is still uniform, since the foam will separate over time. If needed, use a spoon to hold back thicker foam and let the creamier milk flow first. A quick finish like this creates a better, more balanced result.
How to Choose the Best Milk for French Press Froth

Whole milk vs skim milk
For the richest French press froth, whole milk is usually the easiest choice because its higher fat content creates a creamy, velvety foam that holds well on top of lattes and cappuccinos.
If you want a lighter drink with more foam volume, skim milk produces a bigger, airier froth, but the texture can feel less creamy and may collapse faster.
For most home brewers learning how to froth milk French press style, 2% milk is a strong middle ground: it foams more easily than whole milk and still tastes smooth.
Use milk that is cold and fresh, since colder milk gives you more time to introduce air before it warms too much. If you want café-style microfoam, start with whole or 2% milk and avoid ultra-pasteurized options when possible, because they can be slightly less stable.
The best choice depends on whether you value creaminess, foam height, or stability.
Best dairy-free milk options
Not all dairy-free milks froth the same in a French press, so look for products labeled barista blend or foam-friendly. Oat milk is often the best overall option because it creates a smooth, creamy foam and has a neutral taste that works well in coffee.
Soy milk can also froth nicely thanks to its protein content, but some brands separate or curdle if the coffee is very acidic or too hot. Almond milk usually makes lighter, less stable foam, though it can still work if you want a thinner layer on top.
Coconut milk can taste delicious, but the foam is often more delicate and may not hold as long. For the best results, shake the carton first, use the milk straight from the fridge, and avoid heating it too much before frothing.
If you are testing how to froth milk French press style, try a few brands, because formulation matters more than the milk type alone.
How fat and protein affect foam
The secret to choosing the best milk for French press froth is understanding fat and protein. Protein builds structure by trapping air bubbles, which helps create stable foam, while fat adds richness and a smoother mouthfeel.
That is why skim milk can make a lot of foam but often feels less creamy, and whole milk tastes luxurious but may produce slightly less volume. For balanced froth, a milk with moderate protein and moderate fat usually performs best.
In dairy-free options, added proteins and stabilizers can improve results, which is why barista versions often foam better than standard cartons. Temperature matters too: milk that is too hot can weaken foam, while milk that is cold and gently warmed after frothing tends to hold better.
If you want a thicker cap of foam, choose a milk with more protein. If you want a smoother, café-style texture, choose a milk with enough fat to soften the bubbles without making them heavy.
How to Get Thicker, Creamier Foam
Use the right milk temperature
For thicker, creamier foam, start with cold milk straight from the fridge and warm it gently after frothing if needed. Cold milk gives you more time to build tiny, stable bubbles before the proteins break down, which is key when learning how to froth milk french press.
If the milk is too warm at the start, it can foam quickly but collapse faster and feel thin. Pour in whole milk for the richest texture, or use a barista-style oat milk if you want a dairy-free option that still holds foam well.
Avoid heating the milk above about 140°F to 150°F during the process, because overheating can make the foam dry, bubbly, or flat. If you are aiming for extra thickness, chill the French press first, then add cold milk and froth immediately.
A colder starting point plus the right milk choice gives you a more velvety finish and better structure.
Adjust pumping speed and pressure
The way you pump the plunger matters just as much as the milk itself. To make thicker foam, use steady, medium-fast strokes rather than aggressive, hard pumping. Fast, controlled movement pulls more air into the milk in smaller bubbles, which creates a creamier texture instead of large frothy bubbles.
Keep the plunger moving through the milk smoothly and try not to slam it to the bottom. If you pump too hard, you can oversaturate the milk with air and end up with foam that looks big but feels weak.
A good method is to pump for 20 to 30 seconds, pause briefly, and then pump a few more times until the milk looks glossy and doubled in volume. If the foam seems too loose, give it a few more slow strokes to refine the texture.
The goal is to build a fine, silky microfoam that pours well and sits beautifully on coffee.
Fill the French press only halfway
Do not overfill the French press if you want thick, creamy foam. Leave plenty of empty space so the milk can expand as you pump. A good rule is to fill the press only halfway, or even a little less if you are using a smaller press.
This gives the milk room to triple in volume without overflowing and helps the plunger move through the liquid more effectively. When the container is too full, the milk cannot incorporate air evenly, so the foam often turns thin or messy.
Measure your milk before frothing and choose a press that matches the amount you need for your drink. For example, if you only need one or two cups of foam, use a smaller batch rather than filling a large press to the top.
Better spacing means better aeration, more consistent texture, and a creamier result. Once frothing is done, tap the press lightly on the counter and swirl the milk to smooth out any big bubbles.
Common French Press Milk Frothing Mistakes to Avoid
Overheating the milk
One of the easiest mistakes when learning how to froth milk french press is letting the milk get too hot. Aim for warm, not boiling, because overheated milk tastes flat and scorched and loses its ability to hold foam.
For best results, heat the milk to about 140–150°F (60–65°C) before pouring it into the press. If you do not have a thermometer, stop heating when the milk is hot to the touch but still comfortable to hold briefly.
Also, remember that the milk keeps warming slightly as you pump and after you pour. If you notice steam rising heavily or the milk forming a skin, it is already too hot. Lower heat and start over for a smoother, sweeter foam.
Overfilling the press
Another common French press frothing mistake is filling the container too high. A French press needs space for the milk to expand, or the foam will push upward and spill over the lid. A good rule is to fill the press only one-third to halfway full.
This gives the plunger room to move and creates more air incorporation with less mess. Overfilling can also make pumping harder and less effective, leading to uneven foam. If you want to froth more milk, work in smaller batches rather than trying to do everything at once.
This simple adjustment improves control, creates a more consistent texture, and keeps your countertop cleaner. Less milk in the press usually means better foam and easier cleanup.
Pumping too fast or too hard
When people ask how to froth milk french press style, they often assume faster pumping creates better foam. In reality, too much force breaks the bubbles and can make the milk thin and unstable. Use steady, controlled strokes instead of aggressive plunging.
Start with a moderate pace and keep the motion smooth, letting air build gradually. If you pump too fast, the milk may splash, cool unevenly, or become overly airy with large bubbles. The goal is a texture that is fine, creamy, and silky, not stiff or foamy like soap suds.
If the foam looks too bubbly, tap the press gently on the counter and swirl the milk a little before pouring. Control is more important than speed.
Using milk that will not froth well
Milk choice matters a lot when using a French press. If your milk will not froth well, the problem may be the type you chose, not your technique. Whole milk usually produces the richest, most stable foam because its fat and protein balance supports texture.
Low-fat milk can still froth, but it often makes a lighter foam. Some plant-based milks work too, but results vary widely by brand and formulation. Look for versions labeled barista or frothing-friendly. Also avoid milk that is too old, because freshness affects foam quality.
If you want the best results, use cold milk straight from the fridge and choose one with enough protein. The right milk makes the process much easier and the foam much creamier.
How to Use Frothy Milk for Coffee Drinks
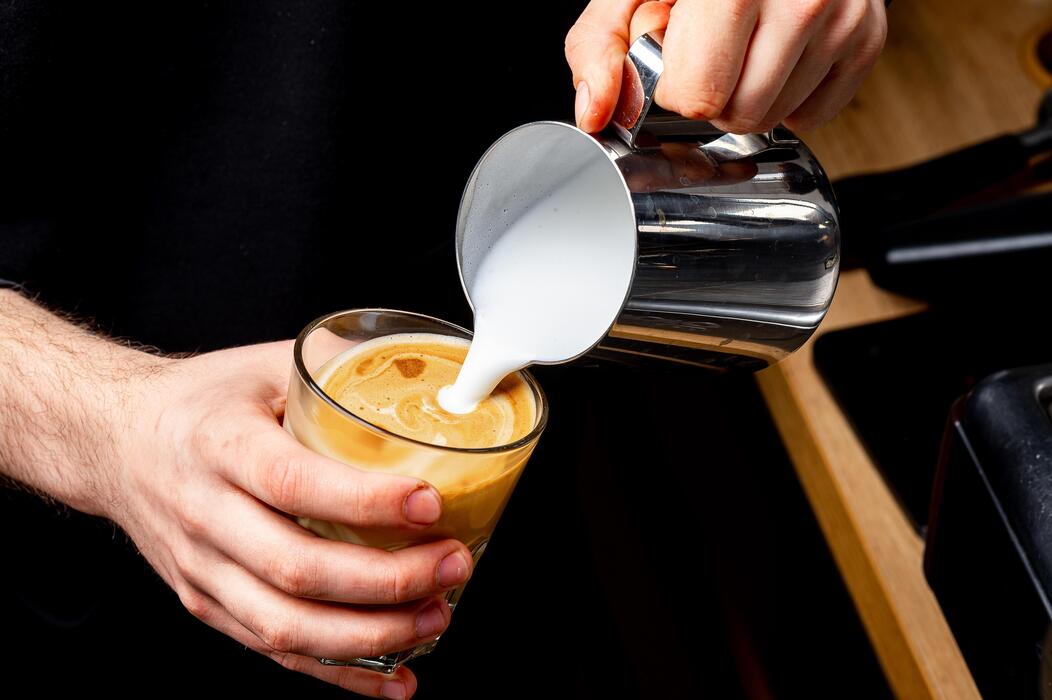
Make a latte with French press milk
To make a latte, start by heating your milk until it is hot but not boiling; around 140–150°F is ideal if you have a thermometer. Pour the milk into a clean French press, filling it only about one-third to one-half full so there’s room for foam.
Move the plunger up and down quickly for 20–40 seconds until the milk looks doubled in volume and feels velvety. For the best texture, let the milk sit for 10–15 seconds so the larger bubbles rise, then swirl the press gently before pouring.
Pour the milk into your espresso slowly, holding back the foam with a spoon if you want a smoother latte, or spoon the foam on top for a thicker finish. If you want a sweeter drink, add simple syrup, vanilla, or caramel before frothing so it blends evenly.
Top cappuccinos and macchiatos
French press frothed milk works especially well for drinks that need light, airy foam. For a cappuccino, froth milk a little longer so you get a drier, foamier texture than you would for a latte.
Use the same heating and plunging method, but stop when the milk is very frothy and the bubbles are fine and glossy. Pour the espresso first, then add a small amount of steamed milk, followed by a generous layer of foam.
For a macchiato, use less milk overall and add just a spoonful or two of froth to “stain” the espresso without making it too milky. If your foam is too dense, tap the French press lightly on the counter and swirl it before pouring.
The goal is smooth, stable microfoam that sits neatly on top and gives each sip a creamy finish without collapsing right away.
Add foam to hot chocolate and matcha
French press milk foam is not just for espresso drinks; it can also upgrade hot chocolate and matcha. For hot chocolate, make the cocoa base first, then top it with warm foamed milk to create a richer, café-style drink.
The foam adds a light, creamy layer that balances the sweetness and makes the drink feel more indulgent. For matcha, whisk your powder with a small amount of hot water until smooth, then pour in frothed milk for a latte-style drink.
The foam helps soften matcha’s earthy, slightly bitter flavor and gives it a smooth finish. To keep the texture pleasant, avoid overheating the milk, since very hot milk can flatten foam and dull flavor.
If you want extra sweetness, stir in honey, maple syrup, or vanilla before frothing so everything blends evenly. A French press makes both drinks feel special with minimal equipment.
How to Clean and Maintain Your French Press After Frothing
Rinse immediately after use
As soon as you finish frothing, empty the French press right away so milk doesn’t dry inside the carafe. Swirl in warm water and pour it out a few times to loosen foam and prevent buildup on the glass and walls.
If you used very hot milk, let the press cool for a minute first so the glass isn’t shocked by sudden temperature changes. Avoid letting milk sit in the container, because even a thin film can turn sticky and make the next clean-up harder.
For best results, do a quick rinse of the plunger assembly too, especially around the rim where foam tends to collect. A fast rinse after every use helps keep your French press in better shape and makes it easier to use again for coffee or milk frothing.
This simple habit is one of the easiest ways to maintain hygiene and extend the life of your press.
Wash the plunger and mesh filter
The plunger and mesh filter need extra attention because they trap tiny milk solids and foam. Disassemble the parts and wash them with warm water and a drop of mild dish soap.
Use a soft sponge or bottle brush to gently scrub both sides of the mesh, along with the spring and frame, where residue can hide. If the plunger feels sticky, soak the parts for a few minutes before scrubbing.
Make sure the filter is completely free of buildup, since leftover milk can affect the texture of future froth and cause odors. Rinse thoroughly so no soap remains, because soap residue can change the taste of milk and coffee. Reassemble only after everything is clean and dry.
Regularly washing these parts keeps the froth smoother, prevents clogs, and helps your French press perform well each time you use it for milk frothing.
Remove milk residue and odors
Milk residue can create lingering smells if it is not removed fully, so do a deeper clean when needed. After washing, fill the French press with warm water and a tablespoon of baking soda, then let it sit for 10 to 15 minutes to help neutralize odors and loosen film.
You can also use a small amount of white vinegar for stubborn smells, but rinse very well afterward to avoid any sour taste. Pay attention to the bottom corners and the underside of the lid, where residue often hides.
Dry all parts completely before storing, because moisture can encourage odors and make buildup return faster. If you froth milk often, consider a weekly deep clean to keep the carafe fresh.
Consistent odor removal helps your French press stay sanitary, keeps flavors clean, and ensures the frother works well for both milk and coffee.
Frequently Asked Questions
How do I froth milk with a French press?
Pour warmed milk into the French press, filling it no more than one-third full. Move the plunger up and down briskly for 20-30 seconds until the milk becomes foamy and doubles in volume.
What kind of milk works best for frothing in a French press?
Whole milk usually gives the richest, most stable foam because of its fat and protein content. You can also froth 2% milk, oat milk, and some other non-dairy milks, but results vary by brand and formulation.
Should I heat the milk before frothing it in a French press?
Yes, slightly warmed milk froths better than cold milk. Heat it to about 150°F/65°C, or warm but not boiling, to help create smoother foam and better texture.
How much milk should I put in the French press?
Use only about one-third of the French press capacity, or less. Milk expands as you froth it, and too much milk can overflow and make it harder to create good foam.
How long should I pump the French press to froth milk?
Usually 20-30 seconds is enough for a light, airy foam. If you want a denser texture, you can continue a little longer, but stop once the milk looks foamy and has increased in volume.
Why is my French press milk not frothing well?
The milk may be too hot, too cold, or not suitable for frothing. Try using fresher milk, warming it gently, and making sure you are pumping quickly with enough space in the press for the milk to expand.
Conclusion
Frothing milk with a French press is a simple, affordable way to create café-style drinks at home. By heating the milk, pumping steadily, and choosing the right milk texture, you can achieve smooth, airy foam in just minutes. With a little practice, you’ll make lattes, cappuccinos, and hot chocolate feel more special. Give it a try and enjoy better coffee moments every day.