How To Iced Coffee At Home
Stop spending five dollars on a drink you can easily master in your own kitchen. Learning how to iced coffee at home is the ultimate game-changer for your morning routine and your wallet. Whether you prefer a quick flash-brew over ice or a smooth overnight cold brew, we have you covered. Let’s dive into the best methods to satisfy your caffeine cravings today.
Best Coffee Beans and Roasts for Iced Drinks
Why Dark Roasts Work Best Over Ice
When making iced coffee at home, selecting a dark roast is often the most effective strategy for maintaining a bold flavor profile. As ice cubes melt, they naturally dilute your beverage, which can make lighter coffees taste weak or watery.
Darker roasts, such as French or Italian roasts, feature low acidity and robust smoky notes that cut through the dilution effortlessly. These beans undergo a longer roasting process, developing oils and sugars that provide a heavy body and a lingering finish.
This structural integrity ensures that even with a significant amount of ice, your drink retains its characteristic coffee strength. Furthermore, the caramelized sweetness found in darker beans pairs exceptionally well with milk, cream, or flavored syrups, creating a balanced and indulgent treat.
By prioritizing beans with chocolatey or nutty undertones, you ensure that your homemade iced coffee tastes professional and remains flavorful from the very first sip until the last drop in the glass.
Single-Origin vs. Blends for Cold Brewing
The choice between single-origin beans and blends significantly impacts the final taste of your cold brew or iced pour-over. Single-origin beans are sourced from a specific region and offer unique, distinct flavor profiles like citrus, floral, or berry notes.
These are excellent if you prefer drinking your iced coffee black, as they allow the complex terroir to shine through the chilled medium. On the other hand, coffee blends are specifically engineered for balance and consistency.
They combine beans from various regions to create a rounded flavor that is less likely to have overwhelming acidic peaks. For most home baristas, a high-quality blend is the superior choice for iced drinks because it provides a reliable foundation that tastes great regardless of the brewing method.
Blends are also generally more forgiving during the extraction process, ensuring that your cold brew doesn’t end up tasting overly sour or bitter. Ultimately, choose single-origin for clarity and blends for a smooth, classic iced coffee experience.
The Importance of Freshly Ground Beans
To elevate your at-home iced coffee, the most critical step you can take is using freshly ground beans immediately before brewing. Coffee begins to oxidize and lose its aromatic oils the moment it is ground, which leads to a flat and stale taste in the final cup.
When brewing for ice, you need as much aromatic intensity as possible to combat the cold temperature, which naturally dulls our sense of taste. Investing in a burr grinder allows you to control the grind size precisely, which is essential for different methods.
For example, a coarse grind is required for cold brew to prevent over-extraction, while a medium-fine grind is better for a flash-chilled Aeropress. By grinding your beans fresh, you capture the volatile flavor compounds that provide the sweetness and complexity missing from pre-ground bags.
This simple habit ensures your iced coffee has a vibrant aroma and a clean, crisp finish that rivals any high-end cafe, making your morning routine much more satisfying.
How to Make Iced Coffee Using the Flash Chill Method
The Science of Brewing Hot Over Ice
The flash chill method, often referred to as Japanese-style iced coffee, relies on the immediate cooling of hot coffee to preserve its most delicate aromatic compounds.
When you brew coffee directly onto ice, the rapid temperature drop locks in the bright acidity and floral notes that are often lost in the slow-cooling process of traditional iced coffee.
Unlike cold brew, which steeps for hours and results in a heavy, chocolatey profile, flash chilling creates a vibrant and clean cup that tastes exactly like a fresh pour-over but at a refreshing temperature.
The key scientific principle here is thermal shock; by capturing the volatile oils the moment they are extracted by hot water, you prevent the oxidation that leads to bitterness. This technique ensures that your home-brewed beverage maintains a professional-grade flavor profile without requiring expensive commercial equipment.
It is the most efficient way to achieve a complex, nuanced drink that highlights the specific terroir of your favorite single-origin beans while providing an instant chill.
Step-by-Step Instructions for Your Drip Machine
To master this method at home, start by filling your carafe with exactly half of your calculated ice volume. Place the carafe under your drip machine or pour-over cone and add your freshly ground coffee to the filter.
It is essential to use a medium-fine grind to ensure proper extraction during the faster brew cycle. Begin the brewing process as usual, allowing the hot liquid to drip directly onto the ice cubes.
You will notice the ice melting rapidly; this is an intentional part of the process, as the melting ice provides the necessary dilution to balance the concentrated hot brew. Once the cycle finishes, give the carafe a gentle swirl to ensure the temperature is uniform throughout the vessel.
Pour the finished coffee into a glass filled with fresh ice to maintain the chill. This approach turns your standard kitchen setup into a high-performance brewing station, allowing you to skip the coffee shop line and enjoy a superior, crisp beverage in under five minutes with minimal cleanup required.
Adjusting Your Coffee-to-Water Ratio
Precision is the most critical factor when transitioning from hot to flash-chilled coffee. Because the ice acts as a portion of your total brewing water, you must concentrate the hot extraction to avoid a watery result.
A gold-standard rule for the flash chill method is to use a 1:15 ratio, but you must split the water weight specifically: use approximately 60% hot water for brewing and 40% ice in the carafe for cooling.
For example, if you typically use 500 grams of water, you should brew with 300 grams of hot water over 200 grams of ice. This adjustment compensates for the dilution that occurs the moment the hot coffee hits the frozen cubes.
If the result feels too heavy, slightly increase the ice percentage next time; if it feels thin, increase the amount of coffee grounds. Mastering this mathematical balance of dilution ensures that your iced coffee remains bold and flavorful rather than becoming a translucent, weak imitation.
Always use filtered water and fresh ice to ensure that no off-flavors interfere with the final profile of your handcrafted drink.
How to Make Cold Brew Coffee at Home
The Low-Acid Cold Steep Process
To master the art of cold brew, you must understand that time replaces heat as the primary extraction agent. Unlike traditional hot coffee that relies on boiling water to dissolve oils, this method uses room temperature or chilled water over a period of twelve to twenty-four hours.
Start by grinding your beans to a very coarse consistency, similar to sea salt, to prevent the final brew from becoming muddy or over-extracted. Combine your grounds with filtered water using a standard ratio of one part coffee to four parts water for a potent concentrate.
This slow, gentle immersion significantly reduces the extraction of bitter acids and tannins, resulting in a smooth, naturally sweet profile that is incredibly gentle on the stomach. Simply mix the components in a large vessel, ensure all grounds are fully saturated, and let the mixture sit undisturbed.
This patient approach yields a versatile base that serves as the perfect foundation for any iced coffee creation you desire.
Equipment You Need for Batch Brewing
One of the greatest advantages of making cold brew at home is that it requires very little specialized gear, making it accessible for any budget. At the most basic level, you simply need a large glass jar or a dedicated cold brew pitcher to hold the steeping liquid.
Many home baristas prefer using a French press because the built-in plunger makes the initial separation of grounds from liquid much easier once the steeping time is complete.
You will also need a high-quality burr grinder to ensure your coffee particles remain uniform, which is essential for even extraction during the long soaking period. If you do not have a specialized brewer, a simple fine-mesh sieve paired with a paper filter or a clean cheesecloth will work perfectly.
Having a digital kitchen scale is also highly recommended so you can precisely measure your coffee-to-water ratios, ensuring that every batch you produce is consistently delicious and strong enough to withstand the addition of ice.
Filtering and Storing Your Concentrate
Once your coffee has finished steeping, the final step is to achieve a clean, sediment-free finish through careful filtration. Slowly pour the mixture through a secondary paper filter or a fine cloth to catch the smallest particles that might cause a gritty texture or continued bitterness.
This resulting liquid is a highly concentrated coffee base, which is much stronger than your typical drip brew.
Because it was never exposed to high heat, this concentrate is remarkably stable and can be stored in an airtight container in the refrigerator for up to two weeks without losing its flavor integrity.
When you are ready to serve, simply dilute the concentrate with equal parts water or milk over plenty of ice. This method allows you to prepare bulk quantities in advance, saving you significant time and money during your busy morning routine.
By keeping a bottle of fresh concentrate ready, you can enjoy a premium, cafe-quality iced beverage in seconds whenever the craving strikes your palate.
Essential Tools for Your Home Coffee Bar
Top Rated Coffee Grinders for Every Budget
Achieving the perfect iced coffee starts with fresh beans, making a reliable grinder the most important investment for your home setup. For those on a budget, a high-quality manual burr grinder provides excellent grind consistency without the high cost, though it requires some physical effort.
If you prefer convenience, an entry-level electric conical burr grinder is a fantastic choice, offering adjustable settings that allow you to switch easily between fine espresso and coarse cold brew textures.
For the ultimate enthusiast, a premium flat burr grinder ensures maximum flavor extraction and heat stability, which prevents bitterness in your final chilled beverage. Regardless of the price point you choose, always prioritize burr grinders over blade models to ensure uniform particle size.
Consistency is the secret to avoiding a sour or muddy taste when the coffee hits the ice. Investing in the right tool ensures your home-brewed iced lattes taste just as vibrant and balanced as those from your favorite local cafe.
Must-Have Glassware and Reusable Straws
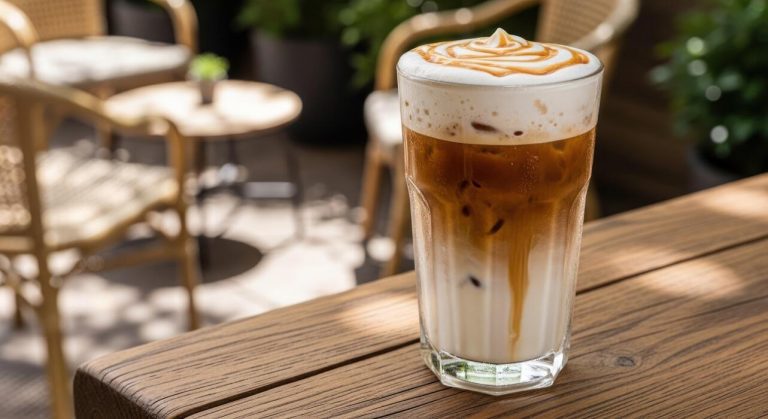
The visual appeal of an iced coffee is part of the ritual, so selecting the right glassware is essential for a professional experience. Double-walled borosilicate glasses are highly recommended because they provide superior insulation, keeping your drink cold for longer while preventing messy condensation from forming on your table.
If you are often on the move, a durable mason jar with a bamboo lid offers a stylish and spill-resistant solution for your morning commute. To complete your eco-friendly station, incorporate a set of reusable glass or stainless steel straws, which are much better for the environment than plastic alternatives.
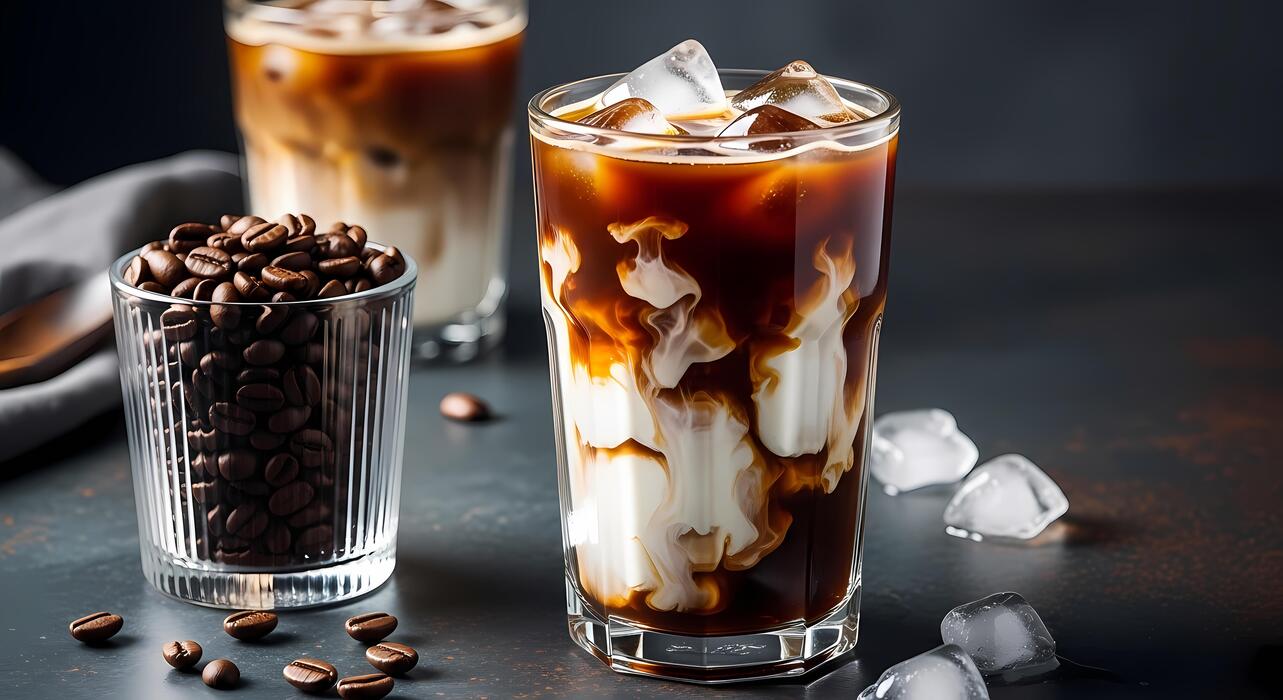
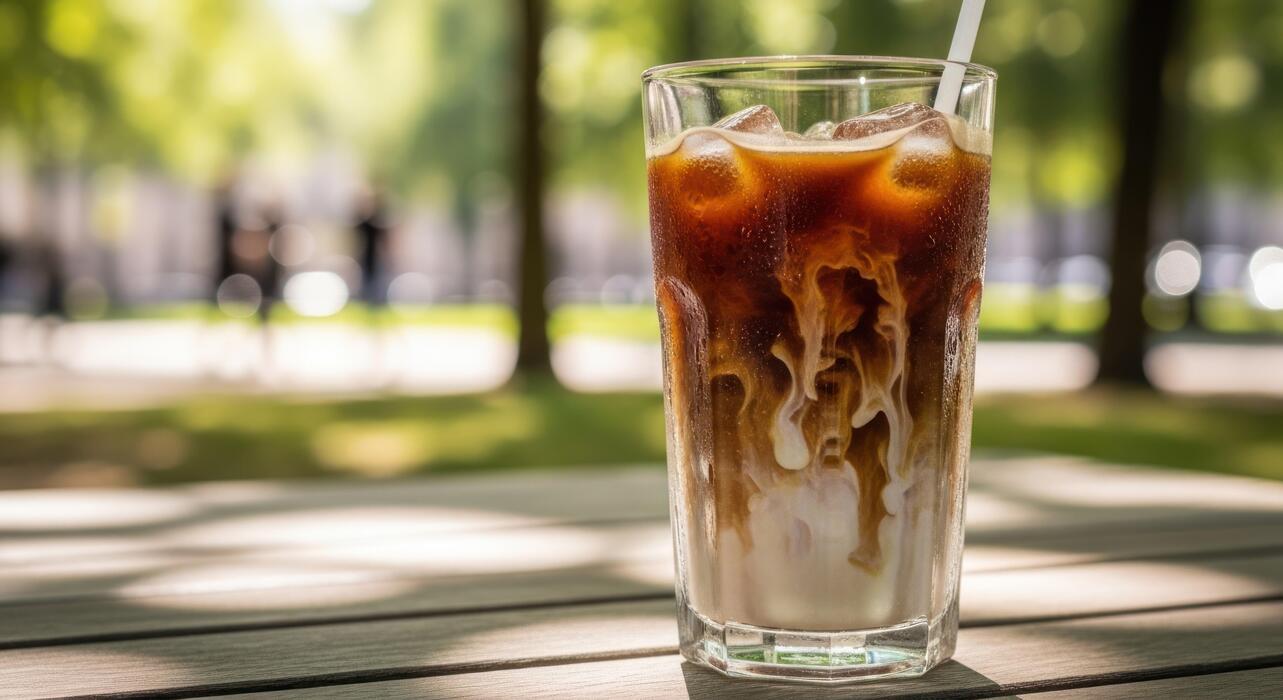
Wide-diameter straws are particularly useful if you enjoy adding cold foam or thick syrups to your recipes. Choosing high-transparency glassware allows you to appreciate the beautiful marbling effect when milk is poured over the dark coffee concentrate.
These aesthetic and functional additions transform a simple caffeine fix into a luxurious daily treat that feels special every time you take a refreshing, ice-cold sip.
Using a French Press for Iced Recipes
A French press is one of the most versatile tools for making iced coffee because it excels at creating both cold brew and concentrated hot bases.
To make a smooth cold brew concentrate, simply combine coarse grounds with room-temperature water and let it steep for twelve to eighteen hours before pressing the plunger down.
If you prefer the Japanese flash-chilled method, brew a concentrated hot carafe using half the usual water, then immediately pour the hot liquid over a glass filled with ice to lock in those bright, acidic notes.
The built-in mesh filter of the French press is excellent for retaining natural oils, resulting in a full-bodied texture that stands up well to heavy cream or flavored sweeteners.
Additionally, you can use the plunger to froth cold milk by rapidly pumping it, creating a thick foam that mimics a professional cafe topper. Mastering these different techniques allows you to customize the strength and mouthfeel of your iced beverages using a single, affordable piece of equipment.
Ways to Prevent Watered-Down Iced Coffee

How to Make Coffee Ice Cubes
One of the most effective strategies to combat a diluted beverage is to replace standard water-based ice with coffee ice cubes. To begin, brew a fresh pot of your favorite blend and allow it to cool completely to room temperature to avoid cracking your trays.
Carefully pour the liquid into silicone or plastic ice cube molds, leaving a tiny bit of space at the top for expansion. For an added flavor boost, you can whisk in a touch of sugar or vanilla extract before freezing.
Once solid, these cubes will melt into your drink as you sip, actually strengthening the flavor profile rather than weakening it. This method ensures that even the last drop of your morning caffeine remains robust and delicious.
Keep a stash of these in a sealed freezer bag to prevent them from absorbing unwanted food odors, ensuring every glass of iced coffee you prepare at home tastes as professional and concentrated as one from a high-end specialty cafe.
The Benefits of Using a Cocktail Shaker
If you want to achieve a professional texture while minimizing dilution, utilizing a cocktail shaker is a game-changing technique for home baristas. By placing your coffee, sweetener, and ice into the shaker and agitating it vigorously for fifteen seconds, you create a rapid thermal exchange.
This process chills the liquid almost instantly, which prevents the ice from melting slowly over several minutes and watering down the brew. Furthermore, the aeration provided by shaking creates a luxurious micro-foam on the surface, mimicking the creamy mouthfeel of a nitro cold brew without the expensive equipment.
When you strain the mixture into a fresh glass over new ice, you are left with a perfectly chilled, frothy beverage that retains its full-bodied integrity.
This method is particularly effective for espresso-based drinks like the shakerato, where maintaining a concentrated flavor profile is essential for balancing the natural bitterness of the beans while providing a refreshing, crisp finish to your homemade iced coffee.
Why Temperature Control Matters
The primary reason most homemade iced coffee ends up bland is a lack of temperature management during the initial mixing phase. Pouring hot coffee directly over ice causes an immediate thermal shock, leading to rapid melting and significant water volume increase.
To prevent this, always aim to pre-chill your coffee in the refrigerator for at least thirty minutes or use a flash-chilling method with a metal container.
Additionally, using the right type of ice is crucial; large, dense cubes have less surface area than crushed ice, meaning they melt at a much slower rate and keep your drink cold for longer periods.
If you are brewing directly onto ice, consider using a higher coffee-to-water ratio to account for the inevitable dilution that occurs during the cooling process.
By controlling these thermal variables, you ensure that the delicate notes of your coffee beans are preserved, resulting in a vibrant, refreshing beverage that stays flavorful from the first refreshing sip until the very end of the glass.
Easy Recipes for Flavored Iced Coffee
Homemade Simple Syrup Recipes
Creating your own sweeteners is the most effective way to elevate your home barista game without spending a fortune. To start, combine equal parts granulated sugar and water in a small saucepan over medium heat.
Stir the mixture continuously until the liquid becomes completely clear, which signifies the sugar has fully dissolved. For a deeper, more complex flavor profile, try using brown sugar to create a rich molasses-based syrup that pairs perfectly with dark roast beans.
Once the base syrup is removed from the heat, you can experiment with infusions like cinnamon sticks, mint leaves, or even a pinch of sea salt. Always ensure your syrups are completely cooled before adding them to cold brew to prevent the ice from melting prematurely.
Storing these mixtures in airtight glass bottles in your refrigerator allows you to have ready-to-use sweeteners for up to two weeks, making your morning routine significantly faster and much more flavorful than using store-bought alternatives that often contain artificial preservatives.
How to Make Vanilla and Caramel Lattes
To craft a professional-grade vanilla or caramel latte at home, begin by brewing a concentrated shot of coffee or using a high-quality cold brew concentrate.
For a vanilla latte, stir two tablespoons of pure vanilla extract infused simple syrup into your coffee base while it is still slightly warm to ensure the flavors meld perfectly.
If you prefer a caramel version, drizzle homemade or high-quality caramel sauce along the inside walls of your glass before adding ice; this creates a beautiful visual effect and ensures sweetness in every sip.
Fill your glass to the brim with large ice cubes, which melt slower than crushed ice, preserving the strength of your beverage.
Pour your choice of chilled milk over the top, leaving a little room for a final swirl of foam or a sprinkle of sea salt to balance the sugar.
Mastering these ratios allows you to bypass expensive coffee shop lines while enjoying a customized drink tailored exactly to your personal sweetness preferences every single day.
Dairy and Non-Dairy Milk Pairings
The choice of milk significantly impacts the texture and final taste of your iced coffee creations. Traditional whole milk remains a favorite for its creamy mouthfeel and natural sweetness, which helps to neutralize the acidity found in many light-roast coffee beans.
However, if you are looking for plant-based alternatives, oat milk is widely considered the gold standard for iced lattes because it mimics the thickness of dairy and creates a beautiful micro-foam when shaken.
Almond milk offers a lighter, nuttier profile that complements mocha flavors, though it can sometimes separate if the coffee is too acidic. For a tropical twist, try coconut milk, which pairs exceptionally well with vanilla and provides a naturally rich and velvety consistency.
When preparing your drink, try frothing your milk of choice in a mason jar or using a handheld frother before pouring it over the ice. This simple step incorporates air, resulting in a luxurious, cafe-style layer that makes your homemade iced coffee feel like a professional treat.
Tips for Professional Results and Presentation
How to Layer Your Coffee and Milk
To achieve that stunning, café-style visual appeal at home, the secret lies in understanding the density of your liquids. Start by filling your glass to the brim with large, solid ice cubes to create a structural framework for the pour.
Pour your chilled milk or cream over the ice first, filling the glass about two-thirds of the way. To create a distinct separation, take a spoon and hold it upside down just above the surface of the milk.
Slowly pour your concentrated coffee or espresso over the back of the spoon. This diffuses the flow of the coffee, preventing it from mixing immediately with the milk. The temperature difference and varying sugar content help maintain these crisp, beautiful layers.
For the best photographic results, use a clear glass and avoid stirring until you are ready to drink. Mastering this gentle pouring technique ensures your homemade beverage looks as sophisticated as any high-end boutique order while maintaining the integrity of each flavor profile.
Creating Cold Foam Without an Espresso Machine
You do not need expensive commercial equipment to top your iced coffee with a velvety, cloud-like layer of cold foam. The most effective DIY method involves using a simple handheld milk frother or even a standard French press.
Begin by using cold non-fat or two-percent milk, as the protein structure in lower-fat milk holds air bubbles much more effectively than whole milk. Add a splash of vanilla syrup or a pinch of cinnamon to the milk before frothing to enhance the flavor.
If using a French press, pump the plunger rapidly for about thirty seconds until the volume doubles. If using a wand, tilt the glass to incorporate air at the surface before submerging the tip to create a smooth texture.
This process creates a dense, stable micro-foam that sits perfectly on top of your iced drink. Spoon the foam gently over your coffee to add a luxurious mouthfeel and professional finish that rivals any professional barista’s signature creation.
Common Mistakes to Avoid When Brewing Cold
The most frequent error when making iced coffee is pouring hot liquid directly over ice, which results in immediate dilution and a watery, flavorless beverage. To prevent this, always brew a double-strength concentrate if you are using hot water, or switch to a slow cold-brew method to extract natural sweetness.
Another critical mistake is using standard ice cubes made from tap water, which can introduce off-flavors as they melt. Instead, consider making coffee ice cubes by freezing leftover brew; this ensures that as the ice melts, your drink actually gets stronger rather than weaker.
Additionally, avoid adding granulated sugar directly to cold coffee, as it will never fully dissolve and will leave a gritty residue at the bottom of your glass. Always use a simple syrup or liquid sweetener to ensure the flavor is distributed evenly throughout the drink.
By paying attention to these small details, you can avoid a bitter or thin cup and ensure a consistently bold and refreshing result every time.
Frequently Asked Questions
What is the best way to make iced coffee at home without it getting watery?
The most effective method is to brew your coffee at double strength to account for the dilution of melting ice. Alternatively, you can freeze coffee in ice cube trays and use those ‘coffee cubes’ to chill your drink without losing flavor.
How do I make iced coffee quickly if I don’t have cold brew?
You can use the ‘flash chill’ method by brewing a concentrated amount of hot coffee directly over a large cup of ice. The immediate cooling locks in the aromatics while the ice melts just enough to reach the perfect drinking strength.
What is the difference between iced coffee and cold brew?
Iced coffee is brewed hot and then cooled down, resulting in a crisp, slightly acidic profile. Cold brew is made by steeping coarse grounds in room temperature water for 12-24 hours, creating a much smoother, less acidic, and more caffeinated concentrate.
How can I sweeten iced coffee so the sugar actually dissolves?
Granulated sugar does not dissolve well in cold liquids, so it is best to use a simple syrup (equal parts water and sugar boiled together). You can also stir sugar into the coffee while it is still hot before pouring it over ice.
What kind of coffee roast works best for icing?
Medium to dark roasts are generally preferred for iced coffee because they have bolder flavors that can stand up to dilution and creamers. Light roasts can sometimes taste overly sour or weak when served cold.
Do I need special equipment to make iced coffee at home?
No special equipment is required; you can use a standard drip machine, a French press, or even an AeroPress. As long as you can brew a strong concentrate and have plenty of ice, you can make high-quality iced coffee with basic kitchen tools.
Conclusion
Mastering iced coffee at home is both simple and rewarding. By choosing the right brewing method and experimenting with various syrups or milk alternatives, you can craft a professional-quality beverage in your own kitchen. Not only does DIY brewing save you money, but it also allows for total creative control over every glass. Now that you have these essential techniques, it is time to start brewing. Grab your favorite beans and enjoy your refreshing homemade creation today.