How To Steam Clean Gas Oven
If you’re wondering how to steam clean a gas oven, you’ve come to the right place. This quick guide walks you through preparation, the right water‑to‑vinegar mix, timing, and safety tips, so you can enjoy a fresh‑smelling, spotless oven in no time, and a brighter kitchen feel today.
Understanding Steam Cleaning for Gas Ovens
What is steam cleaning?
Steam cleaning uses hot water vapor to loosen and dissolve food residues, grease, and carbon buildup inside a gas oven without harsh chemicals.
The process begins by filling a heat‑proof container with water, placing it on the oven floor, and heating the oven to a low‑to‑medium temperature (around 150‑180 °F) for 15‑20 minutes. As the water heats, it turns into steam that penetrates crevices, softening stubborn grime.
After the cycle, you simply wipe away the loosened debris with a damp cloth, leaving a fresh, chemical‑free interior. Key point: steam’s high temperature sanitizes while its moisture prevents the dry‑heat scorching that can damage oven coatings.
This method works for both self‑cleaning and standard gas ovens, offering a quick, low‑energy alternative to traditional pyrolytic cycles. It also reduces the need for abrasive scrubbers, making the cleaning routine gentler on your hands and the oven’s enamel surface.
Why choose steam for gas ovens?
Steam is especially suited for gas ovens because it works with the appliance’s existing heat source and moisture‑rich environment.
When you activate the burners at a low setting, the water in the oven turns to steam, creating a self‑contained cleaning chamber that reaches temperatures high enough to break down baked‑on sauces and meat drippings without triggering the gas‑ignition safety lock.
This eliminates the need for additional electricity or special cleaning agents. Key point: steam penetrates tight corners around the burner ports and the oven door gasket, areas where traditional wipes often miss. The gentle moisture also prevents the metal interior from overheating, extending the lifespan of the oven’s coating.
Moreover, steam cleaning produces no strong odors or fumes, making it a family‑friendly option for homes with children or pets. It also saves time, usually completing the cleaning cycle in under half an hour.
Benefits compared to traditional methods
Compared with conventional oven cleaning—whether using commercial oven cleaners, abrasive pads, or the high‑temperature pyrolytic cycle—steam offers a gentler yet equally effective solution. Steam dissolves grease without the corrosive chemicals that can erode enamel or leave toxic residues, making it safer for food preparation.
Key point: the low‑energy steam process typically uses only a few cups of water and a short heating period, reducing both utility costs and environmental impact.
Unlike the pyrolytic self‑clean that can reach 900 °F and require 2‑3 hours, steam finishes in 20‑30 minutes and does not produce the intense heat that can warp oven doors or damage surrounding cabinetry.
Additionally, steam leaves no lingering chemical smell, so you can resume cooking immediately after a quick wipe‑down. Steam cleaning also preserves the oven’s original finish, preventing the discoloration that often appears after repeated use of harsh chemical sprays.
Preparing Your Oven for Steam Cleaning

Gathering necessary supplies
Start by assembling all tools you’ll need for a safe and effective steam clean. A reliable handheld steam cleaner with adjustable pressure is essential; choose a model that can reach at least 120 °C for thorough sanitization.
Gather a large heat‑resistant bowl or pan, a spray bottle filled with distilled water, and a few clean microfiber cloths to wipe away residue. You’ll also want a soft‑bristled brush for stubborn spots and a heat‑proof silicone mat to protect the oven floor during the process.
Keep a pair of heat‑proof gloves handy to avoid burns when handling hot accessories. Finally, ensure the kitchen is well‑ventilated by opening a window or turning on the exhaust fan, as steam can increase humidity. Having everything within arm’s reach will streamline the cleaning routine and prevent unnecessary interruptions.
Prepare a small bucket of cold water for quick cooling of any splattered steam and keep a trash bag nearby for disposing of debris.
Removing racks and accessories
Before you introduce steam, take out every removable component to allow unrestricted circulation of heat and moisture. Remove the oven racks, grill pan, and any crumb trays, placing them on a heat‑resistant surface.
If your oven includes a pizza stone or rotisserie spit, set these aside as well, since prolonged steam exposure can cause cracking. Inspect each piece for stubborn grime; a quick dip in warm, soapy water can loosen residue, but avoid soaking metal parts that may rust.
Pat them dry with a microfiber towel before setting them aside. While the interior is empty, you’ll also have clear access to the door gasket and side walls, making it easier to target hidden buildup later.
Keeping the accessories separate not only prevents water damage but also speeds up the overall cleaning cycle, as you can re‑install them once the interior has cooled and dried.
Cleaning the interior before steam
With the oven empty, give the cavity a quick wipe to eliminate loose crumbs and ash that could turn into steam‑filled messes.
Sweep the floor with a dry brush or handheld vacuum to collect debris, then use a damp cloth lightly moistened with a mixture of water and a few drops of mild dish soap to scrub the walls and the bottom.
Focus on the hinges, light housing, and the area around the door seal, where grease tends to accumulate. Rinse the cloth frequently to avoid spreading residue, and dry the surfaces with a clean towel.
This pre‑clean step not only reduces the amount of steam‑generated grime but also prevents the steam from turning existing buildup into a stubborn, hardened film.
Once the interior is visibly clean and dry, you’re ready to fill the steam cleaner’s reservoir, set the temperature, and begin the steam‑cleaning cycle for a sparkling result.
Step-by-Step Steam Cleaning Process

Setting up the steam cycle
Begin by removing all racks, trays, and foil from the oven interior. Turn off the oven and let it cool for a few minutes if it was recently used, but it should still be warm enough for steam to generate efficiently.
Fill the dedicated steam reservoir or a heat‑proof dish with one cup of water and place it on the lower rack. If your model lacks a built‑in reservoir, a shallow pan works equally well.
Close the door and select the steam clean function on the control panel; many ovens default to a 20‑minute cycle at 212 °F (100 °C). While the cycle starts, double‑check that the water level is adequate and that the door seal is intact.
This preparation ensures the steam reaches every surface, loosening baked‑on grease and food particles for easier removal later.
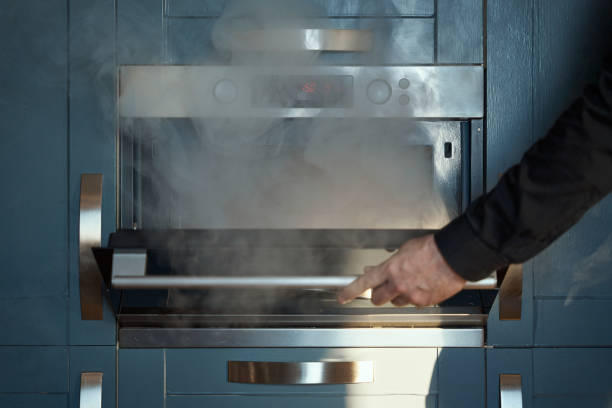
Running the steam cycle
Start the steam cycle and monitor the oven for consistent vapor production. Do not open the door during the first 10‑15 minutes, as this releases heat and reduces cleaning power. As steam fills the cavity, it softens stubborn residues on the walls, ceiling, and door glass.
If your oven allows, you can pause the cycle after ten minutes to spray a light mist of water on particularly thick spots, then resume the program. For ovens without a pause feature, simply wait for the automatic timer to finish.
Throughout the process, keep an eye on the water reservoir; some models automatically refill, while others may need a quick top‑up to avoid drying out. Maintaining a steady flow of steam maximizes the chemical‑free cleaning effect and prepares the interior for a quick wipe‑down after cleaning.
Cooling and final wipe-down
Allow the oven to cool completely before beginning the final wipe‑down. Open the door and remove the water dish, discarding any residue.
Using a soft, lint‑free cloth dampened with warm water, gently wipe all interior surfaces, paying special attention to the door glass, side walls, and the bottom of the cavity where steam may have condensed.
For any remaining streaks, a mixture of equal parts water and white vinegar applied with a spray bottle works well; spray lightly and rinse with a clean damp cloth to avoid lingering odor. Dry the interior with a dry microfiber towel to prevent moisture spots.
Finally, reinstall the racks and any accessories, and run the oven on a low temperature for a few minutes to ensure any moisture evaporates fully, leaving your gas oven fresh and ready for the next use.
Safety Tips and Precautions
Handling hot steam safely
Before you begin, pre‑heat the oven on a low setting for five minutes to reduce the shock of sudden steam.
Place a sturdy, heat‑resistant tray on the lower rack and fill it with water mixed with a few drops of lemon juice or vinegar; this helps loosen grime and adds a pleasant scent.
Once the water begins to simmer, close the door tightly and allow the steam to fill the cavity for 10‑15 minutes, keeping a safe distance of at least one foot. Wear heat‑proof gloves and an eye shield to protect skin and eyes from accidental splashes.
After the cycle, open the door slowly to let excess steam escape, and never reach inside while the interior is still hot. Finally, use a soft, damp cloth to wipe interior surfaces, avoiding abrasive tools that could damage the enamel.
Ventilation considerations
Steam cleaning generates moisture and mild odors, so proper kitchen ventilation is essential to prevent condensation on nearby walls and appliances. Start by turning on the exhaust fan above the stove and, if available, open a window or door to create cross‑draft airflow.
Position a portable dehumidifier or a fan near the oven opening to draw humid air outward, reducing the risk of water‑damage to cabinetry. Keep the oven door slightly ajar after the cleaning cycle for an additional five minutes, allowing residual steam to escape gradually.
If your kitchen lacks built‑in ventilation, place a wet‑dry vacuum nearby to capture excess moisture before it settles. Throughout the process, monitor the humidity level with a hygrometer; aim to keep it below 60 % relative humidity.
By maintaining these airflow practices, you protect surrounding surfaces and ensure a faster, safer drying period.
Protecting surrounding cabinets
Steam can seep into seams and damage the finish of adjacent cabinets, so take proactive steps to shield woodwork before you start. Apply a thin layer of protective foil or parchment paper over cabinet doors and drawer fronts, securing it with heat‑resistant tape that won’t melt under mild steam.
For exposed metal trims, wipe them down with a light coat of oil to create a barrier against moisture corrosion. Position a silicone mat on the oven floor to catch any overflow from the water tray, preventing drips onto the stovetop or floor.
After cleaning, inspect the cabinet edges for any signs of warping or swelling; if detected, dry them promptly with a soft cloth and a low‑heat hair dryer set on a cool setting.
Regularly clean the gasket around the oven door to ensure a tight seal, reducing the chance of steam escaping into the surrounding cabinetry during future cleanings.
Common Mistakes to Avoid
Using excessive water
Before you begin the steam cycle, measure the water you add to the oven’s reservoir. Adding more than the manufacturer’s recommended amount can create excess steam that pools on the floor and may seep into electrical components, causing damage or rust.
Use a measuring cup to pour the exact volume, usually 1‑2 cups for most models. Keep the oven door slightly ajar during the initial heating phase to allow excess moisture to escape, then close it for the full steam period.
Avoid pouring water directly onto the oven walls or racks, as this can create uneven steam distribution and lead to water spots. By controlling the water quantity you ensure the steam cleans effectively without compromising the oven’s interior or surrounding cabinetry.
Also, wipe away any visible puddles after the cycle ends to prevent lingering moisture from damaging the oven’s finish.
Skipping pre-cleaning
Skipping the quick pre‑clean step before you start the steam cycle can leave large food particles that block steam from reaching all surfaces. Begin by removing loose crumbs and burnt debris with a soft brush or a handheld vacuum.
Wipe the oven racks with a damp cloth to lift grease that could melt into the steam and create stubborn stains. If you ignore this step, the steam may only soften the top layer of grime, leaving the underlying residue untouched and requiring a second cleaning round.
A brief 5‑minute pre‑clean with a mild detergent solution ensures that the steam can penetrate the baked‑on mess, making the cleaning process faster and more thorough.
Remember to dry the interior with a clean towel before starting the steam to avoid excess water mixing with the detergent, which could produce suds inside the oven cavity.
Neglecting gas flame adjustments
Neglecting to check the gas flame before you begin a steam clean can cause uneven heating and reduce the effectiveness of the steam.
The flame should be set to a medium‑low level, allowing the oven to reach the recommended steam temperature without creating a high‑heat environment that burns off the moisture too quickly.
First, turn the oven off and let it cool, then inspect the burner ports for clogs or debris that might alter the flame shape. Clean any blockage with a soft brush and re‑light the burner, adjusting the knob until you see a steady, blue‑colored flame with a small yellow tip.
If the flame is too strong, the steam will evaporate before it can loosen baked‑on grime, forcing you to repeat the cycle. By ensuring the flame is properly adjusted, you create a consistent temperature that maximizes steam penetration and leaves the interior sparkling clean.
Maintaining Your Oven After Steam Cleaning
Regular cleaning schedule
After you finish a steam cleaning cycle, set a regular cleaning schedule to keep your gas oven in top condition. Aim to repeat the steam method every 3‑4 months, depending on how often you cook.
Between deep cleans, wipe spills promptly with a damp cloth, and sweep away crumbs after each use. Mark a calendar reminder so you never skip a session, and note any heavy‑grease buildup that may require an extra run.
Consistent maintenance prevents stubborn residue from hardening, which can affect heating efficiency and produce unpleasant odors. By planning short, weekly touch‑ups and a quarterly steam clean, you extend the life of the oven’s interior coating and maintain even temperature distribution for better baking results.
Also, keep the oven door gasket clean and free of moisture to ensure a proper seal, which helps retain steam during cleaning cycles.
Reinstalling racks correctly
Once the steam cleaning cycle has cooled, carefully reinstall the oven racks to preserve the even heat flow you just achieved. Start by checking each rack for residual moisture; dry them with a clean towel before placement.
Align the rack supports with the designated slots, ensuring they sit flat and are not tilted, which can cause hot spots during baking. If your oven uses a split‑rack system, reassemble the halves exactly as they were, locking any clips securely.
Avoid stacking multiple racks unless the recipe calls for it, because extra layers can obstruct steam circulation and lead to uneven cooking.
By positioning the racks precisely, you maintain the oven’s calibrated temperature zones and prevent premature wear on the interior surfaces and ultimately delivering consistent results for every dish you prepare. Check that no plastic liners are left inside.
Monitoring oven performance
After completing the steam clean and reinstalling the racks, it’s essential to monitor oven performance to confirm that the cleaning was successful and that the gas burners are operating efficiently.
Run a quick test bake at a moderate temperature, such as 350°F (175°C), for 15‑20 minutes and observe how evenly the heat distributes across the cavity. Listen for any unusual clicking or hissing sounds from the igniter, which could indicate a gas flow issue that needs adjustment.
Record the pre‑heat time and compare it to previous cycles; a noticeable reduction means the interior is free of insulating grime. If you notice cold spots, rotate the dish halfway through the bake and re‑evaluate.
Regular performance checks help you catch early signs of wear, allowing timely maintenance and preserving the oven’s longevity. Also, verify the oven’s temperature probe reads accurately.
FAQs About Steam Cleaning Gas Ovens
Can I use a steam cleaner device?
Yes, you can safely use a handheld steam‑cleaner on a gas oven, but follow a few precautions. Turn off the oven and let it cool completely before you begin. Remove all racks, pans and the stone‑baked liner so steam can reach every surface.
Fill the cleaner’s reservoir with distilled water to avoid mineral deposits, then spray in short bursts, focusing on the interior walls, ceiling and door gasket. Do not direct steam at the gas burner or igniter; keep the nozzle at least six inches away.
After steaming, wipe the softened grime with a soft, lint‑free cloth or a non‑abrasive sponge, then rinse the cloth in clean water and wipe again to remove residue. Allow the oven to air‑dry for at least 30 minutes before reinstalling the racks.
This method removes baked‑on splatter without harsh chemicals and preserves the oven’s finish.
How often should I steam clean?
The ideal frequency for steam cleaning a gas oven depends on how often you cook and what you prepare, but a good rule of thumb is once every 2–3 months for regular home use.
If you bake frequently, especially with sugary or greasy dishes, you may need to steam clean monthly to prevent stubborn caramelization. For occasional cooks, a quarterly steam session keeps the interior fresh without excessive effort.
Before each cleaning, inspect the oven for visible spills; spot‑cleaning with a damp cloth can extend the interval between full steam cycles. Remember to always perform a quick visual check of the burner and igniter after each steam session to ensure no moisture has seeped into the combustion area.
By sticking to a consistent schedule, you maintain optimal heating efficiency, reduce the need for abrasive scrubbing, and keep food flavors pure.
Will steam affect the gas burner?
Steam itself does not damage the gas burner, but improper application can cause moisture to collect where it shouldn’t. Never direct a stream of steam onto the open burner ports or the igniter; keep the nozzle at least six inches away and aim toward the oven walls.
After steaming, open the oven door and let the interior air out for several minutes, then wipe any condensation from the burner area with a dry microfiber cloth.
If a small amount of water does reach the burner, it will evaporate quickly once the oven is turned on, but you should always perform a brief test cycle—set the oven to a low temperature (150 °F/65 °C) for five minutes—to confirm the flame lights cleanly.
Regular steam cleaning, when done correctly, leaves the burner unaffected and can actually reduce the buildup of grease that might otherwise clog the ports.
Frequently Asked Questions
What is steam cleaning for a gas oven and why is it useful?
Steam cleaning uses hot water vapor to loosen food residue and grease, making it easier to wipe away without harsh chemicals. It helps preserve the oven’s finish and reduces the need for abrasive scrubbing.
Can I use the self‑clean feature on a gas oven for steam cleaning?
No. The self‑clean cycle on gas ovens typically uses high heat, not steam. For steam cleaning, you’ll need to create steam manually with water and heat.
What supplies do I need to steam clean a gas oven?
You’ll need a heat‑proof baking dish or pan, water, a towel or sponge, and optionally a few drops of mild dish soap or vinegar for extra degreasing.
How do I set up a steam cleaning cycle in a gas oven?
Place a pan of water on the middle rack, preheat the oven to 200‑250°F (90‑120°C), and let it heat for 15‑20 minutes until steam forms. Turn off the oven, close the door, and let the steam sit for another 10‑15 minutes.
What steps should I follow after the steam has done its work?
Open the oven door, carefully remove the hot pan, and use a damp towel or non‑abrasive sponge to wipe away softened grime. Rinse the towel frequently and dry the interior with a clean cloth.
Are there safety tips I should keep in mind while steam cleaning a gas oven?
Wear oven mitts to handle hot pans, keep the kitchen well‑ventilated to avoid excess humidity, and never leave the oven unattended while the water is heating.
Conclusion
Regular steam cleaning extends your oven’s life and maintains even cooking performance. Give it a try after your next meal and enjoy the effortless, fresh results for weeks to come.


