Craft A Brew Wine Making Kit
Want to make your own wine at home without the hassle? A craft a brew wine making kit is the perfect solution for beginners and hobbyists alike. These all-in-one kits simplify the process, giving you everything needed to create delicious, custom wine in just a few weeks. Whether you’re curious about reds, whites, or fruit wines, these kits take the guesswork out of fermentation. In this guide, we’ll break down how they work, what’s included, and why they’re a top choice for easy, fun, and rewarding home winemaking.
What Is a Craft a Brew Wine Making Kit?
How Craft a Brew Kits Work
Craft a Brew wine making kits simplify the home winemaking process by offering pre-measured ingredients and step-by-step instructions for consistent results. These kits use concentrated grape must, which is rehydrated with water, then fermented using included yeast.
The fermentation process typically takes 4 to 6 weeks, after which the wine is clarified and stabilized before bottling. No prior experience is required, making it ideal for beginners. The kits are designed for 23-liter batches, producing about 30 standard 750ml bottles.
Key steps include sanitizing equipment, mixing the must, monitoring fermentation, and racking to separate sediment. With optimized yeast strains and additives, Craft a Brew ensures balanced flavor development. The process encourages learning through hands-on experience while delivering professional-quality wine from the comfort of home, fostering confidence in aspiring winemakers.
Types of Craft a Brew Wine Kits Available
Craft a Brew offers a diverse selection of wine kits to suit every palate and occasion, including reds, whites, rosés, and fruit wines. Popular red varieties include Cabernet Sauvignon, Merlot, and Shiraz, known for their rich body and bold flavors.
White wine options like Chardonnay, Riesling, and Sauvignon Blanc provide crisp, refreshing profiles perfect for warm weather. Fruit-based kits such as Blackberry, Peach, and Strawberry offer sweet, aromatic alternatives. Seasonal and limited-edition kits are also available, allowing experimentation with unique blends.
Each kit is formulated for consistent quality and authentic taste, using premium concentrates and advanced stabilization techniques. Whether you prefer dry, semi-sweet, or sweet wines, there’s a Craft a Brew kit tailored to your preference. This variety supports creative exploration and helps home winemakers discover their ideal flavor profiles.
What’s Included in a Standard Kit
A standard Craft a Brew wine making kit comes with all essential components needed to produce 23 liters of wine, eliminating the need for additional purchases. Inside, you’ll find a concentrated grape must bag, specially formulated yeast, clarifying agents, stabilizers, and an instruction manual.
The kit also includes fining agents to help clear the wine and ensure a polished finish. Detailed step-by-step guidance walks users through sanitation, fermentation, racking, and bottling stages. No extra additives are required, ensuring a seamless process from start to finish.
High-quality packaging preserves the integrity of ingredients, while batch-specific instructions optimize fermentation conditions. Everything is pre-measured for accuracy, reducing guesswork and improving consistency. With this all-in-one approach, even first-time winemakers can achieve great-tasting, restaurant-quality wine at home with minimal effort and maximum satisfaction.
How to Choose the Right Craft a Brew Wine Kit
Matching Kits to Your Skill Level
When choosing the right Craft a Brew wine making kit, assess your experience level to ensure a satisfying and successful winemaking experience. Beginners should look for starter kits that include clear, step-by-step instructions, pre-measured ingredients, and all necessary equipment like fermenters, airlocks, and siphons.
These kits simplify the process and reduce the risk of contamination or errors. Intermediate and advanced winemakers may prefer customizable kits that allow for ingredient adjustments, extended aging options, and more control over fermentation. Read product descriptions carefully to determine skill requirements and included components.
Craft a Brew offers kits labeled by difficulty, helping you match your abilities with the right product. Choosing a kit aligned with your skill level boosts confidence, improves results, and makes the process enjoyable. Don’t rush into complex kits—master the basics first to build a strong foundation for future batches.
Best Varietals for Beginners
For first-time winemakers using a Craft a Brew wine making kit, selecting beginner-friendly varietals is key to achieving great results with minimal hassle. Varieties like Chardonnay, Merlot, and Cabernet Sauvignon are popular choices because they are forgiving, ferment reliably, and produce balanced, approachable wines.
White wine kits such as Sauvignon Blanc or Riesling are also excellent, offering crisp flavors and straightforward fermentation. These varietals typically require less precise temperature control and are less sensitive to minor process variations. Craft a Brew designs their beginner kits with these stable, crowd-pleasing grapes to ensure success.
Avoid delicate or finicky varietals like Pinot Noir until you’ve gained more experience. Starting with reliable, easy-to-manage wines builds confidence and teaches core techniques. Plus, these styles are widely enjoyed, making them perfect for sharing your first homemade bottles with friends and family.
Factors to Consider: Flavor, Time, and Effort
When selecting a Craft a Brew wine making kit, consider flavor preferences, time commitment, and effort level to find the best match for your lifestyle. Think about whether you enjoy bold reds, crisp whites, or fruity blends, and choose a kit that aligns with your taste.
Some kits produce drinkable wine in just 4–6 weeks, while others require several months of aging for optimal flavor. Check the fermentation timeline and ensure it fits your patience and schedule. Simpler kits minimize hands-on time and technical steps, ideal for casual hobbyists.
More advanced kits may involve racking, sulfite additions, or blending, demanding greater attention. Also, consider storage space and equipment cleanup—larger batches need room and maintenance. By balancing flavor goals with practical constraints, you’ll enjoy the process more and achieve better results.
Prioritize convenience without sacrificing quality to make winemaking a sustainable and rewarding hobby.
Step-by-Step Guide to Using a Craft a Brew Kit
Preparing Your Equipment
Before starting with your Craft a Brew wine making kit, it’s essential to thoroughly clean and sanitize all equipment to prevent contamination. Gather your fermenter, airlock, siphon tube, stirring spoon, and any measuring tools. Wash each item with warm, soapy water, then rinse completely.
Next, use a no-rinse sanitizer to eliminate bacteria and wild yeast that could spoil your batch. Pay close attention to hard-to-reach areas like the spigot of the fermenter and the inside of the airlock. Sterilize the airlock and stopper by soaking them in sanitizer for at least five minutes.
Once sanitized, let all equipment air dry on a clean surface. Keeping everything sterile ensures a pure fermentation process and a better-tasting final product.
Mixing the Juice and Additives
Begin by opening the wine concentrate pouch from your Craft a Brew kit and pouring it into the sanitized fermenter. Rinse the pouch with a small amount of cool, filtered water and add it to the fermenter to ensure you capture all the flavor.
Next, add the included wine base and any additives, such as acid blend or tannin, as directed in the instructions. Then, top up the fermenter with water to reach the indicated fill line—typically about 1 gallon for smaller kits or 6 gallons for standard batches.
Stir the mixture thoroughly but gently with a sanitized spoon to ensure even distribution and proper sugar dissolution. This step creates the ‘must’—the unfermented wine base—ready for yeast activation.
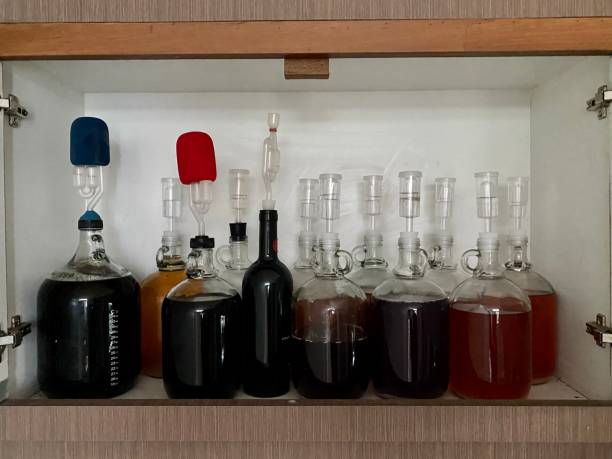
Fermentation: What to Expect
After mixing, sprinkle the included wine yeast evenly over the must and seal the fermenter with the lid and airlock filled with water. Store the fermenter in a dark, temperature-stable area between 65–75°F (18–24°C). Fermentation typically begins within 24–48 hours, indicated by bubbling in the airlock.
This means the yeast is converting sugar into alcohol and carbon dioxide. Avoid opening the fermenter during this stage to prevent contamination. Primary fermentation lasts about 7–14 days, after which bubbling slows significantly.
At this point, you may transfer the wine to a secondary fermenter or proceed to stabilization and clearing, depending on your kit’s instructions. Patience is key—rushing fermentation can impact flavor and clarity.
Bottling and Corking Your Wine
Once fermentation is complete and the wine is clear, it’s time to bottle your homemade wine. Sanitize all bottles, corks, and bottling tools. Use a siphon hose and bottling wand to transfer the wine from the fermenter into bottles, leaving sediment behind.
Fill each bottle to about an inch from the top to allow for corking. Use a hand corker or automatic press to securely insert corks into each bottle. Store bottles upright for the first 24 hours, then lay them on their sides in a cool, dark place to age.
Most Craft a Brew wines benefit from aging 2–6 weeks before drinking to develop smoother flavor. Label your bottles with the date and type for best results.
Best Practices for Fermenting Wine at Home
Ideal Temperature and Environment
Maintaining the ideal temperature is crucial when using a craft a brew wine making kit. Most wine yeasts perform best between 68°F and 75°F (20°C–24°C). Temperatures outside this range can lead to sluggish fermentation or off-flavors.
Choose a consistent, dark location away from direct sunlight and temperature fluctuations, such as a basement or closet. Avoid placing the fermenter near appliances or vents that emit heat. Use a fermentation jacket or water bath if your home runs too warm or cool.
Also, ensure proper airflow around the fermenter to prevent mold and overheating. Sanitation is equally vital—always sanitize equipment before use to prevent contamination. A stable, clean environment allows yeast to thrive and produce clean, flavorful wine. Monitoring room temperature daily with a reliable thermometer helps catch issues early.
Following these steps ensures optimal fermentation conditions and a higher-quality finished product.
How to Monitor Fermentation Progress
Tracking fermentation progress ensures your wine develops correctly. Use a sanitized hydrometer to measure specific gravity at the start and weekly thereafter. A steady drop in gravity indicates active fermentation. Expect the initial reading (around 1.090) to fall to near 1.000 or lower when complete.
Check for bubbling in the airlock, which signals CO2 release—though this alone isn’t foolproof. Combine visual cues with gravity readings for accuracy. Record all measurements in a fermentation log to identify stalls or inconsistencies. After 7–10 days, if gravity remains unchanged for 48 hours, fermentation is likely complete.
Avoid opening the fermenter unnecessarily, as this increases contamination risk. Patience is key—rushing can compromise flavor. Monitoring diligently ensures you know exactly when to rack or bottle. Using your craft a brew kit with precision leads to consistent, high-quality results every time.
Common Fermentation Problems and Fixes
Even with a craft a brew wine making kit, issues can arise. Stuck fermentation, where activity stops prematurely, often results from low temperatures or nutrient deficiency. Gently warm the fermenter to 70–75°F and consider adding yeast nutrient or energizer.
Off-odors like rotten eggs indicate hydrogen sulfide—racking the wine and aerating slightly can help. If mold or wild yeast appears, discard the batch; it’s likely due to poor sanitation. Excessive foaming can be managed by using a larger fermenter or foam control product.
Overly slow starts may mean old or inactive yeast—always rehydrate properly if using dry yeast. Cloudy wine post-fermentation may require fining agents or extended settling. Prevention is key: sanitize thoroughly, control temperature, and use fresh ingredients. Addressing problems early with the right fix keeps your batch on track.
Understanding these common pitfalls ensures smooth, successful home winemaking.
How to Store and Age Your Homemade Wine
Proper Bottling Techniques
Once your wine has completed fermentation and clearing, proper bottling is essential to preserve quality and prevent contamination. Begin by sanitizing all equipment—bottles, corks, tubing, and the bottling wand—to eliminate bacteria and wild yeast. Use a siphon to transfer the wine from the carboy to the bottles, leaving sediment behind.
Fill each bottle to about one inch from the cork to minimize headspace and reduce oxidation. Use a corker to securely seal each bottle, ensuring an airtight closure. Consider using quality natural corks or oxygen-absorbing synthetic corks for better aging potential.
Label each bottle with the wine type and bottling date to track aging progress. Avoid disturbing the bottles immediately after bottling; let them sit upright for 24 hours to stabilize. Proper technique ensures your homemade wine remains fresh, flavorful, and ready for long-term storage.
Ideal Storage Conditions
To maximize the lifespan and quality of your homemade wine, maintain consistent, cool, and dark storage conditions. Store bottles horizontally to keep corks moist and prevent air from entering, which can cause oxidation.
The ideal temperature is between 55°F and 58°F (13°C–14°C), with minimal fluctuations—avoid areas near appliances, windows, or exterior walls. Humidity should remain around 60–70% to prevent corks from drying out. Keep wine away from strong light, especially sunlight and fluorescent lighting, which can degrade compounds and create off-flavors.
A basement, closet, or dedicated wine fridge works well. Avoid vibrations and strong odors, as both can negatively impact aging. Proper storage ensures your wine develops complexity and maintains its intended character over time, especially important for wines made from a craft brew wine making kit.
How Long to Age Different Wine Types
Not all wines benefit from long aging—knowing when to drink your wine enhances enjoyment. Most fruit wines and lighter whites from a craft brew kit are best consumed within 6 months to 1 year of bottling, as they peak in freshness and aroma early.
Full-bodied whites and rosés can improve slightly over 1–2 years. Red wines, especially those with higher tannin and structure, often benefit from 2–5 years of aging, allowing flavors to mellow and integrate. However, many kit wines are designed for early consumption and may not improve significantly past 3 years.
Monitor aging by sampling a bottle annually. Keep detailed notes on flavor development to determine your ideal drinking window. Aging too long can lead to flat or oxidized flavors, so balance patience with regular tasting to enjoy your wine at its peak.
Troubleshooting Common Issues with Craft a Brew Kits
Cloudy Wine: Causes and Solutions
Cloudy wine in your Craft a Brew wine making kit can result from incomplete fermentation, insufficient settling time, or premature bottling. Ensure fermentation is fully complete by checking specific gravity readings over two consecutive days—if they’re stable, fermentation has likely finished.
After fermentation, allow the wine to cold stabilize for several days by placing the carboy in a cool, dark place; this encourages yeast and particles to settle. Using a fining agent like bentonite or isinglass can accelerate clarification.
Racking the wine carefully off the sediment into a clean container also helps. Avoid disturbing the lees during transfers, and use a siphon with a tip protector. If cloudiness persists, consider filtering before bottling. Patience is key—rushing the process often leads to haze.
With proper timing and techniques, your Craft a Brew kit will yield brilliantly clear wine every time.
Off Flavors and How to Avoid Them
Unpleasant tastes in wine made with a Craft a Brew kit—such as vinegar, sulfur, or musty notes—often stem from poor temperature control, stressed yeast, or oxidation. Maintain ideal fermentation temperatures (typically 65–75°F) to keep yeast healthy and prevent off-flavors.
Use a fermentation jacket or wrap if your room is too warm or cold. Rehydrate dry yeast properly before pitching, and avoid adding it directly to concentrated must. Sulfur odors can be reduced by vigorous stirring during fermentation or using a degassing tool.
Always use clean, sanitized equipment to avoid bacterial contamination. Limit wine’s exposure to air after fermentation by topping up carboys and using airlocks. If off-flavors persist, age the wine longer—many dissipate over time. With attention to yeast health and sanitation, your Craft a Brew wine will develop balanced, enjoyable flavors.
Preventing Contamination and Mold
Contamination and mold in your Craft a Brew wine making kit can ruin a batch, but are easily preventable with rigorous sanitation. Sanitize all equipment—carboys, airlocks, siphons, and utensils—using a no-rinse sanitizer before and after each use. Even small residues can harbor bacteria or wild yeast.
Keep your workspace clean and covered, and avoid opening the fermenter unnecessarily. Mold growth often occurs when the airlock isn’t filled or the seal is compromised—ensure the lid is airtight and the airlock has water or sanitizer.
If you notice mold on the surface, discard the batch immediately—do not taste or attempt to salvage. Use fresh ingredients from trusted kits, and store them properly. Never reuse stoppers or airlocks without sanitizing.
By making sanitation a habit, you protect your wine and ensure consistent, high-quality results with every Craft a Brew kit.
Tips for Enhancing Flavor and Quality
Adding Extra Ingredients for Depth
Enhance the complexity of your wine by incorporating additional ingredients during fermentation or aging. For red wines, consider adding oak chips or cubes to introduce vanilla, spice, and tannin structure that mimic barrel aging.
Use citrus zest, honey, or dried fruit to boost aromatic profiles and add subtle layers of flavor. Always sanitize additions before introducing them to your must to prevent contamination. Use in moderation—overpowering ingredients can unbalance the wine.
For fruit wines, layering complementary fruits (like blackberry with raspberry) can create a more nuanced palate. Experiment in small batches first to gauge impact. Taste regularly as the wine evolves, adjusting only before final stabilization.
Ingredients like acid blend or tannin powder can also fine-tune mouthfeel and brightness, especially in homemade kits that may lack natural complexity. Thoughtful additions transform a simple kit wine into a personalized, full-bodied creation.
Blending Wines for Better Taste
Blending is a powerful technique to improve balance, aroma, and mouthfeel in kit wines. Combine different batches—such as a bold, tannic wine with a softer, fruit-forward one—to achieve a more harmonious final product.
Start by tasting each component separately, then mix small test samples in varying ratios (e.g., 70/30, 50/50) to evaluate flavor integration. Keep detailed notes on each blend to replicate successful combinations. Blending can correct flaws like excessive sweetness, high acidity, or weak body.
For instance, blending a dry wine into a sweet one can reduce cloyingness while preserving fruit character. This method is especially effective with kits that produce uniform results, allowing you to customize complexity. Allow the blended wine to age for a few weeks post-blending to ensure cohesion.
With patience and precision, blending turns good wine into exceptional, well-rounded creations.
When to Use Wine Stabilizers and Clarifiers
Proper use of wine stabilizers and clarifiers ensures clarity, stability, and shelf life. Add potassium metabisulfite at the start of fermentation and again before bottling to prevent oxidation and microbial spoilage.
Use potassium sorbate only after fermentation is complete and the wine is clear, as it prevents yeast re-fermentation—especially important in sweetened wines. Clarifiers like bentonite or isinglass should be added after fermentation ends and the wine has settled, helping proteins and yeast drop out for brilliant clarity.
Avoid premature use, as they can interfere with active fermentation. Follow kit instructions closely, but understand that cooler storage temperatures improve clarification. Rack the wine carefully after clarification to leave sediment behind.
Using these additives at the right stage ensures a polished, professional-quality wine that remains stable and bright over time.
Frequently Asked Questions
What is a Craft a Brew wine making kit?
A Craft a Brew wine making kit is a beginner-friendly home winemaking package that includes all the necessary ingredients and equipment to make wine from concentrate. These kits typically come with juice concentrate, yeast, clarifying agents, and instructions for fermentation and bottling.
How do I use a Craft a Brew wine making kit?
To use the kit, sanitize all equipment, mix the provided concentrate with water, add yeast, and ferment for about 4-6 weeks. After fermentation, siphon the wine into bottles, cap or cork them, and let age for best flavor.
How long does it take to make wine with a Craft a Brew kit?
The fermentation process usually takes 4 to 6 weeks, followed by an additional aging period of several weeks to months for improved taste. Most kits recommend waiting at least 2-3 months before drinking for optimal results.
Do I need additional equipment to use a Craft a Brew kit?
Most kits include basic supplies, but you may need common household items like a large pot, stirring spoon, and bottles. A separate sanitizer and hydrometer can also be helpful for best results.
Can I make different types of wine with Craft a Brew kits?
Yes, Craft a Brew offers a variety of kits for different wine styles including red, white, rosé, and fruit wines. Each kit is formulated to produce a specific type and flavor profile of wine.
Is Craft a Brew suitable for beginners?
Yes, Craft a Brew kits are designed with beginners in mind, featuring simple step-by-step instructions and pre-measured ingredients to ensure a successful first winemaking experience.
Conclusion
The Craft a Brew Wine Making Kit offers an easy, enjoyable way to create high-quality homemade wine without prior experience. With all necessary ingredients and clear instructions included, it’s perfect for beginners and hobbyists alike. The process is both rewarding and customizable, allowing personal touches in every batch. Whether for fun or as a thoughtful gift, this kit makes winemaking accessible and fun. Try it today and savor the satisfaction of crafting your own delicious wine.