How To Steam Clean Air Fryer
Wondering how to steam clean your air fryer without hassle? You’re in the right place. No disassembly nightmares, no expensive cleaners—just water, a little heat, and a few minutes of your time. Follow our quick guide and your air fryer will be sparkling clean and ready for the next batch of crispy delights and enjoyment.
Understanding Steam Cleaning for Air Fryers
Why steam cleaning is beneficial
Steam cleaning uses hot vapor to loosen food residue and grease without harsh chemicals, making it an eco‑friendly choice for your air fryer. Hot steam penetrates crevices where a brush or sponge often misses, breaking down stubborn buildup on the basket, tray, and heating element.
Because the water turns to steam, it softens grime while the temperature sanitizes surfaces, reducing bacterial growth. The process also prevents scratching of non‑stick coatings, extending the lifespan of the appliance. Additionally, steam leaves no residue, so you won’t need extra rinsing steps that can introduce moisture into electrical components.
By incorporating a quick steam cycle after each use, you keep the fryer ready for the next batch, maintain consistent cooking performance, and cut down on deep‑cleaning time. This method is especially useful for busy kitchens where maintaining hygiene efficiently is a priority.
How steam differs from traditional cleaning methods
Steam cleaning differs from traditional scrubbing or dishwasher cycles by relying on moisture in its gaseous state rather than abrasive contact. Temperature‑driven vapor reaches areas a sponge cannot, such as the narrow gaps between the heating coil and the interior wall, dissolving grease that cold water leaves behind.
Unlike detergent‑based washes, steam leaves no chemical residues, which is important for preserving the flavor integrity of foods cooked later. The method also reduces water exposure to electrical components, lowering the risk of short circuits compared to submerging parts.
Because steam condenses quickly, it shortens drying time, allowing you to resume cooking within minutes. Moreover, the high heat kills most bacteria and mold spores, offering a level of sanitation that ordinary wiping cannot achieve.
Understanding these distinctions helps you choose steam when you need a deep, hygienic clean without the wear and tear associated with manual scrubbing.
Safety considerations before steaming
Before you start a steam cleaning cycle, take several safety steps to protect both the appliance and yourself. First, unplug the air fryer and let it cool completely; hot elements can cause steam burns if activated while still warm.
Remove any detachable parts such as the basket or tray and inspect them for cracks that could let water seep into electrical zones. Place a heat‑resistant container filled with a small amount of water on the lower rack, ensuring it does not touch the heating element.
Use only distilled or filtered water to avoid mineral deposits that could clog the steam vents. Keep the kitchen well‑ventilated, as the hot vapor may increase humidity and cause condensation on nearby electronics.
Finally, never exceed the manufacturer’s recommended water level or steam duration, and always monitor the process to intervene if excess steam builds up. Following these precautions ensures a clean, efficient result without compromising safety.
Preparing Your Air Fryer for Steam Cleaning
Gathering necessary tools and supplies
Begin by assembling everything you’ll need before you start the steam cycle. A clean water source such as filtered tap water prevents mineral buildup, and a measuring cup helps you add the correct amount, typically one to two cups depending on the model.
Keep a soft‑bristled brush or non‑abrasive sponge nearby for later spot‑cleaning, and have a dry microfiber cloth ready to wipe excess moisture. If your fryer includes a steam‑clean function, locate the dedicated steam tray or insert and set it aside.
Finally, gather any mild dish‑soap or food‑safe cleaning solution if you plan to rinse the basket afterwards. Having these tools within arm’s reach ensures a smooth, uninterrupted cleaning session and reduces the risk of forgetting essential items mid‑process.
Before you begin, ensure the appliance is unplugged and completely cooled to avoid steam burns. Double‑check that the water reservoir is free of debris, and wipe the exterior with a damp cloth to prevent splatter during the steam cycle.
Removing detachable parts and accessories
Next, detach every removable component so steam can reach all interior surfaces. The basket, crisper tray, and drip pan should be lifted out and set on a heat‑resistant surface. If your model features a removable heating element cover or a silicone mat, pull these pieces away as well.
Inspect each part for visible food residue; a quick rinse under warm water will loosen stuck bits before the steam cycle begins. Place the accessories in a shallow basin so they won’t roll away when you move the fryer onto the countertop.
For larger units, consider using a silicone baking mat to protect the work area while you handle the components. Removing these parts not only improves cleaning efficiency but also prevents water from pooling in crevices, which could cause rust or affect the appliance’s performance over time.
Checking manufacturer guidelines
Before you start the steam function, review the manufacturer’s instructions to avoid voiding the warranty. Locate the user manual—either the printed booklet or an online PDF—and find the section on steam or water‑based cleaning.
Some brands limit the amount of water you can add or require a specific temperature setting; follow those limits precisely. Verify whether the appliance needs to be powered on for the steam cycle or if it operates in a “stand‑by” mode with the lid closed.
Note any cautions about cleaning the heating element directly, as many models advise against submerging it. If the guide recommends a pre‑heat period, allow the fryer to run for a few minutes before introducing water.
Recording these details in a quick checklist can streamline future cleanings and ensure you stay within the safety parameters set by the manufacturer.
Step-by-Step Steam Cleaning Process
Filling the water reservoir correctly
Begin by unplugging the air fryer and allowing it to cool completely. Locate the removable water reservoir, usually found at the back or side of the unit. Remove the reservoir and rinse it with warm water to eliminate any residue.
Fill the reservoir with filtered or distilled water up to the marked max line; avoid overfilling to prevent leaks. If your model includes a measuring cup, use it to ensure accurate volume, typically 200‑250 ml for a standard 5‑liter fryer.
Secure the lid tightly, then re‑insert the reservoir into its slot, making sure it clicks into place. Double‑check that the water level indicator aligns with the “full” mark. This precise preparation guarantees consistent steam generation and protects the appliance’s heating element from damage.
Also, wipe the exterior of the reservoir with a soft cloth to remove any splashes, ensuring a clean start for the steam cycle.
Setting the appropriate temperature and time
After the reservoir is secured, plug the air fryer back in and power it on. Access the control panel and select the steam cleaning mode; if your model lacks a dedicated button, choose the highest temperature setting that does not exceed 120 °C (250 °F).
Use the digital display to input the recommended steam duration, typically 5‑7 minutes for routine cleaning. For heavily soiled interiors, you may extend the time to 10 minutes, but avoid exceeding 12 minutes to prevent excess moisture buildup.
Confirm the settings by pressing the start button, and watch the indicator light turn green, signaling that the unit is heating the water to create steam. Setting the correct temperature and timing ensures effective grime dissolution while protecting the non‑stick coating and electronic components from overheating.
Refer to the user manual for any model‑specific temperature caps, and always ensure the fryer’s basket is removed before initiating the steam cycle.
Executing the steam cycle and monitoring
With the settings confirmed, press the Start button to launch the steam cleaning cycle. As the water heats, you will hear a gentle hissing sound indicating steam production.
Keep the fryer’s door slightly ajar, if the design permits, to allow excess moisture to escape and prevent condensation inside the electrical housing. Monitor the process through the transparent lid or built‑in window; watch for steady steam and ensure there are no unusual noises or smoke.
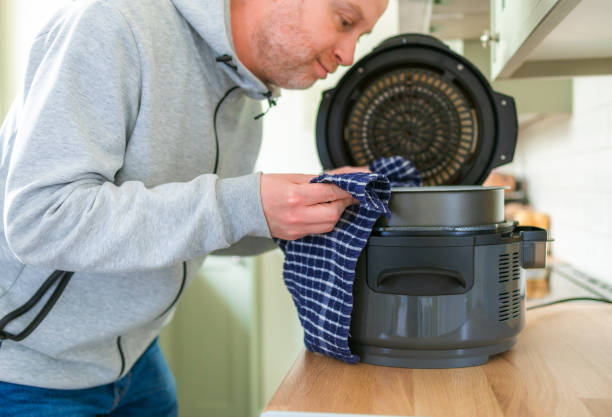
After the programmed time elapses, the unit will automatically shut off and the indicator will flash red, signaling the end of the cycle. Open the door carefully, using oven mitts if the interior is hot, and let the steam dissipate for a minute.
Wipe the interior with a soft, damp cloth to remove loosened food particles, then dry the basket and tray thoroughly before the next cooking session.
Cleaning Detachable Components Separately
Steam cleaning the basket and tray
Begin by filling a heat‑proof bowl with 1‑2 cups of water and placing it on the lower rack of the air fryer.
Set the temperature to 120 °C (250 °F) and run the unit for five to seven minutes; the hot steam will loosen grease and food particles on the basket and tray. Turn off the appliance before opening it, then carefully remove the basket and tray using oven mitts.
Submerge both pieces in a sink of hot, soapy water for another two minutes, allowing the residual steam to finish the cleaning. Use a soft silicone spatula to scrape away any remaining film, being gentle to avoid scratching the non‑stick coating.
Finally, rinse thoroughly under running water to eliminate soap residue. This method combines steam’s penetrating power with a quick hand wash, saving time while preserving the delicate surfaces.
Using a brush for stubborn residues
If steam and soaking do not fully dissolve baked‑on bits, reach for a dedicated air‑fryer brush with soft nylon bristles.
Spray a light mist of white vinegar or a citrus‑based degreaser onto the basket and tray, then gently scrub in circular motions, concentrating on the corners and the perforated bottom where grime tends to collect. The brush’s flexible head can navigate the intricate mesh without damaging it.
For especially tenacious residue, let the vinegar sit for one minute before brushing; the mild acidity helps break down carbonized oil. After scrubbing, rinse each component under warm water, checking that no bristle fragments remain. Finally, wipe the surfaces with a clean microfiber cloth to remove any lingering moisture.
This step ensures that even the most stubborn deposits are lifted, keeping the cooking area hygienic and extending the appliance’s lifespan.
Drying and reassembling parts
Once cleaning is complete, set the basket and tray on a dry rack to air‑dry for at least five minutes; this prevents water spots that could affect future crisping.
For faster results, pat the pieces gently with a lint‑free paper towel or a soft cotton cloth, ensuring no moisture remains in the perforations. Before reassembly, inspect the non‑stick coating for any scratches; if you notice damage, replace the part to maintain optimal performance.
Place the basket back into the fryer cavity, aligning the tabs correctly, then slide the tray into its slot, confirming a snug fit. Run a short 2‑minute preheat cycle at 180 °C (350 °F) without food; this evaporates any residual dampness and readies the appliance for immediate use.
After the cycle, wipe the exterior with a damp cloth, and your air fryer is fully prepared for the next cooking session.
Post-Cleaning Maintenance Tips
Wiping down the exterior after steam
After the steam cycle finishes, allow the air fryer to cool for 2–3 minutes before handling. Turn off and unplug the unit to eliminate any electrical risk. Use a soft, lint‑free cloth dampened with warm water mixed with a few drops of mild dish soap.
Gently wipe the stainless‑steel or plastic housing, focusing on the control panel, handle, and vent openings. Avoid abrasive sponges or harsh chemicals such as bleach, which can damage the finish and affect future steam performance.
For stubborn fingerprints, apply a tiny amount of white vinegar to the cloth and rub in circular motions. Once the surface is clean, use a dry microfiber towel to remove any remaining moisture.
This quick exterior wipe prevents soap residue from seeping into seams and keeps the fryer looking polished for the next use.
Ensuring complete drying to prevent moisture buildup
After wiping, it is crucial to guarantee that every interior and exterior surface is thoroughly dry before storing or reusing the air fryer. Leave the basket and tray open on a clean rack for at least 10 minutes, allowing natural airflow to evaporate trapped steam.
For hard‑to‑reach corners, use a dry cotton swab or a soft brush to absorb lingering droplets. If you notice any damp spots, pat them gently with a paper towel, then let the unit sit in a well‑ventilated area for another 5–10 minutes.
Do not cover the appliance with a plastic lid or foil until you are certain it is completely moisture‑free, as trapped humidity can promote mold growth and affect the next steam cycle’s efficiency.
Finally, inspect the power cord and plug; any moisture there can cause short circuits, so wipe them with a dry cloth before plugging the fryer back in.
Regular cleaning schedule recommendations
Establishing a consistent cleaning routine ensures your air fryer stays ready for steam cleaning without performance loss. After every 5‑6 uses, remove the basket, tray, and any removable accessories, then give them a quick rinse and a thorough dry.
Perform a deeper clean—including descaling the heating element and wiping the interior walls—with a mild vinegar‑water solution once a month, or sooner if you notice mineral deposits. Mark your calendar with a reminder: “Steam‑clean + interior wipe” on the first Saturday of each month.
For households that cook heavily with oily foods, increase the frequency to every 3‑4 uses to prevent grease buildup that can interfere with steam generation.
Keep a log of cleaning dates in a kitchen notebook or a phone note; this visual cue helps you stay accountable and spot any patterns of neglect. By following this schedule, you reduce the risk of lingering odors, extend the appliance’s lifespan, and maintain optimal steam‑cooking results.
Troubleshooting Common Issues
Dealing with lingering odors
Start by emptying the fryer basket and wiping the interior with a damp cloth. Remove any food residue that could be fermenting and producing smells. Next, fill the water reservoir to the maximum line and add a tablespoon of white vinegar or a few drops of lemon juice.
Run a steam cycle at the highest temperature for 5‑10 minutes; the acidity helps neutralize odor‑causing molecules. After the cycle, discard the liquid, rinse the reservoir, and wipe down all surfaces with a soft sponge.
For persistent smells, sprinkle a thin layer of baking soda on the basket, let it sit for 15 minutes, then rinse thoroughly. Finally, leave the fryer door open for an hour to air‑dry, allowing any remaining moisture to evaporate.
Regularly cleaning the drip tray and checking the heating element for buildup will keep odors at bay and maintain fresh‑smelling results.
Handling excess water or steam leaks
First, verify that the water tank is seated correctly; an off‑center placement can create gaps where steam escapes. Secure the lid by aligning the locking tabs and pressing firmly until you hear a click.
If you notice droplets forming on the exterior during a cycle, reduce the amount of water to the recommended level—overfilling often leads to pressure buildup and leaks. Inspect the silicone gasket around the door for cracks or debris; a damaged seal should be replaced immediately to maintain a tight enclosure.
During operation, avoid opening the fryer until the timer finishes; premature opening releases hot steam and can cause water to pool on the countertop. Should a leak persist, wipe the interior dry with a lint‑free cloth, then run a short 2‑minute steam program with only water to test the system.
This dry‑run helps identify whether the issue stems from a faulty valve or a misaligned component, allowing you to address it before it escalates.
When to seek professional service
Even with careful maintenance, some problems require a technician’s expertise. Contact support if the fryer repeatedly fails to reach the programmed temperature, as this may indicate a malfunctioning thermostat or heating element that cannot be safely repaired at home.
Persistent steam that vents from unexpected seams or a continuously dripping reservoir suggests a cracked internal pipe or a defective pressure release valve—components that need specialized tools to disassemble.
If the digital display flashes error codes that do not clear after a power reset, the control board could be damaged and should be examined by an authorized service center. Additionally, any unusual burning smells combined with smoke may signal electrical shorting, posing a fire hazard.
Before sending the unit for repair, gather the model number, purchase receipt, and a brief description of the symptoms to expedite the warranty claim. Professional intervention not only restores full functionality but also protects you from voiding the warranty through improper DIY fixes.
Frequently Asked Questions (FAQ)
Can I use any type of water for steaming?
Yes, you can steam clean most air fryers with regular tap water, but using filtered or distilled water is recommended to prevent mineral buildup that can affect performance over time.
Start by filling the removable water reservoir or a heat‑proof bowl with about 1‑2 cups of water, ensuring the level does not exceed the maximum mark.
If your model has a dedicated steam function, select it; otherwise, set the temperature to 100‑120 °C and let the water create gentle vapor for 5‑10 minutes. Avoid adding any additives, such as vinegar or lemon, unless the manufacturer explicitly approves them, as these can corrode internal components.
After steaming, allow the fryer to cool, then wipe the interior with a soft, damp cloth to remove any residual moisture. This routine keeps the heating element clean and extends the lifespan of your appliance.
How often should I steam clean my air fryer?
The ideal frequency for steam cleaning depends on how often you use the air fryer and what you cook in it, but a good rule of thumb is to perform a light steam clean every 2‑3 weeks and a deeper clean once a month.
If you notice lingering odors, visible grease buildup, or reduced crispiness in your food, it’s a sign that a steam session is overdue. For heavy‑duty users who fry daily, consider a quick 5‑minute steam after each week of use to prevent residue from hardening on the heating coil.
Conversely, occasional cooks can stick to the monthly schedule unless they prepare particularly oily meals. Always consult the user manual for model‑specific recommendations, and remember to empty and dry the water reservoir after each steam cycle to avoid mold growth.
Consistent steaming not only maintains performance but also reduces the need for abrasive scrubbing.
Is steam cleaning safe for all air fryer models?
Steam cleaning is safe for most modern air fryers, but not every model is designed to tolerate high humidity, so you should first verify compatibility by checking the manufacturer’s guidelines or the product manual.
Units with a built‑in steam function are explicitly engineered for this purpose and can handle regular steam cycles without damage.
For traditional fryers without a steam setting, you can still use a manual steam method as long as the interior components are heat‑resistant and the water reservoir is removable; however, avoid exposing electronic panels or control knobs to direct steam.
If you have a compact or budget model, look for warnings about “no water” or “do not steam” in the specifications. When in doubt, perform a short test run with a small amount of water and inspect for any signs of corrosion or malfunction before establishing a routine.
Following these precautions ensures safe and effective steam cleaning across a wide range of air fryer designs.
Frequently Asked Questions
What is steam cleaning for an air fryer and why should I use it?
Steam cleaning uses hot water vapor to loosen food residue and grease inside the air fryer without harsh chemicals. It helps maintain hygiene, extends the appliance’s lifespan, and reduces the need for abrasive scrubbing.
What equipment do I need to steam clean my air fryer?
You’ll need a heat‑proof bowl or shallow pan that fits inside the air fryer, water, optional a few drops of mild dish soap, and a clean kitchen towel or silicone brush for finishing.
How do I steam clean my air fryer step by step?
1. Remove the basket and tray. 2. Fill a heat‑proof bowl with about 1‑2 cups of water (add a drop of dish soap if desired). 3. Place the bowl inside the air fryer and set the temperature to 180‑200 °C (350‑400 °F) for 5‑7 minutes. 4. Let the steam work, then carefully remove the bowl and wipe the interior with a damp cloth or soft brush.
Can I steam clean the basket and accessories of the air fryer?
Yes. After the main chamber is steam cleaned, place the basket and tray in the same bowl of hot water (or a separate bowl) for a few minutes, then scrub gently with a non‑abrasive brush to remove any remaining crumbs.
How often should I steam clean my air fryer?
For regular home use, steam cleaning once a week is sufficient. If you cook heavily seasoned or oily foods, consider steaming after every 2‑3 uses to prevent buildup.
Are there any safety tips I should follow when steam cleaning?
Always unplug the air fryer before adding water. Use heat‑proof containers, avoid overfilling the bowl, and allow the appliance to cool before handling the basket or wiping the exterior to prevent burns.
Conclusion
By mastering steam cleaning, you keep your air fryer hygienic, extend its lifespan, and preserve the crispness of every dish. Remember to unplug, add water, set the appropriate temperature, and let the steam work before wiping the interior. Regular maintenance prevents residue buildup and eliminates odors, ensuring consistent performance.