How To Make Beer
Ever wondered how to make beer right in your own kitchen? It’s a rewarding hobby that is surprisingly simple to start. You don’t need a massive brewery to create delicious, custom brews that impress your friends. You will be sipping on your homemade creation before you know it. Let’s get brewing and answer that question quickly!
Understanding the Home Brewing Process
The Science of Fermentation
At its core, brewing is about converting sugars into alcohol and carbon dioxide through the metabolic activity of yeast. Once your cooled wort is safely transferred to a sanitized fermenter, you pitch the yeast, which immediately begins consuming the fermentable sugars extracted from the malted grain.
This biological process generates heat, ethanol, and CO2, effectively transforming a sweet liquid into beer. Temperature control is absolutely crucial during this active stage; if the environment is too hot, the yeast produces off-flavors, while temperatures that are too low may cause it to go dormant.
Primary fermentation typically lasts one to two weeks, but patience is key to achieving a clean flavor profile. Afterward, a secondary fermentation can help clarify the beer and allow complex flavors to mature fully. Understanding this transformation helps you troubleshoot common issues like stalled fermentation or unwanted esters.
Extract Brewing vs. All-Grain Brewing
Beginners often choose between extract brewing and all-grain methods, and understanding the difference helps you decide your path. Extract brewing uses concentrated malt syrup or powder, simplifying the process by removing the need for a full mash.
It is less time-consuming and requires less equipment, making it perfect for those just starting out. Conversely, all-grain brewing involves steeping crushed malted barley in hot water to extract sugars yourself.
This method offers complete control over the flavor and color of the final beer but demands a larger investment in gear and time. While extract brewing yields excellent results, all-grain provides a deeper connection to the craft.
Many brewers start with extract to master the basics of boiling, hopping, and fermenting before transitioning to the more complex all-grain process to refine their recipes and technical skills.
Legal Considerations for Homebrewers
Before you begin brewing, it is essential to understand the legal landscape surrounding home beer production. In the United States, federal law generally permits adults to brew up to 100 gallons per year for personal use, or 200 gallons in households with two or more adults.
However, state and local laws vary significantly, so you must verify specific regulations in your area. Some states have strict quantity limits, while others prohibit homebrewing entirely or require permits. Furthermore, selling your homebrew without a license is strictly illegal under federal law.
Always ensure you are compliant with local zoning laws regarding where you brew and store your ingredients. Staying informed about these regulations protects you from legal trouble and ensures your hobby remains an enjoyable and lawful pursuit within your community.
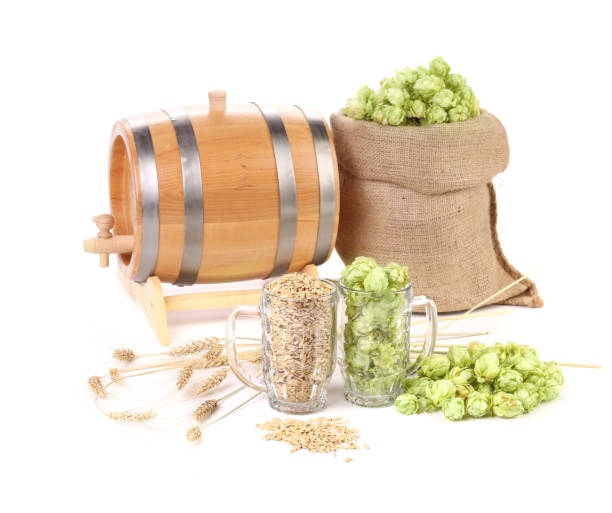
Essential Ingredients for Brewing Beer
Water Chemistry and Quality
Water constitutes over 90 percent of your final brew, making its chemistry fundamental to the process. You must begin with water that tastes good and is free from chlorine or chloramines, which can create off-flavors.
Adjusting the mineral profile is the next step; calcium is essential for yeast health and enzyme function, while sulfate enhances hop bitterness in IPAs. Conversely, chloride accentuates maltiness. Treat your water with a filter or campden tablets to remove impurities.
Furthermore, monitoring the mash pH between 5.2 and 5.6 ensures optimal starch conversion. Tailoring your water profile to the style you are brewing is a professional move that significantly elevates the quality of your homemade beer.
Malted Barley and Beer Grains
Malted barley serves as the primary source of fermentable sugars, which yeast later convert into alcohol and CO2. Base malts, such as two-row or Pilsner, form the foundation of your recipe, providing the necessary enzymes for conversion.
Specialty grains, including caramel malt or roasted barley, are then added to dictate the beer’s color, body, and distinct flavor profile. Crack your grains using a mill to expose the starchy interior while keeping the husks intact for filtration.
During the mashing process, hot water activates natural enzymes within the grain that break down complex starches into simple sugars. Selecting the right balance of grains is crucial for achieving the specific taste and strength you desire.
Hops for Bitterness and Aroma
Hops act as the balancing agent in beer, counteracting the residual sweetness of the malt with bitterness and contributing complex aromas. Alpha acids in hops are isomerized during the boil to provide bitterness, so adding them early in the process creates a sharp bite.
Conversely, adding hops late in the boil or during whirlpooling preserves their delicate essential oils for floral, citrus, or piney aromas. Select specific hop varieties like Cascade for American ales or Hallertau for European lagers to match your intended style.
For an intense aromatic boost, consider dry hopping during fermentation, which imparts fresh hop scent without significantly increasing bitterness. Proper hop timing is essential for a balanced flavor profile.
Yeast Strains and Their Profiles
Yeast is the biological engine responsible for turning sugary wort into alcohol and carbon dioxide. Selecting the right strain is paramount, as ale yeasts ferment at warmer temperatures to produce fruity esters and spicy phenols, while lager yeasts require colder conditions for a clean, crisp finish.
You must ensure you pitch an adequate amount of healthy yeast to avoid stressed fermentation, which can lead to off-flavors. Create a yeast starter or properly rehydrate dry yeast to guarantee a vigorous fermentation begins quickly.
Furthermore, maintaining strict temperature control during fermentation allows the specific characteristics of the yeast to shine. Ultimately, the yeast strain defines the beer’s final personality, distinguishing a stout from a porter or an IPA.
Brewing Equipment You Need to Get Started
Large Brew Kettles and Pots
To begin brewing, you must select a stainless steel or aluminum brew kettle capable of holding at least five gallons for a standard batch. This vessel is where you will boil your ingredients, known as wort, so ensure it includes a tight-fitting lid to maintain heat.
A dedicated brew pot is essential because it allows for efficient heat distribution and easy cleaning, avoiding any lingering flavors from previous cooking. Ideally, choose a pot with a ball valve for easy draining later.
Remember that a larger volume helps prevent messy boil-overs during the most vigorous stage of the boil, ensuring a safer and cleaner brewing process right from the start. A pot with sturdy handles is also vital for safety.
Fermentation Vessels and Airlocks
Once your wort is boiled and cooled, it must be transferred into a food-grade fermentation vessel, such as a plastic bucket or glass carboy. This container is the heart of your brewery, providing a sterile environment for yeast to convert sugars into alcohol.
You absolutely need a fermentation lock or airlock fitted into the lid; this simple device allows carbon dioxide to escape during fermentation while preventing bacteria and oxygen from entering. Always ensure your vessel is scrupulously sanitized before use to avoid off-flavors or contamination.
A clear glass vessel also allows you to visually monitor the fermentation activity, giving you confidence that the process is proceeding smoothly.
Siphons, Tubing, and Bottles
Transferring your finished beer without disturbing sediment requires a reliable auto-siphon and food-grade tubing. This setup allows you to move liquid from the fermenter to bottling buckets or bottles using gravity, minimizing oxidation and splashing.
You will also need a collection of pry-off bottles or swing-top bottles that can withstand carbonation pressure. Avoid twist-off bottles, as they do not seal well with standard caps. Invest in a bottle capper and caps to seal your brew airtight.
Properly racking your beer ensures clarity and quality, so practice using your siphon before brew day to ensure a smooth transfer from vessel to bottle without introducing oxygen.
Thermometers and Hydrometers
Precision is key in brewing, making a high-quality thermometer an indispensable tool for monitoring your wort temperature. You must cool your wort to a specific range before adding yeast; otherwise, you risk killing the yeast or producing off-flavors.
Additionally, a hydrometer is essential for measuring specific gravity, which tells you the sugar content of your beer. By taking a reading before fermentation and after, you can calculate the alcohol by volume (ABV) and confirm that fermentation is complete.
These tools remove the guesswork from the process, allowing you to replicate successful batches and troubleshoot problems. Accurate measurements ensure your homebrew tastes exactly as intended every time.
Preparation: Sanitation and Recipe Selection
Choosing Your First Beer Recipe
When embarking on your homebrewing journey, selecting the right recipe is crucial for a successful first batch. Beginners should strongly consider starting with a malt extract recipe rather than all-grain brewing, as this simplifies the process and reduces the risk of errors.
Look for styles known for their forgiving nature, such as an American Pale Ale or a robust Stout, which offer clear flavor profiles without requiring complex temperature control. Ensure you choose a recipe that matches your equipment setup, whether you are brewing in a bag or using a standard kettle.
Reading through the entire instructions before starting helps you understand the timeline and specific gravity targets. By picking a straightforward recipe, you can focus on mastering the fundamental techniques of fermentation and sanitation, laying a solid foundation for future brewing experiments.
The Importance of Sanitizing Equipment
Sanitization is arguably the most critical step in the brewing process, as it prevents unwanted bacteria and wild yeast from spoiling your beer. You must distinguish between cleaning, which removes visible grime, and sanitizing, which eliminates microscopic organisms.
After thoroughly washing your equipment with soap and water, apply a no-rinse sanitizer, such as iodophor or Star San, to every surface that will touch the cooled wort. Even a small lapse in sanitation can lead to off-flavors, sourness, or undrinkable beer.
Prepare your sanitizing solution in a large bucket or spray bottle to ensure easy coverage of fermenters, spoons, and airlocks. Remember that anything post-boil is highly susceptible to infection, so maintain a sanitary environment throughout the transfer and fermentation phases.
Consistent and rigorous sanitization practices guarantee that your hard work results in a clean and tasty final product.
Preparing Your Brewing Water
Water constitutes the vast majority of your beer, making its quality essential for a great final product. If your tap water tastes like chlorine or has a strong mineral flavor, it is best to use spring water or filtered water to avoid off-flavors in your brew.
While advanced brewers adjust water chemistry with specific salts, beginners should focus on using clean, neutral water that does not overpower the malt and hops.
Bring your brewing water to a boil before use if you are unsure about its biological safety, though this is less critical if using commercial bottled water. Ensuring your water is at the correct temperature for mashing and steeping is also vital for enzyme activity and sugar extraction.
By starting with high-quality water, you provide the perfect canvas for your ingredients to shine, resulting in a refreshing and flavorful beer.
Step-by-Step Brewing Guide: Creating the Wort
Steeping the Grains
Begin by heating approximately 2 to 3 gallons of water in your brew kettle until it reaches a temperature of 150°F to 165°F. Once the water is ready, place your crushed specialty grains into a mesh steeping bag and slowly submerge them into the hot water.
Ensure the water covers the grains completely, but avoid letting the temperature exceed 170°F, as this can extract unwanted tannins that make your beer taste astringent. Allow the grains to steep for about 20 to 30 minutes, maintaining a steady temperature range.
During this process, you will notice the water darken and take on a malty aroma. After the time has elapsed, carefully lift the grain bag out of the kettle, allowing the liquid to drain back into the pot without squeezing the bag too hard.
Squeezing too tightly can also release harsh tannins. Discard the spent grains and turn up the heat to bring the liquid to a boil.
The Boil and Hop Additions
Once your wort begins to boil, it is time to add your malt extract. Stir the liquid continuously to ensure the extract dissolves completely and does not scorch the bottom of your kettle.
This moment marks the start of the 60-minute boil, which is crucial for sterilizing the wort and extracting bitterness from your hops. Add your bittering hops early in the boil, typically right at the beginning, to utilize the high heat for isomerization.
As the boil progresses, monitor for boil-overs, especially when adding extracts, by lowering the heat slightly if necessary. With about 15 minutes remaining, add your flavoring hops to impart distinct characteristics.
Finally, in the last 5 minutes, add your aroma hops to maximize the volatile oils that give beer its nose. This timed schedule ensures a balanced flavor profile. Once the timer hits zero, remove the kettle from the heat immediately to prevent over-boiling and prepare for the cooling phase.
Cooling the Wort Rapidly
After the boil is complete, you must cool the wort down to yeast-pitching temperature as quickly as possible, ideally between 65°F and 75°F for ales.
Rapid cooling is essential because it helps create a cold break, where proteins and tannins precipitate out of the solution, resulting in a clearer final beer. Furthermore, quick cooling minimizes the time the wort sits at temperatures where bacteria or wild yeast can infect it.
If you are using an immersion wort chiller, run cold water through the coils while stirring the wort gently to maximize heat exchange. If you do not have a chiller, place your kettle in an ice bath in your sink, changing the water and ice as it warms up.
Once the target temperature is reached, carefully transfer the cooled wort into your sanitized fermenter. Be vigorous during the transfer to splash the liquid slightly, as this introduces oxygen necessary for the yeast’s initial growth phase before fermentation begins.
Fermentation: Turning Wort into Alcohol
Pitching the Yeast Correctly
Pitching yeast is the critical moment where your sweet wort begins its transformation into beer. First, ensure your wort has cooled to the appropriate temperature range, usually between 65°F and 72°F for ales, as high heat can kill the yeast.
Before adding the yeast, sanitize everything that touches the wort to prevent infection. If you are using dry yeast, consider rehydrating it in sterile water first to jumpstart cell activity, though sprinkling it directly is acceptable. For liquid yeast, make a starter to ensure a healthy population.
Once the temperature is stable, sprinkle or pour the yeast gently on the surface. Avoid splashing to minimize oxidation, but do shake the fermenter vigorously after pitching to introduce oxygen, which the yeast needs for healthy reproduction during the early growth phase.
Managing Temperature During Fermentation
Maintaining a stable fermentation temperature is vital for producing a clean, flavorful beer. Different yeast strains require specific temperature ranges; for example, lagers need much cooler environments than ales. If the temperature gets too high, the yeast may produce unwanted fusel alcohols resulting in harsh, solvent-like flavors.
Conversely, temperatures that are too low can cause the yeast to go dormant, leaving the beer overly sweet. Ideally, keep your fermenter in a dark, temperature-controlled area away from direct sunlight. You can use a simple swamp cooler with ice water or a dedicated fermentation fridge for precision.
Remember that fermentation generates heat, so the liquid inside the carboy can actually be a few degrees warmer than the ambient room temperature. Monitoring this internal temperature helps you avoid off-flavors and ensures the yeast works efficiently throughout the entire process.
Signs of Active Fermentation
Recognizing the signs of active fermentation confirms that your brewing efforts are successful. Within 24 to 72 hours of pitching, you should see a thick layer of foam called krausen form on top of the liquid.
This foam consists of proteins and yeast and is a clear visual indicator that fermentation is underway. Simultaneously, you will notice bubbles escaping through the airlock or blow-off tube as CO2 is produced. A distinct, yeasty aroma will fill the room, which is another positive sign.
While visual cues are helpful, the most accurate way to confirm fermentation is by taking a specific gravity reading with a hydrometer. If the gravity is dropping compared to your original reading, the yeast is actively consuming sugars.
Once the activity slows and the krausen falls, the initial vigorous phase is complete, but conditioning still takes time.
Bottling, Carbonating, and Storing Your Beer
Priming Sugar for Carbonation
To achieve the perfect level of carbonation in your homebrew, you must add a precise amount of priming sugar before bottling. This sugar provides food for the remaining yeast, which will ferment it inside the sealed bottle, producing carbon dioxide.
Since the gas cannot escape, it dissolves into the beer, creating that desirable fizz. Boil the priming sugar in a small amount of water to sanitize it and ensure it dissolves completely, then mix it thoroughly into your entire batch of beer right before filling the bottles.
It is crucial to measure this sugar accurately based on your batch volume and desired carbonation level; too much sugar can cause over-carbonation or dangerous bottle explosions, while too little will leave your brew flat.
Common priming sugars include corn sugar, dextrose, or dried malt extract, each imparting a slightly different character to the finished product.
The Bottling Process
Once your beer is primed, the bottling process requires cleanliness and patience to prevent contamination and oxidation. Sanitize all bottles, caps, and your bottling bucket thoroughly, as any wild bacteria can ruin the beer during this final stage.
Use a siphon or bottling wand to transfer the beer from the fermenter to the bottles, filling each one to the top to minimize oxygen exposure, then lower the liquid level to leave about an inch of headspace.
Oxygen is the enemy of fresh beer, so avoid splashing the liquid during transfer. Cap the bottles immediately using a hand capper or bench capper, ensuring a tight seal to hold in the carbonation pressure.
Inspect every seal to guarantee there are no leaks, and label your bottles with the brew date and style so you can track their progress during the conditioning phase.
Conditioning and Aging Your Beer
After bottling, your beer needs time to condition, allowing the flavors to mature and the carbonation to fully develop. Store the bottles in a dark, temperature-controlled environment ideally between 65°F and 70°F for the first two weeks to allow the yeast to consume the priming sugar effectively.
During this initial period, the beer will naturally carbonate, so avoid opening a bottle prematurely. Once carbonated, you can move the beer to a cooler location for long-term storage, which helps clear the beer and refine complex flavors.
Different beer styles require different aging times; lighter ales may be ready in a few weeks, while heavier stouts or high-gravity beers benefit from months of aging.
Patience is key during this stage, as rushing the process often results in green, unbalanced flavors that have not yet reached their full potential.
Frequently Asked Questions
What are the four main ingredients needed to make beer?
Beer is traditionally made using water, malted barley, hops, and yeast. Water provides the liquid base, malted barley supplies the sugars for fermentation, hops add bitterness and aroma, and yeast converts the sugars into alcohol and carbon dioxide.
What are the basic steps to brew beer at home?
The basic process involves crushing grains and steeping them in hot water to create wort, boiling the wort with hops for flavor, cooling it down, and adding yeast to begin fermentation. After the yeast ferments the sugars for about two weeks, the beer is bottled or kegged and allowed to carbonate.
What equipment is essential for a beginner homebrewer?
Essential equipment includes a large brew kettle for boiling, a fermenting bucket or carboy with an airlock, a siphon or tubing for transferring liquid, a thermometer, and a hydrometer to measure alcohol content. Many beginners start with a pre-assembled homebrewing kit that contains all necessary items.
How long does it take to make beer from start to finish?
While the actual brewing process takes only a few hours, fermentation generally requires two to four weeks. After fermentation, the beer typically needs another one to two weeks of bottle conditioning or carbonation before it is ready to drink.
What is the difference between extract brewing and all-grain brewing?
Extract brewing uses pre-made malt extract syrup or powder, simplifying the process and reducing the equipment needed. All-grain brewing involves converting starches from raw grains into fermentable sugars yourself, offering more control over the final flavor but requiring more time and specialized gear.
Why is cleaning and sanitizing equipment so important?
Sanitizing is crucial because any unwanted bacteria or wild yeast present on your equipment can ruin the beer by causing off-flavors or infections. Everything that touches the beer after the boiling stage must be sanitized to ensure the brew remains healthy and tasty.
Conclusion
Brewing beer at home is a rewarding craft that combines science and art. By mastering the basics of malting, boiling, fermenting, and bottling, you can create unique flavors tailored to your taste. Remember, patience and strict sanitation are the secrets to a perfect brew. Don’t be afraid to experiment with different ingredients and techniques. Grab your equipment, start your first batch today, and enjoy the satisfaction of sharing a cold, homemade beer with friends.