
How To Wash Pizza Stone
Cleaning a pizza stone doesn’t have to be a mystery. We’ll cover the tools you need, the safest methods, and tips to avoid damage, so you can enjoy crispy crusts without the hassle. Stick with us and you’ll have a spotless stone in no time. today for every bake.
Understanding Your Pizza Stone
What Is a Pizza Stone Made Of?
Pizza stones are typically crafted from ceramic, cordierite, or natural stone such as soapstone. These materials are porous, allowing them to absorb moisture and distribute heat evenly for a crisp crust.
The stone’s micro‑pores act like a sponge, drawing in steam from the dough and releasing it slowly, which creates that coveted bakery‑style bottom. Because the stone is unglazed, it does not have a protective coating that can be stripped away by harsh chemicals.
Understanding that the stone is essentially a high‑temperature, heat‑retaining slab helps you treat it gently: avoid sudden temperature changes, and clean it without abrasive tools.
When you know the composition, you can select the right cleaning method—usually a simple scrape, a brush, and a dry wipe—while preserving the stone’s performance for many baking sessions.
Season the stone by baking a thin layer of oil‑free dough for a few minutes before first use; this builds a subtle, non‑sticky patina that also aids cleaning later.
Why Proper Cleaning Matters
Cleaning a pizza stone correctly protects both flavor and durability. Residue from cheese, sauce, and dough can seep into the stone’s pores, later releasing unwanted tastes onto new pizzas. If left unchecked, these remnants can become a breeding ground for mold, especially in humid kitchens.
Moreover, harsh detergents or soaking can cause the stone to crack due to thermal shock or moisture expansion. A proper cleaning routine—allowing the stone to cool completely, scraping off charred bits, brushing with a stiff nylon brush, and wiping with a damp cloth—keeps the surface porous yet clean.
After cleaning, let the stone air‑dry for at least an hour before storing to prevent moisture retention that could weaken the material. By maintaining a spotless stone, you ensure consistent heat transfer, a crisp crust, and a longer lifespan for your baking tool.
Common Misconceptions About Washing
Many home bakers believe that soap, soaking, or a dishwasher are safe for pizza stones, but these myths can ruin the stone. Soap leaves a thin film that absorbs into the pores, later imparting a soapy taste to every crust.
Soaking the stone for any length of time allows water to penetrate deep, and when the stone is reheated the trapped moisture expands, causing cracks or a warped surface. Likewise, a dishwasher’s high‑temperature cycles and harsh detergents are far too aggressive.
The truth is simple: after each use, let the stone cool, scrape off debris, and wipe it with a slightly damp cloth or a brush. If stubborn bits remain, use a paste of baking soda and water, then rinse lightly and dry thoroughly.
Rejecting these misconceptions preserves the stone’s neutral flavor profile and structural integrity.
Preparing for the Cleaning Process
Gather Essential Tools
Before you begin cleaning, assemble the tools that will make the job safe and efficient. A sturdy spatula or metal scraper helps lift baked-on residue without cracking the stone. A soft-bristled brush or non-abrasive scrub pad removes loose crumbs while preserving the surface texture.
A clean, lint-free cloth is useful for wiping away moisture after rinsing. Keep a large tray or baking sheet nearby to catch any debris that falls off during the process.
If you prefer a natural degreaser, have a small bowl of warm water mixed with a few drops of mild dish soap ready, but remember that soap should be used sparingly. Finally, ensure you have a heat‑resistant glove or kitchen towel to handle the stone if it’s still warm.
Having these items within arm’s reach prevents interruptions and reduces the risk of accidental damage to the stone or your countertop.
Let the Stone Cool Completely
Allow the pizza stone to reach room temperature before any cleaning action. Never attempt to wash a hot stone, as sudden temperature changes can cause cracks or breakage. After cooking, turn off the oven and open the door to let the stone cool gradually for at least 30 minutes.
If you’re in a hurry, gently lift the stone onto a heat‑proof surface and let it sit undisturbed until it feels cool to the touch. Avoid using cold water on a warm stone; instead, let it sit until it is completely cool, then proceed with rinsing.
This cooling period also gives any stubborn bits of cheese or sauce a chance to loosen naturally, making the subsequent scrub easier and less abrasive. Patience during this step preserves the stone’s longevity and ensures a flawless surface for future baking.
Safety Precautions
Cleaning a pizza stone safely involves protecting both yourself and the stone’s surface. Wear heat‑resistant gloves when handling the stone, especially if it has retained residual warmth after cooling. Keep the work area well‑ventilated; steam from rinsing can make the floor slippery.
Avoid using harsh chemicals, abrasive pads, or dishwasher cycles, as these can degrade the stone’s porous structure and leave residues that affect flavor. If you must use a cleanser, choose a mild, food‑safe soap and rinse thoroughly with warm water, ensuring no suds remain.
After washing, dry the stone completely with a clean towel and let it air‑dry for at least an hour before storing it in a dry cabinet. Store the stone on a flat, stable surface to prevent warping, and keep it away from direct sunlight or extreme humidity.
Following these precautions extends the stone’s life and maintains optimal baking performance.
Basic Cleaning Method for Light Residue

Scrape Off Food Particles
Before any cleaning, let the stone cool completely to prevent cracking. Use a thin metal or plastic scraper to gently lift baked-on cheese, sauce, and crumbs. Work from the edges toward the center, applying light pressure to avoid gouging the surface.
If stubborn bits remain, sprinkle a handful of coarse kosher salt on the stone; the salt acts as an abrasive that loosens residue without scratching. Sweep the salt away with the scraper, then brush the area with a soft brush or dry cloth.
This step removes the bulk of debris, making the later damp‑wipe more effective and protecting the porous texture that gives the crust its crispness. For delicate stones, opt for a plastic scraper to minimize risk of surface marks.
Repeat the scraping motion in small sections until the stone feels smooth to the touch. This thorough removal of particles prevents them from burning during the next bake and helps maintain even heat distribution across the stone.
Use a Damp Cloth or Sponge
After scraping, lightly dampen a clean kitchen cloth or soft sponge with warm water—no soaking, just a hint of moisture. Wipe the surface in gentle, circular motions, allowing the water to lift remaining crumbs and oil without saturating the porous stone.
Work quickly; the stone should never stay wet for more than a minute to avoid moisture absorption that can cause cracking during heating. If a spot feels sticky, apply a second pass with a fresh damp area of the cloth, then immediately dry it with a dry towel.
This method cleans the stone while preserving its ability to absorb and release steam, which is essential for achieving a crispy pizza crust. Finish by letting the stone air‑dry completely before storing or reheating it in the oven.
Avoid using excessive pressure, as it can push water into the stone’s pores, which takes longer to evaporate.
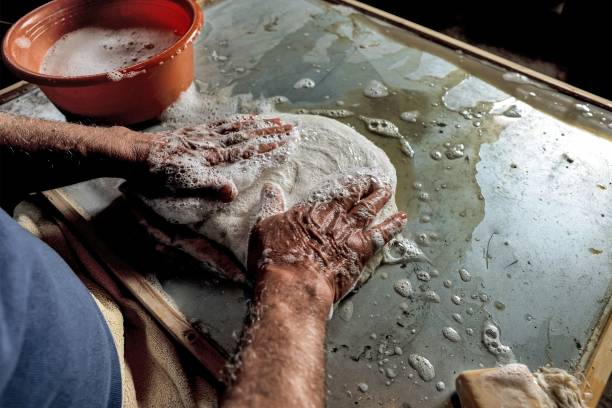
Avoid Soap and Detergents
One of the most common mistakes is reaching for dish soap; soap and detergents should never touch a pizza stone because they leave a thin film that can transfer to the dough and affect flavor. The stone’s porous surface readily absorbs chemicals, making them difficult to rinse out completely.
Instead, rely on the scraping and damp‑wipe steps to remove residue. If a stubborn stain persists, make a paste of baking soda and water, apply it lightly, let it sit for a few minutes, then wipe away with a damp cloth. Rinse the cloth thoroughly to ensure no powder remains.
After cleaning, allow the stone to cool and then store it in a dry place. By keeping soaps out of the routine, you preserve the stone’s natural seasoning and ensure every pizza bakes with a pure, untainted taste.
Deep Cleaning Techniques for Stubborn Stains
Baking Soda Paste Method
Start by sprinkling a generous layer of baking soda over the entire surface of the pizza stone. Add just enough warm water to create a thick, spreadable paste that clings to the stone without dripping.
Let the mixture sit for 10‑15 minutes; the mild alkaline action will loosen baked‑on cheese, sauce, and oil residues. Using a soft, non‑abrasive sponge, gently work the paste in circular motions, focusing on the darkest spots. Avoid harsh scouring pads because they can erode the stone’s porous texture.
After the paste has done its work, wipe away the residue with a clean, damp cloth, ensuring no gritty particles remain. Finally, allow the stone to air‑dry completely before the next use, preserving its heat‑distribution qualities and preventing moisture‑related cracking.
You can repeat the process if any stubborn specks persist, but never soak the stone for extended periods.
Using a Plastic Scraper
After the baking‑soda treatment, or when dealing with particularly tenacious caramelized bits, reach for a flexible plastic scraper. Hold the scraper at a shallow angle—about 15 degrees—to the stone’s surface and glide it gently across the stain, allowing the edge to lift debris without gouging the material.
Do not use metal tools; they can scratch the porous layer and create uneven heating zones. For curved or irregular areas, bend the scraper slightly to maintain contact and work in short, overlapping strokes.
If the residue proves stubborn, dampen the scraper with a few drops of warm water to soften the particles before scraping. Once the bulk of the stain is removed, wipe the area with a damp microfiber cloth to capture any remaining crumbs.
Finish by inspecting the stone for micro‑scratches; a smooth surface ensures optimal pizza crust crispness and longevity.
Rinsing and Drying Thoroughly
With stains lifted, the final step is a careful rinse and complete drying to keep the pizza stone ready for high‑heat baking. Use a clean, soft sponge soaked in lukewarm water—no soap, as detergents can seep into the pores and affect flavor.
Gently wipe the entire surface, paying extra attention to corners where moisture can hide. Pat the stone dry with a lint‑free towel, then place it upright on a cooling rack in a well‑ventilated area.
Allow at least two hours for any residual dampness to evaporate; if the stone feels even mildly cool to the touch, give it more time. Never store a damp stone in a sealed container, as trapped humidity can cause mold or cracking during the next heating cycle.
Once fully dry, the stone can be stored or returned to the oven, ready to deliver evenly baked, crispy crusts every time.
When to Use Specialized Cleaning Products
Choosing Food‑Safe Stone Cleaners
When your pizza stone develops stubborn stains or a lingering odor, a food‑safe stone cleaner can be more effective than plain water. Select a non‑abrasive, pH‑balanced cleanser that is specifically labeled safe for cookware and stone surfaces.
Avoid products containing bleach, ammonia, or harsh solvents, as they can seep into the porous stone and affect flavor. Look for cleaners that are free of dyes and fragrances to prevent any residue from transferring to your dough.
Before purchasing, read the ingredient list and verify that the manufacturer guarantees no harmful chemicals. Test the cleaner on a small, hidden area of the stone for a few minutes to ensure it does not discolor or degrade the material.
Using a dedicated stone cleaner only when regular scraping and hot‑water rinses fail helps preserve the stone’s natural porosity while keeping it hygienic for future baking.
How to Apply Commercial Cleaners
Before you begin, pre‑heat the oven to a low temperature (around 150 °C) and place the stone on a heat‑proof tray to prevent warping. Apply the commercial cleaner with a soft, damp sponge, spreading a thin, even layer over the entire surface.
Work in small sections, allowing the cleaner to sit for the manufacturer‑recommended dwell time—typically two to five minutes—to break down grease and carbon deposits. Do not let the solution dry, as this can leave a film that is difficult to remove.
Gently agitate stubborn spots with a non‑metallic brush, but avoid scrubbing aggressively, which could erode the stone’s pores. After the dwell period, wipe away excess liquid with a clean, damp cloth, ensuring no residue remains.
This method maximizes the cleaner’s effectiveness while protecting the stone’s integrity for consistent heat distribution in future baking sessions.
Rinsing Guidelines
Thorough rinsing is essential to eliminate any cleaning agents that could affect the taste of your crust. Rinse the stone with warm water using a gentle spray or a clean, damp sponge, moving in circular motions to flush out all traces of the product.
Do not use high‑pressure streams, as they can force water into the stone’s deep pores, leading to prolonged drying times and potential cracking. After the initial rinse, fill a shallow basin with lukewarm water and submerge the stone for one minute, allowing any remaining residue to dissolve.
Drain and pat dry with a lint‑free towel, then let the stone air‑dry on a rack for at least two hours, or until it feels completely dry to the touch.
For added safety, place the stone in a low‑heat oven (around 100 °C) for 15‑20 minutes to evaporate hidden moisture, ensuring the stone is ready for the next pizza‑making session.
Maintaining Your Pizza Stone for Longevity
Seasonal Storage Tips
Before storing your pizza stone for the season, give it a thorough but gentle clean. Avoid soap because the porous material can absorb chemicals that affect flavor. Use a stiff plastic scraper or a damp cloth to remove baked‑on crumbs, then wipe with a thin layer of water.
If stubborn residue remains, sprinkle coarse salt on the stone, add a few drops of water, and scrub lightly; the salt acts as a mild abrasive without damaging the surface. After cleaning, let the stone air‑dry completely in a well‑ventilated area for at least several hours.
Once dry, wrap it in a breathable cloth or place it in a cardboard box with a few newspaper sheets to absorb moisture. Store the stone in a cool, dry place away from direct sunlight or extreme temperature swings.
Label the container with the date of storage so you can track how long the stone has been idle before its next use.
Re‑seasoning the Stone
Re‑seasoning restores the stone’s non‑stick surface and helps prevent cracks after heavy use or after a wash. Start by preheating your oven to 250 °C (482 °F) and placing the stone on the middle rack.
Do not apply any oil or soap; the high heat will bake off any residual moisture and open the pores. Let the stone bake for 30‑45 minutes, then turn off the oven and let it cool gradually inside the chamber to avoid thermal shock.
For an extra protective layer, spread a thin coat of cornmeal or a dusting of flour across the surface before the next bake; this creates a sacrificial barrier that absorbs excess starch and reduces sticking.
Repeat the heating cycle once a month if you bake pizza frequently, or after each thorough cleaning. This routine reinforces the stone’s durability, keeps flavors pure, and ensures that future pizzas slide off effortlessly.
Regular Inspection Checklist
Performing a regular inspection keeps your pizza stone safe and ready for the next bake. Check for cracks, chips, or discoloration each time you remove the stone from the oven. Lightly tap the surface; a hollow sound may indicate internal fractures that could worsen with heat.
Examine the underside for any buildup of ash or food particles that could cause uneven heating. If you notice stubborn stains that won’t lift with a damp cloth, gently scrub with a nylon brush and a sprinkle of baking soda—avoid abrasive pads that could scar the stone.
After each inspection, wipe the stone with a clean, slightly damp towel and let it air‑dry completely before storage. Keep a short log noting the date, any issues found, and the cleaning method used; this record helps you spot trends and decide when a replacement is necessary.
Consistent checks extend the stone’s life and preserve the authentic crust texture you expect.
Frequently Asked Questions
Can I Use a Dishwasher?
No, a pizza stone should never go in a dishwasher. The high‑temperature water and harsh detergents can cause the porous material to crack or break down, ruining its ability to retain heat.
Instead, let the stone cool completely after use, then scrape off any baked‑on bits with a metal spatula or a stiff brush. If stubborn residue remains, gently wipe the surface with a damp cloth—avoid soaking the stone.
Never submerge the stone in water, and never use abrasive cleaners that could damage the texture. By keeping the stone dry and free of chemicals, you preserve its natural seasoning and extend its lifespan for many more perfect crusts.
If you notice a faint gray film after several uses, it’s simply accumulated oil; a light scraping followed by a brief warm oven session will burn it off. Regular maintenance like this keeps the stone non‑sticky and ensures even baking.
Is It Safe to Use Soap Occasionally?
Using soap on a pizza stone is generally discouraged, but an occasional gentle wash won’t ruin it if you follow proper steps. After the stone has cooled, wipe it with a soft sponge dampened with a tiny amount of mild dish soap, then rinse quickly with a clean, damp cloth.
Rinse thoroughly to remove all soap residues, because any leftover detergent can affect the flavor of future pizzas. Once cleaned, allow the stone to air‑dry completely before storing or reheating it in the oven.
Keep in mind that repeated soap use can strip away the stone’s natural seasoning, leading to a more porous surface that may absorb flavors. For most home cooks, a quick scrape and a dry brush are sufficient after each bake, reserving a soap‑clean only for rare, heavily soiled situations.
After the stone is dry, you can heat it in the oven at 300 °F for ten minutes to ensure any remaining moisture evaporates.
How Often Should I Clean My Stone?
A pizza stone doesn’t need a deep clean after every use; a simple scrape and brush after each bake is usually enough to keep it performing well.
Aim to remove food particles while the stone is still warm, using a metal spatula or a stiff nylon brush—avoid steel wool that can gouge the surface.
If you notice a buildup of oil or charred bits, give the stone a more thorough cleaning once a month by wiping it with a damp cloth and letting it air‑dry completely.
For heavy residue, a brief warm‑oven bake at 400 °F for 15 minutes can burn off leftovers without water. Remember, the stone’s porous nature means it will gradually absorb flavors, so regular light maintenance helps preserve a neutral taste profile for every new pizza you bake.
Doing this routine every few weeks ensures consistent heat distribution and prevents stubborn stains from forming.
Frequently Asked Questions
How should I clean a pizza stone after each use?
Allow the stone to cool completely, then scrape off any baked-on bits with a metal spatula or a brush. Wipe the surface with a damp cloth; avoid using soap or harsh detergents.
Can I use water to wash a pizza stone?
Yes, you can lightly dampen a cloth or sponge with water to wipe the stone, but never soak it. Excess water can be absorbed and cause the stone to crack when reheated.
Is it safe to use soap on a pizza stone?
No, soap can seep into the porous stone and leave a lingering taste that transfers to future pizzas. Stick to water and gentle scraping for cleaning.
What tools are recommended for removing stubborn residue?
Use a plastic or metal scraper, a stiff-bristled brush, or a non-abrasive scouring pad. For tough spots, a paste of baking soda and water can help, followed by a thorough rinse with a damp cloth.
How do I prevent a pizza stone from staining or developing odors?
Avoid cooking strong-flavored foods like fish directly on the stone. If stains appear, sprinkle baking soda on the stone, let it sit for 10 minutes, then wipe clean with a damp cloth.
How should I store a pizza stone after cleaning?
Make sure the stone is completely dry, then store it in a cool, dry place. Placing it in a sealed container or bag can protect it from moisture and dust.
Conclusion
Keeping your pizza stone clean ensures crisp crusts and long‑lasting performance. Remember to let the stone cool completely, scrape off debris with a metal spatula, and wipe it with a damp cloth—never soak or use soap. Periodic deep cleaning with a gentle brush and baking soda paste removes stubborn stains.