Ginger Beer Making Kit
Want to make your own delicious, fizzy ginger beer at home without the hassle? A ginger beer making kit is the perfect solution—everything you need in one simple package. Whether you’re a beginner or a seasoned DIY enthusiast, these kits take the guesswork out of brewing, delivering great-tasting results in just days. In this guide, we’ll break down how these kits work, what’s included, and how to choose the best one for your needs, so you can start enjoying homemade ginger beer fast.
What is a Ginger Beer Making Kit?
Components of a Typical Kit
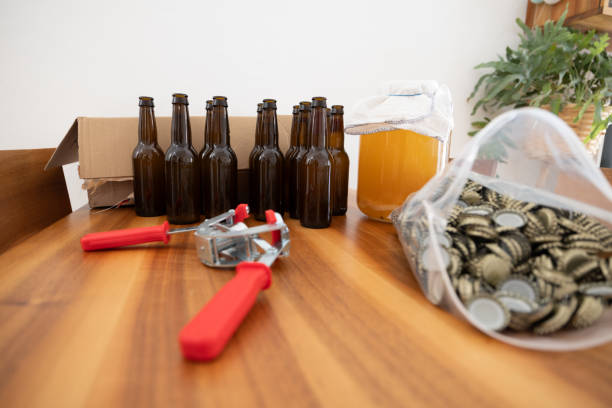
A ginger beer making kit typically includes all essential ingredients and equipment needed to produce flavorful, fizzy ginger beer at home. Most kits come with fresh or dried ginger extract, yeast cultures specifically selected for consistent fermentation, sugar or sweetener for carbonation, and citric acid to balance flavor.
You’ll also find bottling supplies like plastic or glass bottles with airtight seals, a funnel, and detailed instructions. Some advanced kits may include flavor enhancers such as lemon peel, cloves, or cinnamon for added complexity. Sanitizing agents are often included to ensure a contamination-free brewing environment.
These components are pre-measured, eliminating guesswork and ensuring consistent results, even for beginners. By providing a complete, ready-to-use system, the kit simplifies the brewing process, allowing you to focus on flavor development and fermentation timing without sourcing individual ingredients.
Types of Ginger Beer Kits Available
Ginger beer making kits come in various types to suit different skill levels and flavor preferences. Beginner kits are all-inclusive, offering pre-portioned ingredients and easy-to-follow instructions, ideal for first-time brewers. Organic kits use pesticide-free ginger and natural sweeteners, appealing to health-conscious consumers.
Craft or gourmet kits provide unique flavor infusions like lime, mint, or chili, allowing for customizable taste profiles. Some kits are alcohol-free, relying on natural carbonation without fermentation, while others support low-alcohol fermentation using champagne or ale yeast.
Refill or booster kits are also available for those who already own equipment and want to continue brewing. Additionally, large-batch kits cater to families or events, producing up to 2 gallons at once.
Choosing the right type depends on your desired taste, alcohol content, and brewing experience, ensuring a satisfying homemade ginger beer every time.
How Kits Differ from Homemade Methods
Using a ginger beer making kit offers greater consistency and convenience compared to traditional homemade methods. While DIY brewing from scratch requires sourcing ingredients, measuring ratios, and sterilizing equipment independently, kits provide pre-measured, quality-controlled components that reduce errors.
Kits often include specialized yeast strains that ensure reliable carbonation and flavor, whereas homemade versions may use bread yeast or wild fermentation, leading to unpredictable results. The inclusion of food-safe bottles designed for pressure buildup also enhances safety, reducing the risk of bottle explosions common in homemade setups.
Additionally, kits come with step-by-step guides and troubleshooting tips, making them ideal for beginners. In contrast, traditional methods demand more trial and error and deeper fermentation knowledge. Ultimately, kits streamline the process, saving time and effort while delivering delicious, effervescent ginger beer with minimal hassle.
How to Choose the Best Ginger Beer Making Kit
Key Features to Look For
When choosing the best ginger beer making kit, focus on essential components that ensure a successful brew. Look for kits that include high-quality yeast strains specifically suited for ginger beer, as this impacts flavor and carbonation.
Organic ginger root or ginger extract is a plus, ensuring a bold, natural taste without artificial additives. Check if the kit provides detailed instructions and measuring tools, which are crucial for beginners. Bottles with secure caps are vital for safe carbonation and avoiding explosions.
Some kits also offer flavor add-ins like citrus or spices, allowing customization. Batch size matters too—most kits produce 1 to 2 gallons, so choose based on your consumption needs. Lastly, ensure the kit is easy to sanitize and made from food-safe materials to prevent contamination.
Prioritizing these core features leads to consistent, delicious homemade ginger beer.
Comparing Starter Kits vs. Advanced Kits
Deciding between a starter and advanced ginger beer making kit depends on your experience level and goals. Starter kits are ideal for beginners, offering pre-measured ingredients, simple instructions, and minimal equipment—often just a fermenter, bottles, and yeast.
They focus on ease of use and quick results, usually ready in 5–7 days. In contrast, advanced kits cater to enthusiasts seeking control over the brewing process. These include refractometers, airlocks, siphoning tools, and bulk ingredients for multiple batches. They allow experimentation with fermentation times, flavor profiles, and alcohol content.
While advanced kits require more time and knowledge, they offer greater customization and better long-term value. Assess your commitment: if you’re new, begin with a starter kit; if you’re passionate about craft brewing, invest in an advanced system for richer, more nuanced ginger beer.
Reading Customer Reviews and Ratings
Customer reviews and ratings are invaluable tools when selecting a ginger beer making kit. Look for feedback on ease of use, flavor quality, and kit durability—these reveal real-world performance beyond marketing claims. Pay attention to comments about fermentation success rates and whether users experienced issues like flat beer or mold.
Photos from buyers can show the actual product and final results. Focus on reviews with detailed experiences, especially from fellow beginners if you’re new. Be cautious of overly positive or negative outliers; instead, identify consistent patterns in feedback.
A high average rating (4 stars or above) with numerous reviews is a strong indicator of reliability. Also, check how the brand responds to negative reviews—responsive customer service suggests accountability. Using reviews wisely helps you avoid common pitfalls and choose a kit that delivers consistent, satisfying results every batch.
Step-by-Step Guide to Using a Ginger Beer Kit
Preparing Your Equipment
Before starting with your ginger beer making kit, ensure all equipment is thoroughly cleaned and sanitized to prevent contamination. Wash bottles, airlocks, funnels, and mixing containers with hot, soapy water, then sanitize using a no-rinse solution. Sterilization is critical—even small bacteria or wild yeast can spoil your batch.
Check that your fermentation vessel is airtight and the airlock is properly filled with water to allow CO2 to escape without letting air in. Use only food-grade plastic or glass containers. Gather all tools beforehand to avoid interruptions during the brewing process.
Keeping everything organized and ready ensures a smooth workflow and improves the chances of a successful, flavorful ginger beer batch every time.
Mixing Ingredients Correctly
Follow your kit’s instructions precisely when combining the ginger base, sugar, water, and yeast. Start by dissolving sugar completely in warm (not boiling) water to create a simple syrup, then mix in the ginger concentrate. Cool the mixture to room temperature before adding yeast—excessive heat can kill it.
Stir gently but thoroughly to ensure even distribution. Use filtered or dechlorinated water if possible, as chlorine can inhibit fermentation. Proper ingredient balance ensures the yeast thrives and produces the desired flavor and carbonation. Avoid over-mixing once yeast is added to prevent oxygen exposure.
Double-check measurements to maintain consistency and quality in your homemade ginger beer.
Fermentation Process Explained
Once your mixture is in the fermentation vessel, seal it with an airlock and place it in a consistent, dark environment at 68–75°F (20–24°C). Fermentation typically takes 3–7 days, during which yeast converts sugar into alcohol and CO2, creating natural carbonation.
Monitor activity via bubbles in the airlock—slowing or stopping indicates fermentation is nearing completion. Avoid opening the vessel unnecessarily to reduce contamination risk. Taste a small sample after a few days to check sweetness and spice levels. Patience is key; rushing fermentation can lead to off-flavors or over-carbonation.
When ready, proceed to bottling for best results.
Bottling and Carbonation Tips
After fermentation, transfer your ginger beer to clean, sanitized bottles using a siphon or funnel, leaving behind any sediment. Use swing-top or pressure-rated bottles to safely contain carbonation. For extra fizz, add a small amount of sugar (priming sugar) per bottle—about 1/2 teaspoon—before sealing.
Store bottles at room temperature for 2–5 days to build carbonation, then refrigerate to halt fermentation. Always chill before opening and open slowly over a sink to avoid gushers. Proper bottling ensures a crisp, bubbly, and safe final product perfect for enjoying or sharing.
Best Ingredients for Homemade Ginger Beer
Fresh Ginger vs. Powdered Ginger
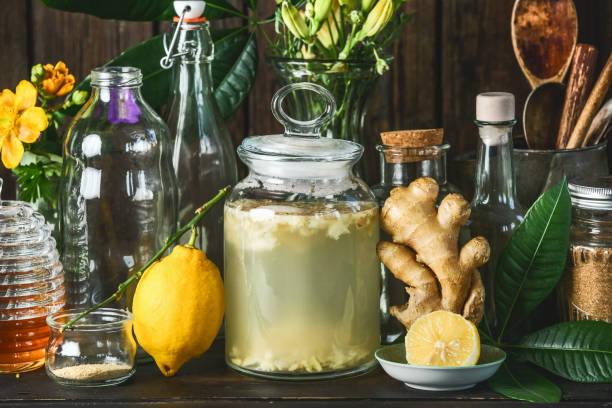
When making homemade ginger beer, fresh ginger root is the superior choice for achieving a bold, authentic flavor. Fresh ginger contains natural oils and enzymes, like gingerol, that deliver a vibrant, spicy kick and aid in fermentation. Grate or finely chop the ginger to maximize surface area and flavor extraction.
While powdered ginger is convenient, it lacks the complexity and heat of fresh root and may result in a flat, one-dimensional taste. Additionally, powdered ginger often contains anti-caking agents or has been sitting on shelves for months, reducing its potency.
For best results, use 1 to 2 inches of fresh ginger per liter, adjusting to taste. If you must use powdered ginger, start with 1/4 to 1/2 teaspoon per liter, but expect a milder outcome.
Ultimately, fresh ginger not only enhances flavor but also supports a healthier fermentation process, making it a critical ingredient in any ginger beer making kit or DIY brew.
Choosing the Right Sweetener
The sweetener you choose plays a dual role in ginger beer: it feeds the fermentation process and balances the spice of the ginger. Granulated cane sugar is the most common and effective option, as it’s easily consumed by yeast, producing consistent carbonation.
For a more complex flavor, consider raw sugars like turbinado or demerara, which add subtle molasses notes. Honey can be used for a floral twist, but its antibacterial properties may slow fermentation, so use it sparingly. Maple syrup and agave are viable alternatives but can alter the traditional taste profile.
Avoid artificial sweeteners, as they do not ferment. Use approximately ¾ to 1 cup of sweetener per gallon, adjusting based on desired sweetness and fizz. Always dissolve the sweetener completely in hot water before adding yeast to ensure even distribution and optimal fermentation.
The right sweetener enhances both flavor and effervescence in your homemade ginger beer.
Natural Flavor Add-Ins
Elevate your ginger beer by incorporating natural flavor add-ins that complement the spice of ginger and add complexity. Citrus zest or juice—especially from lemons or limes—adds brightness and balances the heat, while also aiding in pH regulation during fermentation.
For a warming depth, consider adding a cinnamon stick, whole cloves, or crushed cardamom pods during the initial brew. Fresh herbs like mint or lemongrass can introduce a refreshing, aromatic layer, perfect for summer batches.
Green tea or hibiscus flowers not only add flavor but also contribute tannins that improve mouthfeel. Always use whole or freshly ground spices over pre-ground when possible to preserve volatile oils. Introduce add-ins during the heating phase to extract maximum flavor, then strain before fermentation.
Start with small quantities—a few slices or a single sprig—and adjust in future batches. These botanical enhancements transform simple ginger beer into a craft beverage, making your homemade version stand out from store-bought kits.
Troubleshooting Common Ginger Beer Problems
Fixing Flat or Low-Carbonation Beer
If your ginger beer turns out flat, the most likely culprits are inactive yeast, insufficient sugar, or inadequate fermentation time. First, confirm that your yeast was fresh and properly rehydrated before use—expired or improperly stored yeast won’t ferment effectively.
Ensure you added the recommended amount of sugar, as this is the fuel yeast needs to produce carbon dioxide. Maintain a consistent fermentation temperature between 68–75°F (20–24°C); temperatures outside this range can stall fermentation.
If after 5–7 days there’s still no carbonation, consider adding a small amount of fresh yeast or priming sugar before bottling. Burp the bottles carefully to check for gas buildup, and allow extra conditioning time at room temperature for 3–5 more days. Avoid refrigerating too soon, as cold stops carbonation.
Using a hydrometer to confirm fermentation completion can also help diagnose issues early.
Preventing Over-Pressurized Bottles
Over-pressurized bottles are a safety hazard and often result from excessive sugar at bottling, prolonged warm conditioning, or using improper bottles. Always follow your ginger beer kit’s instructions for priming sugar—adding too much leads to excess CO2 production.
Use plastic PET bottles or pressure-rated glass bottles designed for fermentation; regular glass or jars can explode. Store bottles in a cool, dark place and limit room-temperature conditioning to 3–5 days after bottling. After this period, refrigerate to halt fermentation.
Check bottles daily by gently squeezing plastic ones—firmness means it’s carbonated and ready to chill. For glass bottles, ‘burp’ one carefully each day to test pressure. If you detect excessive fizz or difficulty opening, refrigerate immediately. Never leave ginger beer fermenting at warm temperatures for more than a week.
Identifying Off-Flavors and Causes
Off-flavors in homemade ginger beer—such as sourness, mustiness, or medicinal notes—often point to contamination, incorrect fermentation temperature, or poor sanitation. A vinegar-like taste usually means bacterial contamination, often from unclean equipment. Always sanitize all tools, bottles, and surfaces before use.
Musty or earthy flavors may stem from wild yeast or mold; ensure your fermentation vessel is covered with a clean airlock or breathable cloth. If the beer tastes overly alcoholic or solvent-like, fermentation may have occurred at too high a temperature—keep the brew between 68–75°F (20–24°C).
Bitter or astringent notes could come from over-steeping ginger or using too much peel. Use fresh, peeled ginger root and follow steeping time guidelines. If off-flavors persist, consider using a different yeast strain or checking ingredient freshness.
Safety and Storage Tips for Homemade Ginger Beer
Safe Fermentation Practices
To ensure safe fermentation when using a ginger beer making kit, start with clean, sterilized equipment to prevent contamination by harmful bacteria. Use filtered or boiled water to eliminate chlorine and microbes that could disrupt fermentation.
Maintain a consistent room temperature between 68°F and 78°F (20°C–25°C)—too cold slows fermentation, while excessive heat may encourage unwanted organisms. During the first 3–5 days of fermentation, burp the bottles daily to release excess pressure and prevent explosions.
Always use an airlock or loosely sealed lid to allow carbon dioxide to escape while keeping contaminants out. Avoid over-fermenting by tasting daily after day 3; once your desired tang and fizz are reached, refrigerate to halt fermentation.
Monitor for signs of spoilage, such as mold, off smells, or slimy texture, and discard immediately if detected. Following these steps ensures a delicious, safe homemade ginger beer every time.
Best Bottles for Carbonated Drinks
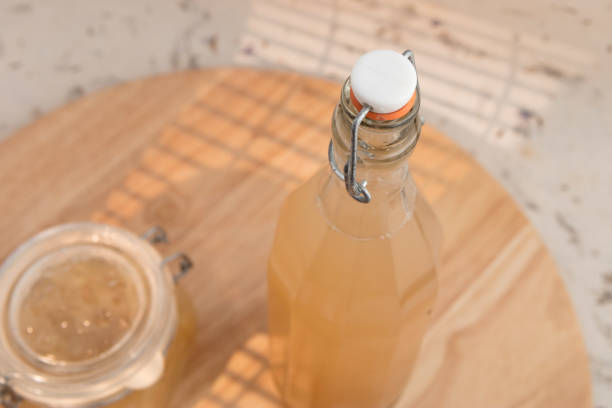
Choosing the right bottles is crucial for safely storing homemade carbonated ginger beer. Always use thick, pressure-rated glass bottles designed for fermentation, such as flip-top (Grolsch-style) or swing-top bottles, which provide a secure, airtight seal.
Avoid using regular glass jars or plastic soda bottles not rated for fermentation, as they may crack or burst under pressure. Plastic PET bottles can be used temporarily—if they feel rock-hard when squeezed, it’s time to refrigerate.
Ensure all bottles are thoroughly cleaned and sanitized before filling to prevent bacterial contamination. Fill bottles with at least 1–2 inches of headspace to allow room for gas expansion. Store upright to minimize yeast disturbance and reduce the risk of over-pressurization.
Using proper bottles not only prevents accidents but also preserves carbonation and flavor quality for a better drinking experience.
How Long Ginger Beer Lasts and Storage Methods
Homemade ginger beer typically lasts 1–2 weeks in the refrigerator after fermentation, maintaining optimal flavor and carbonation. For best results, store bottles upright in a cold, dark place to slow yeast activity and prevent over-pressurization. Refrigeration halts fermentation, preserving taste and safety.
At room temperature, ginger beer continues fermenting, increasing carbonation and alcohol content, and may become overly sour or risky after 3–5 days. Always check for excessive pressure before opening—ease the cap slowly to avoid eruptions. If the drink smells rotten, moldy, or looks cloudy with sediment clumps, discard it.
For longer storage, pasteurization (heating sealed bottles to 180°F/82°C for 10 minutes) can extend shelf life to several months, though it kills beneficial probiotics. Otherwise, consume fresh for peak taste and fizz.
Creative Ways to Use Your Homemade Ginger Beer
Ginger Beer Cocktail Recipes
Elevate your home bar with creative cocktails using your homemade ginger beer. Its bold, spicy kick makes it perfect for classics like the Moscow Mule—just mix with vodka and fresh lime juice over ice in a copper mug.
For a refreshing twist, try a Ginger Margarita by combining tequila, lime, a touch of agave, and your ginger beer. You can also craft a Dark ‘N’ Stormy with dark rum and a splash of lime.
The natural carbonation and robust flavor from your ginger beer making kit ensure each drink is vibrant and full of character. Experiment with muddled herbs like mint or basil to add complexity. Because your ginger beer is preservative-free, it blends smoothly with spirits, enhancing the cocktail’s freshness.
Always chill your bottles before serving, and use a bar spoon to gently mix ingredients, preserving the fizz. These handcrafted cocktails showcase your brewing effort while impressing guests with layered, zesty flavors.
Non-Alcoholic Drink Ideas
Your homemade ginger beer is a versatile base for refreshing non-alcoholic beverages. Create a Spiced Ginger Fizz by mixing it with chilled green tea and a splash of honey syrup. For a citrusy lift, blend with fresh grapefruit juice and a sprig of rosemary.
Try a Ginger Limeade by combining your ginger beer with freshly squeezed limes and a bit of simple syrup for balance. It also makes a flavorful addition to mocktails for kids, such as a Ginger Berry Spritzer—muddle strawberries, add ice, and top with ginger beer.
The natural effervescence and warmth from fresh ginger provide a satisfying alternative to store-bought sodas. Serve over ice with fun straws and garnishes like candied ginger or citrus wheels to elevate the experience.
Since your ginger beer making kit produces a clean, fermented drink without artificial additives, each sip is both tasty and wholesome.
Cooking and Marinade Uses
Unlock unexpected culinary uses for your homemade ginger beer beyond the glass. Its zesty, slightly sweet profile makes it an excellent marinade ingredient for chicken, pork, or tofu.
Combine with soy sauce, garlic, and a touch of chili for a tenderizing glaze that adds depth and shine when grilled or baked. Use it to deglaze pans after searing meats, capturing rich flavors for savory sauces.
You can also substitute it in baking recipes like ginger beer cake or sticky toffee pudding for added moisture and spice. The natural enzymes and acidity in fermented ginger beer help break down proteins, enhancing tenderness. Simmer it down into a syrup for drizzling over pancakes or desserts.
Because your ginger beer making kit produces a live, flavorful brew, each application benefits from authentic, complex notes—transforming everyday dishes into standout meals with minimal effort.
Frequently Asked Questions
What is a ginger beer making kit?
A ginger beer making kit is a package that includes all the necessary ingredients and equipment to brew homemade ginger beer, such as ginger, sugar, yeast, bottles, and instructions. It simplifies the fermentation process for beginners and ensures consistent results.
How do I use a ginger beer making kit?
To use a ginger beer making kit, mix the provided ingredients with water according to the instructions, ferment for 3–7 days at room temperature, then bottle and carbonate. Always follow the specific directions included in your kit for best results.
Do I need additional equipment to make ginger beer with a kit?
Most ginger beer making kits include everything you need, but you may need basic kitchen items like a large pot, spoon, and measuring cups. Some kits require your own bottles, so check the contents before starting.
How long does it take to make ginger beer with a kit?
Fermentation typically takes 3 to 7 days, followed by 1 to 2 weeks of bottle conditioning to build carbonation. Total time from start to drinkable ginger beer is usually 2 to 3 weeks.
Is homemade ginger beer alcoholic?
Yes, naturally fermented ginger beer made with a kit can contain a small amount of alcohol (typically 0.5% to 2% ABV) due to the yeast fermenting sugar. Alcohol content can be controlled by fermentation time and sugar levels.
Can I make non-alcoholic ginger beer with a kit?
Some kits are designed for non-alcoholic ginger beer using alternative methods like forced carbonation without fermentation. Check the kit description to ensure it meets non-alcoholic preferences.
How do I store homemade ginger beer?
Once carbonated, store bottled ginger beer in the refrigerator to slow fermentation and prevent over-pressurization. Consume within 1–2 months for best flavor and safety.
Are ginger beer making kits safe to use?
Yes, when used according to instructions, ginger beer making kits are safe. Use clean equipment, monitor pressure in bottles, and refrigerate after carbonation to minimize risks like bottle explosions.
Conclusion
Making ginger beer at home with a ginger beer making kit is simple, fun, and rewarding. These kits provide all the essentials for delicious, fizzy results with minimal effort. You gain control over ingredients, avoid artificial additives, and enjoy a refreshing homemade beverage. Whether you’re a beginner or a seasoned enthusiast, the process is satisfying and customizable. Try a kit today and discover the joy of crafting your own natural, flavorful ginger beer right in your kitchen.